Audi A6 Typ 4G: Center Armrest, Removing and Installing
Center Armrest, Removing and Installing
Removing
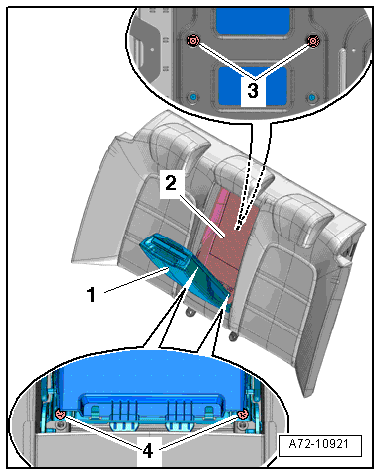
- Fold up the rear center armrest 2/3.
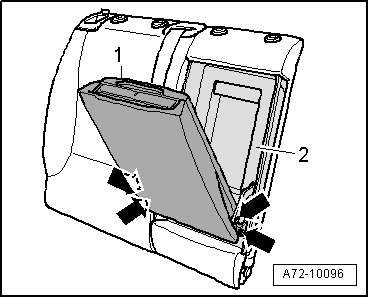
Versions without A Pass-Through
- Remove the bolts -arrows-.
- Remove the rear center armrest -2- from the bracket -1-.
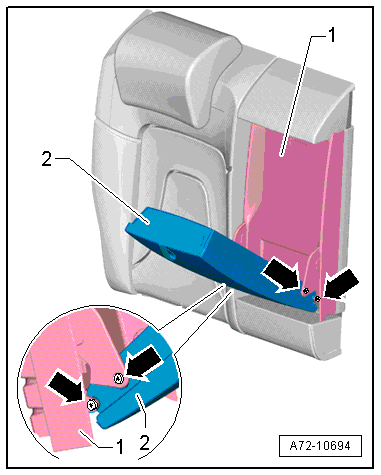
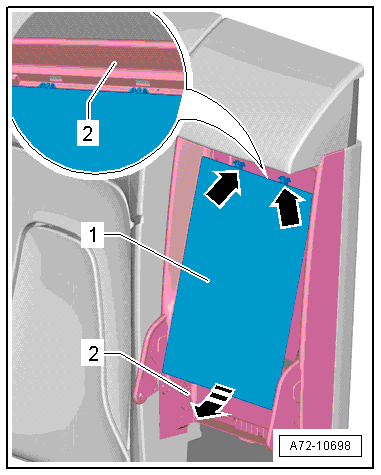
Versions with A Pass-Through
- Remove the bolts -arrows-.
- Remove the rear center armrest -1- from the pass-through door -2-.
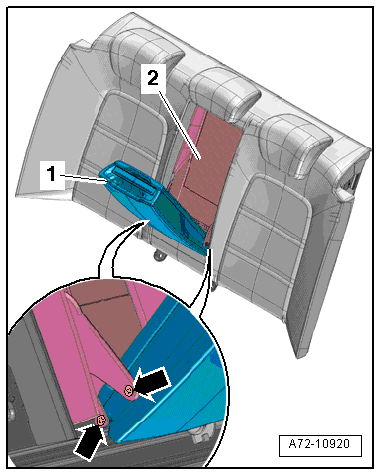
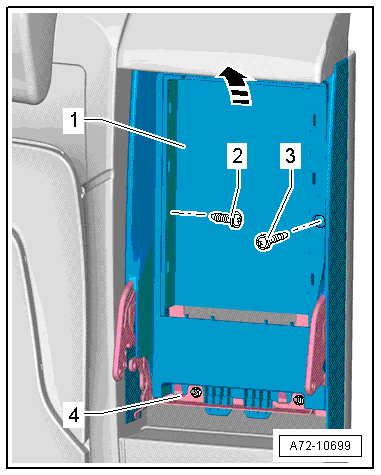
With Fixed Rear Bench Seat Backrest
- Push the backrest cushion toward the rear and remove the screws -arrows- (quantity 4).
- Remove the rear center armrest -1- from the bracket -2-.
Installing
Install in reverse order of removal. Note the following:
Installation notes, for example tightening specifications, replacing components. Refer to → Chapter "Overview - Center Armrest".
Center Armrest, Removing and Installing, Market-Specific
Special tools and workshop equipment required
- Fiber-Optic Repair Set - Connector Protective Caps -VAS6223/9- from the Fiber Optic Repair Set -VAS6223-
 WARNING
- Follow all Safety Precautions when working with pyrotechnic components. Refer to → Chapter "Pyrotechnic Components Safety Precautions".
- Before handling pyrotechnic components (for example, disconnecting the connector), the person handling it must "discharge static electricity". This can be done by touching the door striker, for example.
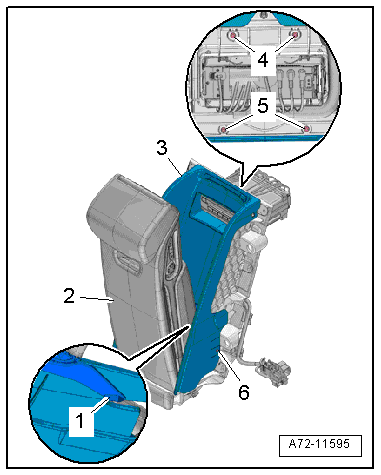
Removing
- Remove the rear seat backrest. Refer to → Chapter "Rear Seat Backrest, Removing and Installing, Multi-contour Seat".
- Disconnect the connectors -3 and 6- and the antenna wires -1, 2, 4 and 7-.
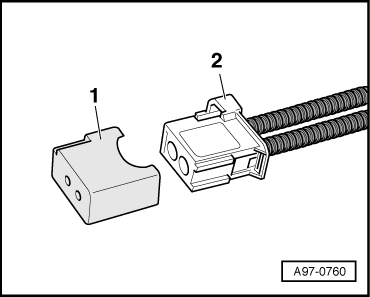
- Disconnect the connector -5- for the fiber-optic cable.
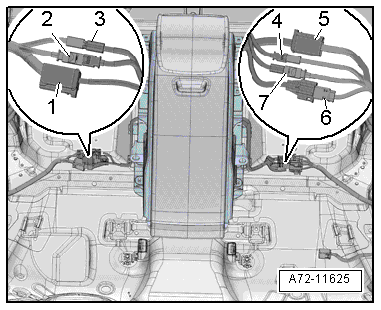
- Seal the opening wiring harness connector -2- on the fiber-optic cable with the Fiber-Optic Repair Set - Connector Protective Caps -VAS6223/9--1-.
 Note
Note
The protective cap prevents soiling and damage to fiber optic face, which would impair light transfer.
- Free up the wiring harness.
- Remove the bolts -arrows-.
- Remove the rear center armrest mount -1-.
Installing
WARNING
- Follow all Safety Precautions when working with pyrotechnic components. Refer to → Chapter "Pyrotechnic Components Safety Precautions".
- Before handling pyrotechnic components (for example, connecting the connector), the person handling it must "discharge static electricity". This can be done by touching the door striker, for example.
Install in reverse order of removal. Note the following:
Installation notes, for example tightening specifications, replacing components. Refer to → Chapter "Overview - Center Armrest, Sedan".

Cupholder, Removing and Installing
Special tools and workshop equipment required
- Trim Removal Wedge -3409-
Removing
- Fold down rear center armrest.
- Pry off the trim -2- using the Trim Removal Wedge -3409-.
- Release the tabs -arrows- starting at the lower edge.
- Release the tabs -3-.
- Remove the trim from the rear center armrest.

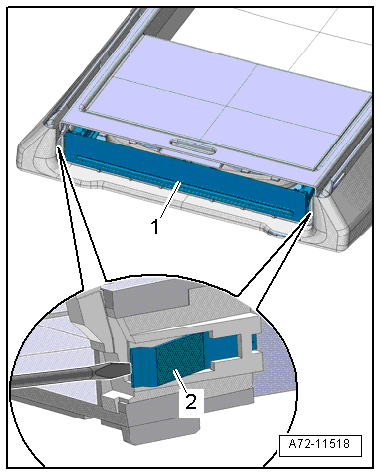
- Open the flap -1- on the cupholder.
- Release the spring -2- using a screwdriver and carefully remove the cupholder alternating between the sides.
Installing
Install in reverse order of removal.
Installation notes, for example tightening specifications, replacing components. Refer to → Chapter "Overview - Center Armrest".
Center Armrest Bracket/Hinge, Removing and Installing, Divided Rear Seat Backrest
Special tools and workshop equipment required
- Trim Removal Wedge -3409-
- Pop Rivet Pliers -VAG1753B-
- Drill
- Protective eyewear
Removing
Vehicles without a Storage Compartment
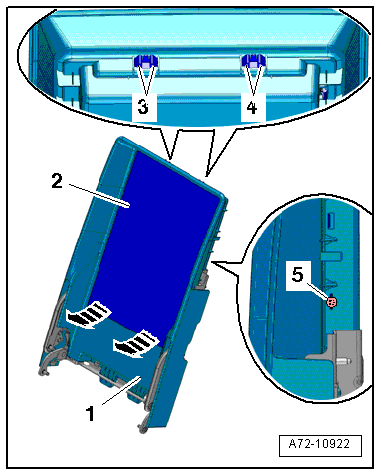
- Fold down the rear center armrest -3-.
- Push the backrest cushion with the backrest cover -1- to the side and remove the screw -4- for the center armrest trim -2- using the 1/4 bit reversible ratchet.
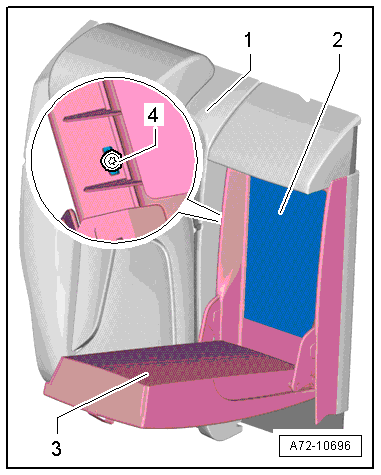
- Hold the center armrest trim -2- at the bottom and pull it as far as possible off the center armrest -1--arrow-.
- Release the tabs -4 and 5-.
Note
Ignore item -3-.
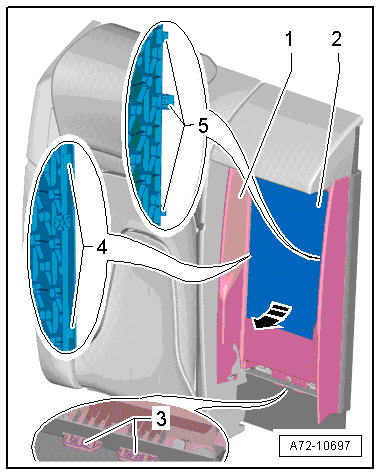
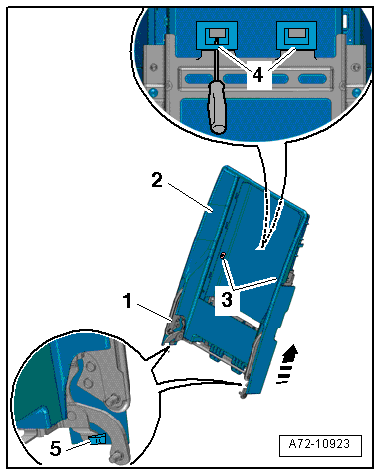
- Remove the center armrest trim -1- in direction of -arrow- from the center armrest cover -2- while unlocking the hook -upper arrows-.
 Caution
The hooks on the upper side of the center armrest trim can get damaged during removal.
- Remove the rear center armrest. Refer to → Chapter "Center Armrest, Removing and Installing".
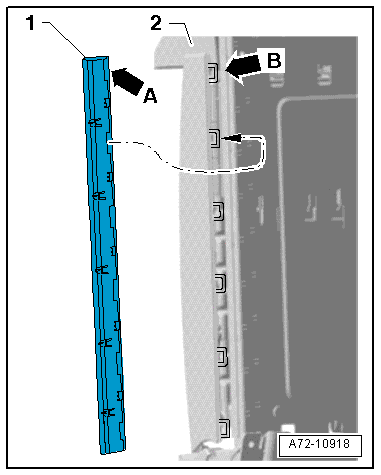
- Pry the cover -1- off of the center armrest trim panel -2- using the Trim Removal Wedge -3409- by unclipping the tabs -arrow B- out of the loops -arrow A-
- Remove the cover from the center armrest trim.
- Remove the screws -2 and 3- from the trim -1-.
- Press the tabs -arrows- in direction of -arrow- until they come out of the trim -1- on the bracket -2-.
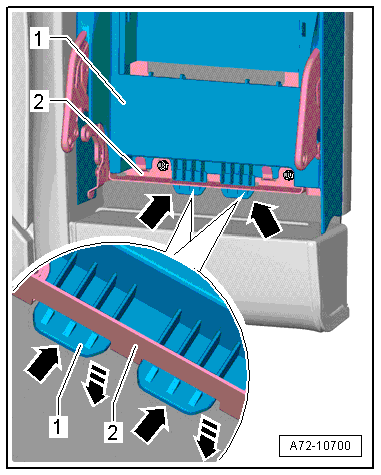
- Remove the center armrest trim -1- at an angle out of the bracket -4--arrow-.
- Vehicles with a storage compartment: remove the rear storage compartment inside the rear center armrest. Refer to → Chapter "Rear Seat Backrest Center Storage Compartment, Removing and Installing".
Note
Lay plastic film between the backrest cover and the backrest frame to protect against metal shavings.
WARNING
Risk of injury!
Wear protective eyewear.
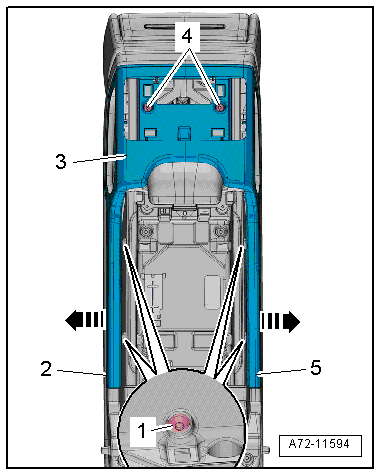
- Drill out rivet -3-.
- Remove the two nuts -4-.
- Remove the center armrest mount -1- from the threaded pins -5- and pull it off the profile -2--arrow-.
Installing
Install in reverse order of removal. Note the following:
Installation notes, for example tightening specifications, replacing components. Refer to → Chapter "Overview - Center Armrest".

Center Armrest Bracket/Hinge, Removing and Installing, Fixed Rear Seat Backrest
Special tools and workshop equipment required
- Trim Removal Wedge -3409-
Removing
- Remove the rear panel trim panel. Refer to → Chapter "Luggage Compartment Rear Trim Panel, Removing and Installing".
- Remove the right and left bracket nuts -3- evenly.
- Fold the center armrest -1-2/3 up and remove the screws -4-.
- Remove the center armrest, the bracket and hinges from the rear seat backrest.
- Remove the center armrest from the bracket and hinges. Refer to → Chapter "Center Armrest, Removing and Installing".
- Remove the bolt -5- for the trim that goes on the center armrest.
- Release the tabs for the center armrest trim -2- using the Trim Removal Wedge -3409- on the lower side of the center armrest cover -1-.
- Pull the trim for the center armrest off of the center armrest cover -arrows- while also removing the hooks -3 and 4-.
- Remove the trim from the center armrest.
Caution
The hooks on the upper side of the backrest trim can get damaged during removal.
- Remove the bolts -3-.
- Disengage the lower left and right strap -5- on the bracket.
- Lift the guides -4- using a screwdriver and at the same time, remove the center armrest cover -2- in direction of -arrow- upward from the bracket -1-.
Installing
Install in reverse order of removal. Note the following:
- Check the center armrest in the area around the hooks for any damage, and replace the cover, if necessary.
- Tighten the right and left bracket nuts alternating sides.
Installation notes, for example tightening specifications, replacing components. Refer to → Chapter "Overview - Center Armrest, Fixed Rear Seat Backrest".
Center Armrest Trim, Removing and Installing, Market-Specific
Special tools and workshop equipment required
- Wedge Set -T10383-
Removing
- Fold down rear center armrest.
- Remove the rear center armrest storage tray. Refer to → Chapter "Center Armrest Center Storage Compartment, Removing and Installing, Market-Specific".
- Open the shade and remove the liner.
- Vehicle versions with massage button in the rear seat: remove the massage button from the rear seat. Refer to → Electrical Equipment; Rep. Gr.96; Controls; Overview - Center Console Controls.
- Vehicle versions with Rear Seat Entertainment. Remove the Multimedia Control Head 2 - E499-. Refer to → Communication; Rep. Gr.91; Infotainment System; Component Location Overview - Infotainment System.
- Remove the bolts -1 and 4-.
- Unclip the trim -3- with the Wedge Set -T10383/1- and remove the side bolsters -2 and 5- slightly from the lower section of the armrest -arrows-.
- Remove the trim from the center armrest.
Installing
Install in reverse order of removal. Note the following:
Installation notes, for example tightening specifications, replacing components. Refer to → Chapter "Overview - Center Armrest, Sedan".
Center Armrest Pressure Damper/Gas-Filled Strut, Removing and Installing, Market-Specific
Removing
- Remove the rear center armrest trim mount. Refer to → Chapter "Center Armrest, Removing and Installing, Market-Specific".
- Remove the bolts -4, 5 and 6-.
- Move the armrest -2- into position, as shown in the illustration.
- Remove the upper trim -3- from the center armrest -arrows- and release the left and right retaining hooks -1-.
- Remove the trim forward.
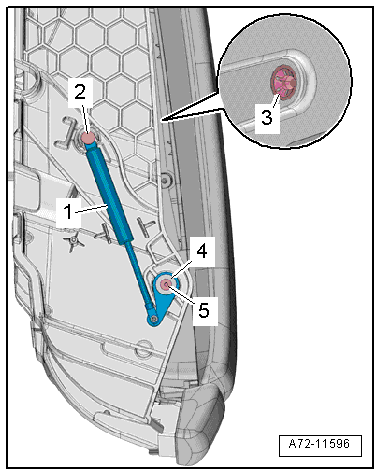
Pressure Damper
- Remove the bolt -2- and washer -1-.
- Remove the retaining pin -4- with a punch.
- Remove the small gas-filled strut -3-.
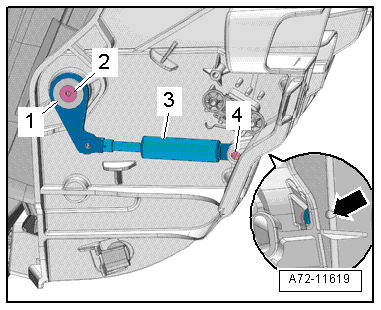
Gas-Filled Strut
- Remove the bolt -5- and the washer -4-.
- Open the armrest.
- Remove the clip -3- and remove the retaining pin -2- with the large gas-filled strut -1-.
Installing
Install in reverse order of removal. Note the following:
- Close the armrest.
Gas-Filled Strut
- The relay lever -6- must be pushed onto the shaft, as shown in the illustration.
- Attach the washer -5- and tighten the bolt -1-.
- The cone -arrow- at the washer must face outward.
- Attach the retaining pins -2- and secure them with the clips -3-.

Pressure Damper
- The relay lever must be pushed onto the shaft, as shown in the illustration.
- Attach the washer -2- and tighten the bolt -1-.
- The cone -arrow- at the washer must face outward.
Installation notes, for example tightening specifications, replacing components. Refer to → Chapter "Overview - Center Armrest, Sedan".
Mount/Center Armrest, Removing and Installing, Market-Specific
Special tools and workshop equipment required
- Wedge Set -T10383-
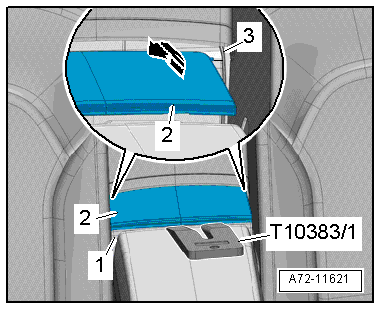
Removing
- Fold down rear center armrest.
- Remove the gap cover -2- from the rear armrest -1- using the Wedge Set -T10383/1-.
- Thread the gap cover from the guide rails -3- and remove them -arrow-.
- Remove the rear center armrest trim mount. Refer to → Chapter "Center Armrest, Removing and Installing, Market-Specific".
- Remove the bolts -4, 5 and 6-.
- Move the armrest -2- into position, as shown in the illustration.
- Remove the upper trim -3- from the center armrest -arrows- and release the left and right retaining hooks -1-.
- Remove the trim forward.
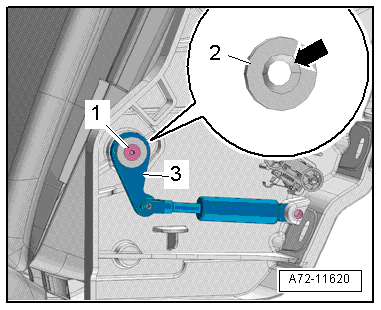
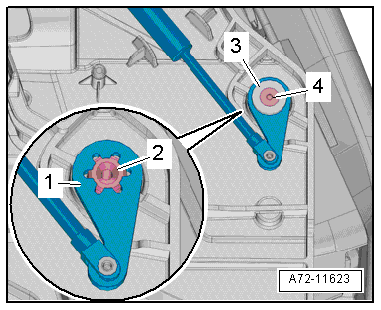
- Free up the wiring harness from the center armrest.
- Remove the bolt -4- from the gas-filled strut and remove the washer -3-.
- Remove the relay lever -1- and remove the shaft -2- to the side.
- Remove the armrest from the center armrest.
Installing
Install in reverse order of removal. Note the following:
Installation notes, for example tightening specifications, replacing components. Refer to → Chapter "Overview - Center Armrest, Sedan".
Center Armrest Arm Cushion, Removing and Installing, Market-Specific
Removing
- Remove the lower section of the armrest. Refer to → Chapter "Mount/Center Armrest, Removing and Installing, Market-Specific".
- Remove the storage tray trim. Refer to → Chapter "Center Armrest Center Storage Compartment, Removing and Installing, Market-Specific".
- Remove the bolts -arrows-.
- Cut through the cable tie -1-.
- Using the Wedge Set -T10383/1-, release the trim on the side -2- and press the spring bolts -3- together to remove the armrest from the lower section of the armrest.
Installing
Install in reverse order of removal. Note the following:
Installation notes, for example tightening specifications, replacing components. Refer to → Chapter "Overview - Center Armrest, Sedan".

