Audi A6 Typ 4G: Gas-Filled Strut, Removing and Installing
Gas-Filled Strut with Metal Clip, Removing and Installing
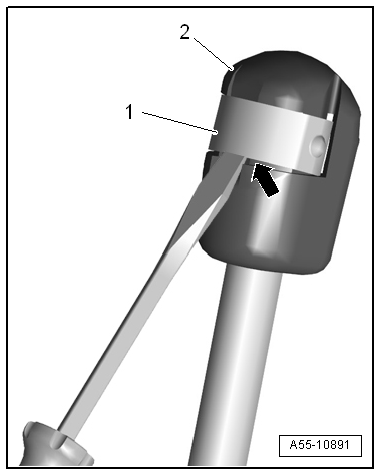
Removing
- Support the lid or secure it against falling.
- Using a small screwdriver, lift the securing spring -1- slightly and remove the gas-filled strut -2- from the ball stud.
Installing
Install in reverse order of removal. Note the following:
- Press the gas-filled strut onto the ball stud until it engages audibly.
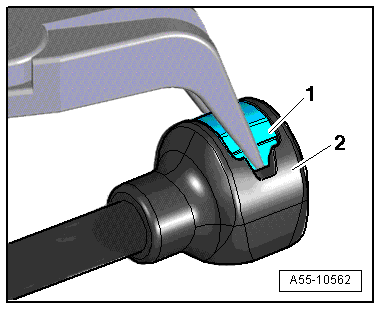
Gas-Filled Strut with Clip, Removing and Installing
Removing
- Support the lid or secure it against falling.
- Press the clip -1- together using needle nose pliers and remove the gas-filled strut -2- from the ball stud.
Installing
Install in reverse order of removal. Note the following:
- Press the gas-filled strut onto the ball stud until it engages audibly.
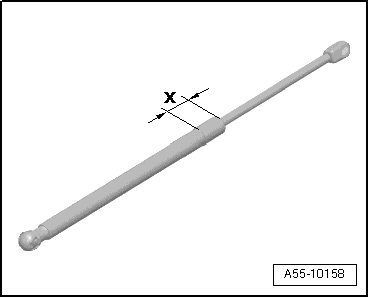
Gas-Filled Strut, Releasing Gas
Procedure
- Clamp gas-filled strut in a vise in area -x- = 50 mm.
 WARNING
- Clamp only within this area, otherwise accident could occur!
- Wear protective eyewear when sawing.
 Note
Note
Cover area of sawn portion with a rag to absorb oil spraying out.
- Cut open cylinder of gas strut within first third of cylinder overall length, using piston rod end of cylinder as a reference point.
Tension Spring, Removing and Installing
Tension Spring, Removing and Installing, Sedan
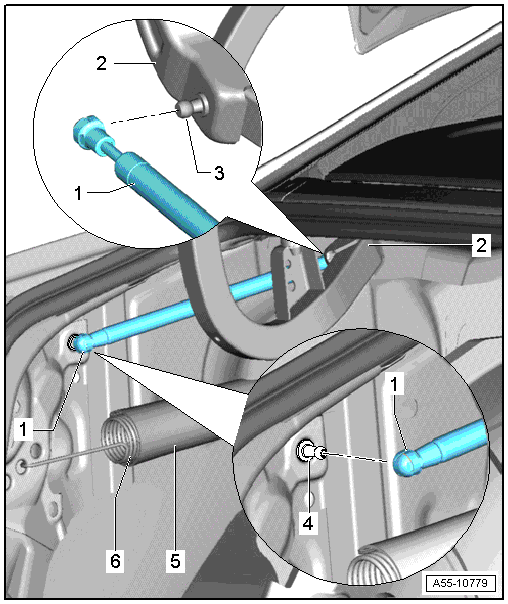
1 - Gas-Filled Strut
- Disengage. Refer to → Chapter "Gas-Filled Strut, Removing and Installing"
- Only with manual rear lid release
2 - Rear lid hinge
3 - Ball Stud
- No replacement part
4 - Ball Stud
- 21 Nm
5 - Cover
- Press it onto the spring from the side.
- Push the cover forward and lock it onto the hinge bolt.
6 - Spring
- Pay attention to the spring engaging direction when attaching it. Refer to -item 1-.
Spring Engaging Points
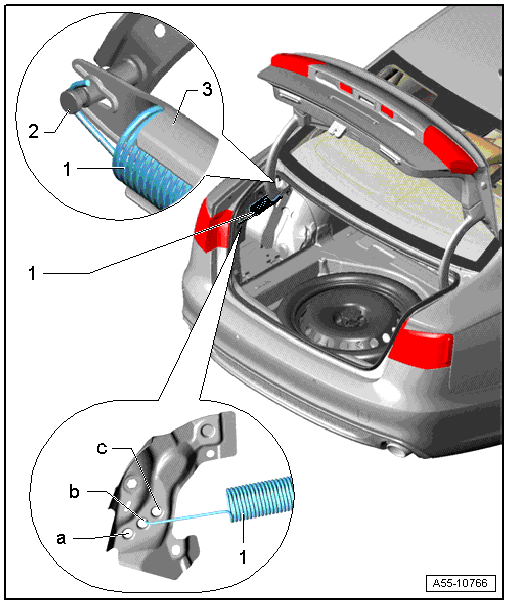
1 - Spring
Note
Pay attention to the spring engaging direction to the hinge bolt.
- Attach the left spring to the short eye by engaging the hook starting at the bottom and then upward.
- Attach the right spring to the short eye by engaging the hook starting at the top and then downward.
- Then engage the spring on the body side to the long eye on the engaging point -b-.
2 - Rear Lid Hinge
3 - Cover
- To install, push the cover forward until it locks secure on the hinge bolt.
