Audi A6 Typ 4G: Backrest Cover and Cushion, Separating
Special tools and workshop equipment required
- Upholstery Clip Pliers -VAG1634-
Removing
- Remove the backrest cover with the backrest cushion. Refer to → Chapter "Backrest Cover and Cushion, Removing and Installing".
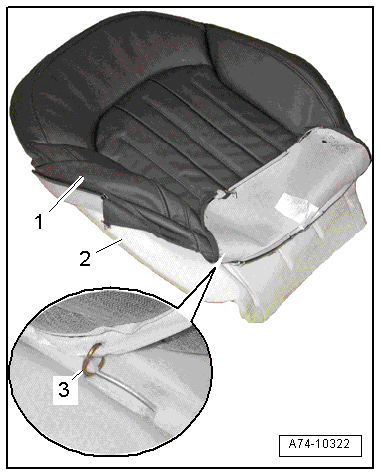
Standard Seat/Sport Seat
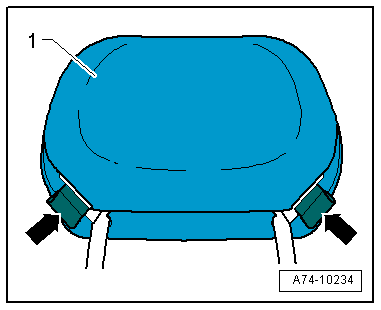
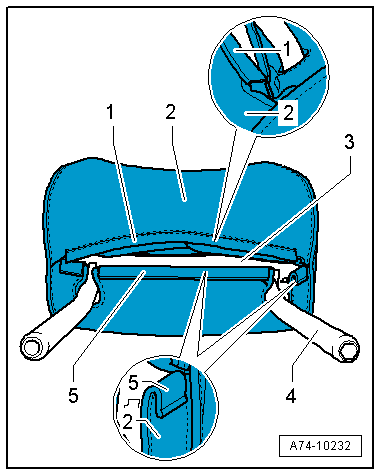
- Remove the backrest cover -1- from the backrest padding -2- as far as possible and cut the upholstery clips -3- using pliers.
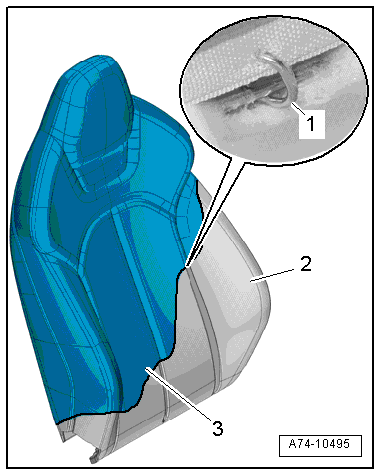
Super Sport Seat
- Pull off the backrest cover -3- from the backrest cushion -2- as far as possible and cut the upholstery clips -1- using pliers.
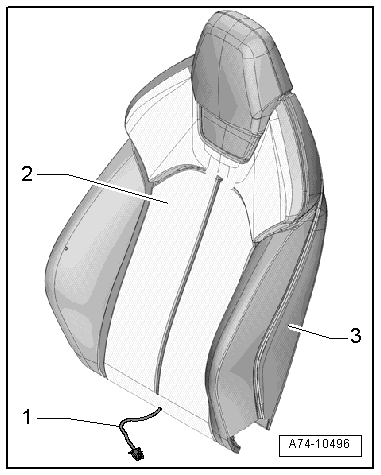
Multi-Contour Seat
- Pull off backrest cover -2- from the backrest padding -1- as far as possible and cut the upholstery clips -3- using pliers -4-.
- Vehicles with backrest heating: disconnect the connector
Installing
Install in reverse order of removal. Note the following:
Installation notes, for example tightening specifications, replacing components. Refer to → Chapter "Overview - Backrest Cover and Cushion, Multi-contour Seat".
Headrest Cover and Cushion, Removing and Installing
 Note
Note
- It is only possible to replace the cover on the height adjustable headrest with a leather cover.
- The height adjustable headrest with a cloth cover and the 4-position headrest cannot be disassembled.
Special tools and workshop equipment required
- Trim Removal Wedge -3409-
Removing
- Remove the headrest. Refer to → Chapter "Headrest, Removing and Installing".
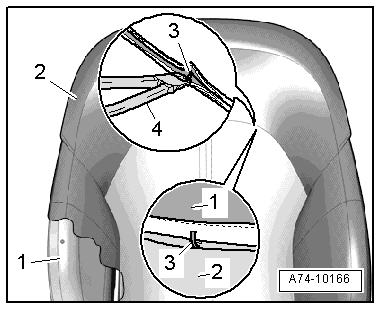
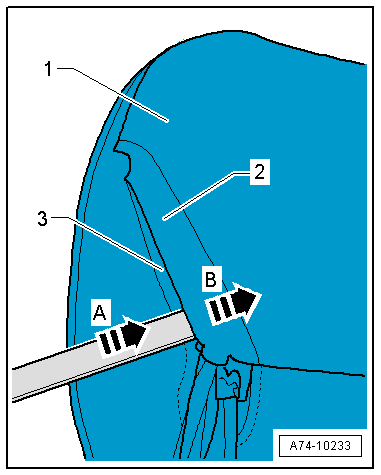
- Open the side openings -arrows- on the cover -1-.
- Insert the Trim Removal Wedge -3409- or a flat-head screwdriver between the openings -1- in direction of -arrow A-.
- Tension the lower U-channel -3- in direction of -arrow B-.
- Remove the upper side of the cover with the flat channel -2- from the U-channel.
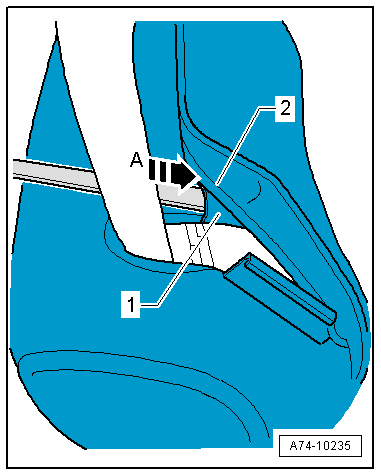
- Open the zipper by inserting the Trim Removal Wedge -3409- or a flat-head screwdriver between the zipper and the cover.
- Tension the lower U-channel -1- in direction of -arrow A-.
- Remove the upper side of the cover with the flat channel -2- from the U-channel -1-.
Note
The cover must be completely open to remove the padding.
- Pull off cover and cushion over the headrest support and remove headrest support.
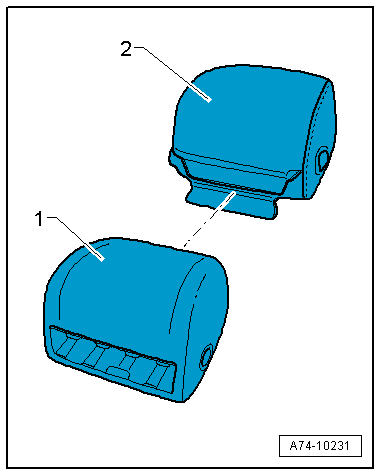
- Remove cushion -1- out of cover -2-.
Installing
- Insert cushion -1- with proper fit in cover -2-.
- Insert headrest support in the cushion with cover.
- Close the main zipper by moving the upper cover flat channel -1- over the cover -2-.
- Push the edge of the material with the flat channel into the U-channel -5-.
- Closing the side locks is similar to the closing the main lock.
- After closing the main zipper and the side zippers with a needle or other pointed object, line up the cover and the profiles.
- Make sure the cover lies on the cushion -3- without any wrinkles and without seam markings.
Installation is performed in reverse order of removal, while noting the following:
Installation notes, for example tightening specifications, replacing components. Refer to → Chapter "Overview - Headrest Cover and Cushion".
Driver Seat Heating Element -Z6-/Front Passenger Seat Heating Element -Z8-, Removing and Installing
Note
Multi-contour seat: the heating element is sewn into the seat cover. Replace the seat cover if the heating element is faulty. Refer to → Chapter "Seat Pan Cover and Cushion, Separating, Multi-contour Seat".
Removing
- Separate the seat cover from the seat cushion. Refer to → Chapter "Seat Pan Cover and Cushion, Separating".
Standard Seat
- Disconnect the wire -2- directly from the old heating element -1-.
Note
The old heating elements remain on the cushion and will be covered over by the new heating element.
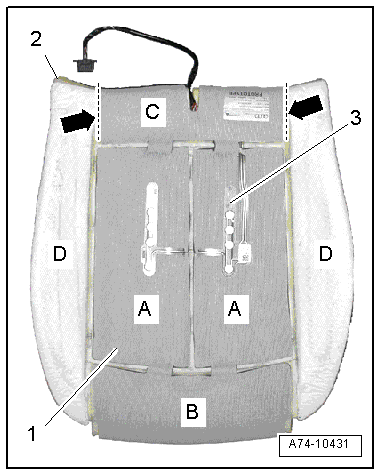
Vehicles with Seat Ventilation
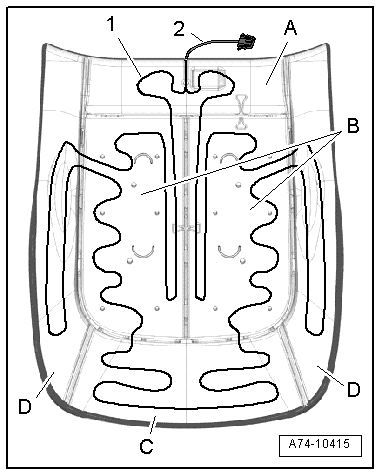
- Vehicles with a front passenger seat occupant sensor: loosen the passenger occupant detection sensor -3- carefully from the heating element -1-.
- Loosen the heating elements -A, B and C- carefully from the adhesive.
- Cut the connecting pieces -arrows- and remove the heating elements.
Note
The old heating elements -D- remain on the cushion -2- and will be covered over by the new heating element.
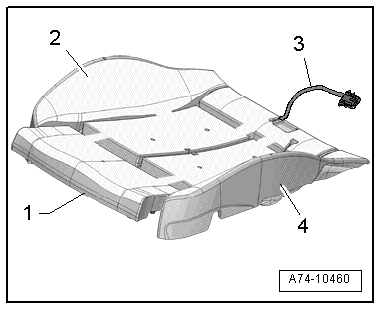
Sport Seat/Super Sport Seat
- Disconnect the wire -3- directly from the old heating element -2-.
Note
The old heating elements remain on the seat cushion -1-, -4- and will be covered over by the new heating elements.
Installing
Standard Seat
- Align the new heating elements on the seat cushion.
- Remove protective films from the heating elements in succession, taking care not to damage the heating elements.
- Bond heating elements in the sequence -B, C, D and A- so that they align with the old heating elements and are wrinkle free.
- Route the connecting wires to the individual heating elements in the base of the gaps.
Vehicles with Seat Ventilation
- Align the new heating elements on the seat cushion.
- Remove protective films from the heating elements in succession, taking care not to damage the heating elements.
- Glue the heating elements in the following sequence: -A through D-. Make sure there are no wrinkles.
- Route the connecting wires to the individual heating elements in the base of the gaps.
Sport Seat/Super Sport Seat
- Align the new heating elements on the seat cushion.
- Remove protective films from the heating elements in succession, taking care not to damage the heating elements.
- Bond heating elements so that they align with the old heating elements and are free of wrinkles.
- Route the connecting wires to the individual heating elements in the base of the gaps.
Procedure for All Seat Versions
Install in reverse order of removal.
Installation notes, for example tightening specifications, replacing components. Refer to → Chapter "Overview - Seat Heating Element".
Driver Backrest Heating Element -Z7-/Front Passenger Backrest Heating Element -Z9-, Removing and Installing
Note
- Multi-contour seat: the heating element is only available together with the seat bolster cushion. Replace the seat bolster cushion if the heating element is faulty. Refer to → Chapter "Seat Pan Seat Bolster Cushion, Removing and Installing, Multi-contour Seat".
- Multi-contour seat: the heating element is sewn into the backrest cover. Replace the seat backrest cover if the heating element is faulty. Refer to → Chapter "Backrest Cover and Cushion, Separating".
Removing
- Separate the backrest cover and backrest cushion. Refer to → Chapter "Backrest Cover and Cushion, Separating".
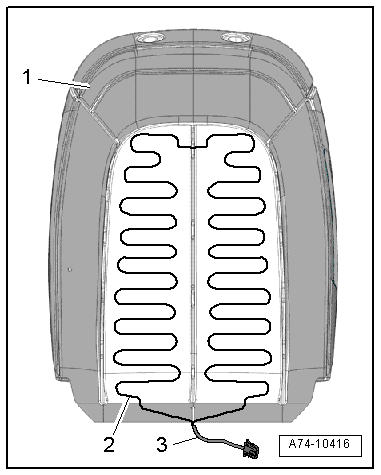
Standard Seat/Sport Seat
- Cut the electric wire -3- directly from the old heating element -2-.
Note
The old seat heating element remains on the backrest cushion -1- and the new seat heating element is bonded over it.
Vehicles with Seat Ventilation
- Remove the heating elements -1- carefully from the glue.

Super Sport Seat
- Cut the electric wire -1- directly from the old heating element -2-.
Note
The old seat heating element remains on the backrest cushion -3- and the new seat heating element is bonded over it.
Installing
- Align the new heating element on the backrest cushion.
- Peel the protective film off the heating element. Be careful not to damage the heating element.
- Glue the heating element so that they align with the old heating element and free of wrinkles.
Install in reverse order of removal.
Installation notes, for example tightening specifications, replacing components. Refer to → Chapter "Overview - Seat Heating Element".