Audi A6 Typ 4G: Cover and Cushion, Removing and Installing
Cover and Cushion, Removing and Installing, Rear Bench Seat
Special tools and workshop equipment required
- Upholstery Clip Pliers -VAG1634-
Removing
- Remove the rear bench seat. Refer to → Chapter "Seat Bench/Single Seat, Removing and Installing".
- 2-seat rear bench seat: Remove the center storage compartment. Refer to → Chapter "Bench Seat Center Storage Compartment, Removing and Installing".
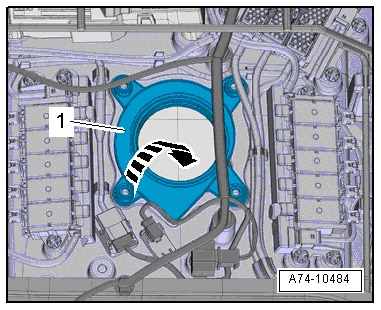
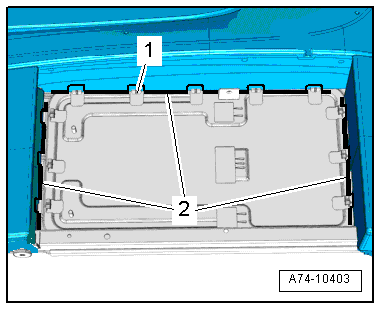
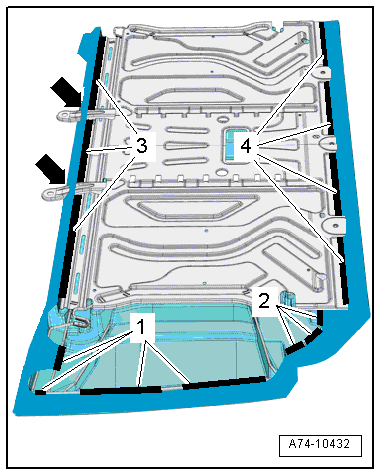
- Vehicles with a Multi-contour seat: remove the seat cushion clips -1- from the seat frame -2-.
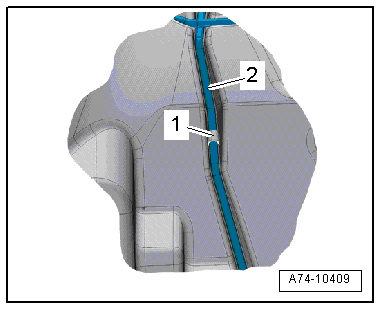
- Vehicles equipped with the rear seat backrest blower fan: unclip the air guide mat connection -1- from the rear seat backrest blower fan in direction of -arrow-.

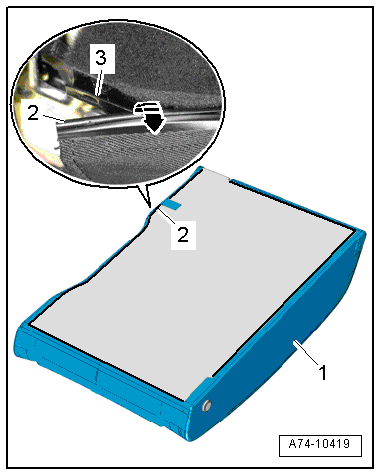
- Cut the upholstery clips -2- all the way around the seat frame with pliers.
- Remove the seat cover -1- and seat cushion from the seat frame.
2-Person Rear Seat Bench
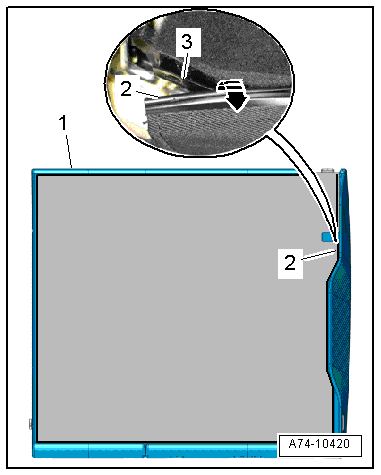
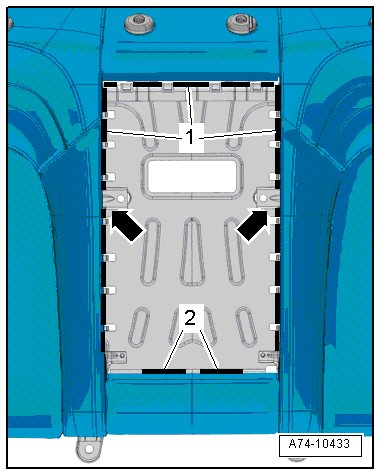
- Cut the upholstery clips -2- all the way around the seat frame with pliers.
- Disengage the protective strip -3- from the seat frame.
- Remove the seat cover -1- and seat cushion from the seat frame.
Installing
Install in reverse order of removal. Note the following:
Installation notes, for example tightening specifications, replacing components. Refer to → Chapter "Overview - Cover and Cushion".

Cover and Cushion, Removing and Installing, Divided Rear Seat Backrest
Special tools and workshop equipment required
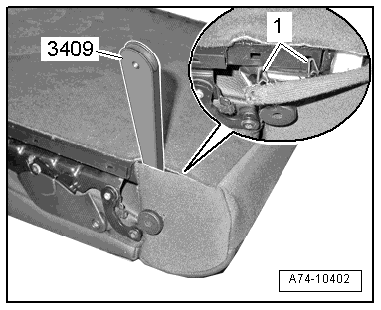
- Trim Removal Wedge -3409-
Removing
- Remove the rear seat backrest. Refer to → Chapter "Divided Rear Seat Backrest, Removing and Installing".
- Remove the rear headrest. Refer to → Chapter "Headrest, Removing and Installing".
- Remove the locking mechanism trim. Refer to → Chapter "Locking Mechanism Trim, Removing and Installing".
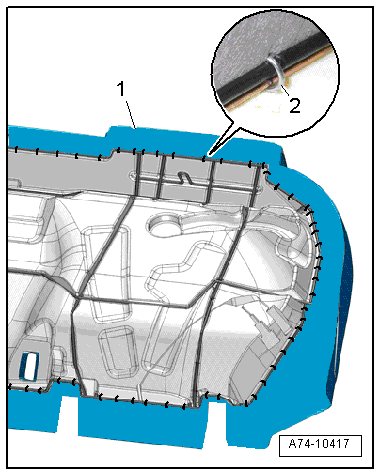
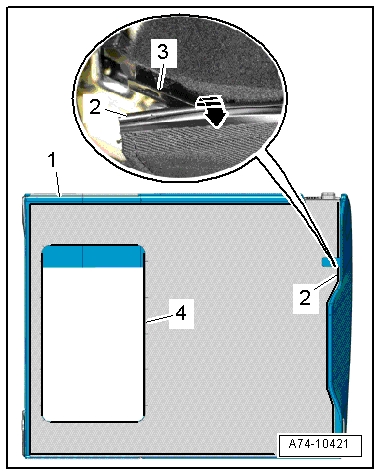
- Unclip the backrest cover clips -1- near the inner mounting pins from the backrest frame using the Trim Removal Wedge -3409-.
Rear Seat Backrest, 1/3 Left
- Starting at the locking mechanism, pry off the clamping strip -2- for the backrest cover using a screwdriver all around the backrest frame -3--arrow-.
- Vehicles with seat heating: free up the seat heating connector
- Remove the rear headrest guides. Refer to → Chapter "Headrest Guide, Removing and Installing, Standard/Sport Seat/Super Sport Seat".
- Remove the backrest cover -1- and backrest cushion from the backrest frame.
Rear Seat Backrest, 2/3 Right without a Pass-Through
- Vehicles without a storage compartment: remove the rear center armrest trim. Refer to → Chapter "Center Armrest Bracket/Hinge, Removing and Installing, Divided Rear Seat Backrest".
- Vehicles with a storage compartment: remove the rear storage compartment inside the rear center armrest. Refer to → Chapter "Rear Seat Backrest Center Storage Compartment, Removing and Installing".
- Version with 3-seat rear bench seat: Remove the rear center belt guide. Refer to → Chapter "Rear Seat Belt Guide in Rear Seat Backrest, Removing and Installing".
- Detach the protective strip -2- for the backrest cover inside the opening for the rear center armrest from the retaining straps -1-.
- Starting at the locking mechanism, pry off the clamping strip -2- for the backrest cover using a screwdriver all around the backrest frame -3--arrow-.
- Vehicles with seat heating: free up the seat heating connector
- Remove the rear headrest guides. Refer to → Chapter "Headrest Guide, Removing and Installing, Standard/Sport Seat/Super Sport Seat".
- Remove the backrest cover -1- and backrest cushion from the backrest frame.
Rear Seat Backrest, 2/3 Right with A Pass-Through
- Remove the rear center armrest and the pass-through door. Refer to → Chapter "Pass-Through Cover, Removing and Installing".
- Remove the pass-through cover frame. Refer to → Chapter "Pass-Through Cover Frame, Removing and Installing".
- Starting at the locking mechanism, pry off the clamping strip -2- for the backrest cover using a screwdriver all around the backrest frame -3--arrow-.
- Pry off the clamping strip -4- for the backrest cover with a screwdriver from the opening for the pass-through.
- Vehicles with seat heating: free up the seat heating connector
- Remove the rear headrest guides. Refer to → Chapter "Headrest Guide, Removing and Installing, Standard/Sport Seat/Super Sport Seat".
- Remove the backrest cover -1- and backrest cushion from the backrest frame.
Installing
Install in reverse order of removal. Note the following:
Installation notes, for example tightening specifications, replacing components. Refer to → Chapter "Overview - Cover and Cushion".
Cover and Cushion, Removing and Installing, Fixed Rear Seat Backrest
Removing
- Remove the rear seat backrest. Refer to → Chapter "Rear Seat Backrest, Fixed, Removing and Installing".
- Remove the center armrest, bracket and hinges. Refer to → Chapter "Center Armrest Bracket/Hinge, Removing and Installing, Fixed Rear Seat Backrest".
- Remove the rear headrest. Refer to → Chapter "Headrest, Removing and Installing, Standard/Sport Seat".
- Detach protective strip -1 and 2- by moving it sideways on the backrest frame.
- Repeat the process on the opposite side of the rear seat backrest.
- Pry the top part of the clamping strip -4- from the backrest frame.
- Unclip the lower part of the retaining channel -3- from the backrest frame.
- Detach the lower part of the backrest frame cover from the backrest frame -arrows-.
- Detach the protective strip -2- for the backrest cover on the backrest cushion opening for the rear center armrest from the backrest frame.
- Detach the protective strip -1- for the backrest cover in the backrest cushion opening for the rear center armrest from the backrest hooks.
- Detach the backrest cover from their mounts -arrows- for the rear center armrest.
- Remove the rear headrest guides. Refer to → Chapter "Headrest Guide, Removing and Installing, Standard/Sport Seat/Super Sport Seat".
- Remove the backrest cover and backrest cushion from the backrest frame.
Installing
Install in reverse order of removal. Note the following:
- Attach the clamping profile to the lower part of the backrest frame, then pull the backrest cover tightly upward.
- Flip the protective strip -1- over 180º toward the inside -arrow A-.
- Attach the protective strip onto the metal tabs -2- on the seatback frame -B arrows-.
Installation notes, for example tightening specifications, replacing components. Refer to → Chapter "Overview - Cover and Cushion, Fixed Rear Seat Backrest".

Cover and Cushion, Removing and Installing, Multi-contour Seat
Special tools and workshop equipment required
- Upholstery Clip Pliers -VAG1634-
Removing
- Remove the Multi-contour seat. Refer to → Chapter "Rear Seat Backrest, Removing and Installing, Multi-contour Seat".
- Remove the rear side airbag. Refer to → Chapter "Rear Side Airbag with Igniter, Removing and Installing, Market-Specific".
- Remove the rear headrest. Refer to → Chapter "Headrest, Removing and Installing, Multi-contour Seat".
- Remove the rear headrest guides. Refer to → Chapter "Headrest Guide, Removing and Installing, Multi-contour Seat".
- Remove rear seat backrest blower fan. Refer to → Chapter "Rear Seat Backrest Fan, Removing and Installing".
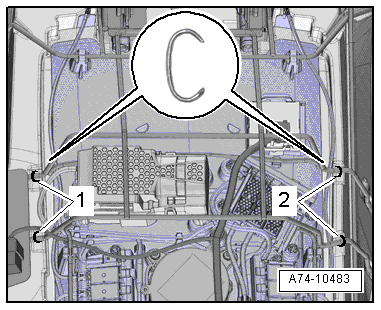
- Free up and disconnect the harness connectors for the seat heater.
- Before disconnecting, mark the pneumatic line assignments to the connections at the valve block using a waterproof permanent marker.
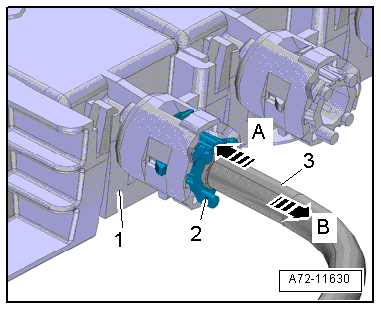
- Disconnect the pneumatic lines for all of the massage mat air cushions.
- To do this, press the release ring -2- in the direction of the valve block -1--arrow A- and at the same time pull out the pneumatic line -3- in direction of -arrow B-.
- Cut through the cushion clips -1 and 2- with pliers.
- Detach the molding -1- for the backrest cover -2- surrounding the backrest frame.
- Detach the rubber boot -1- for the air guide mat from the lumbar support module carrier and remove it towards the front -arrow-.
- Remove the backrest cover and backrest cushion from the backrest frame.
Installing
Install in reverse order of removal. Note the following:
- Connect the pneumatic lines and check them with a final tug, whether the coupling is locked in correctly.
Installation notes, for example tightening specifications, replacing components. Refer to → Chapter "Overview - Cover and Cushion, Multi-contour Seat".