Audi A6 Owners & Service Manuals
Audi A6 Typ 4G (2011–2018) Workshop Manual / Body / Body Exterior / Front Doors, Central Locking System / Bracket, Removing and Installing

Audi A6 Typ 4G: Bracket, Removing and Installing

Special tools and workshop equipment required

  • Pry Lever -80-200-

  Caution

There is a risk of malfunctions.

The door lock must be removed and installed together with the bracket to prevent over-bending the cable when disengaging and engaging it.

The cable must be disconnected from/attached to the lever on the door lock outside of the door.

Removing

- Remove the door trim panel. Refer to → Body Interior; Rep. Gr.70; Front Door Trim Panels; Front Door Trim Panel, Removing and Installing.

- Remove the inner door panel cover. Refer to → Chapter "Door Inner Cover, Removing and Installing".

- Remove the outside door handle. Refer to → Chapter "Exterior Door Handle, Removing and Installing".

- Remove the lock cylinder guide. Refer to → Chapter "Lock Cylinder Guide, Removing and Installing".

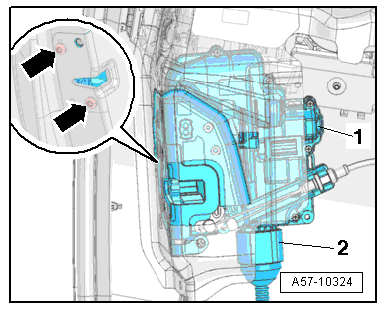
- Disengage the electric wire on the mounting bracket -arrow- if applicable.

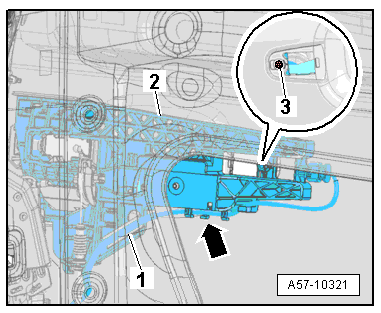
- Free up the spiral clip -1- from the wire using the Pry Lever -80 - 200-.

  Note

Use a soapy solution if necessary make removal easier.

- Remove the bolt -3- and the mounting bracket -2-.

A57-10321

- Remove the bolts -arrows- from the door lock.

- Disconnect the connector -2-.

- Push the bracket and door lock -1- downward and remove them from the vehicle.

- If the bracket is to be replaced, also remove the following components:

  • Remove the door lock cable. Refer to → Chapter "Door Lock Cable, Removing and Installing".

Installing

Install in reverse order of removal.

A57-10324

    READ NEXT:

     Door Lock, Removing and Installing

    Door Lock, Removing and Installing   Caution There is a risk of malfunctions. The door lock must be removed and installed together with the bracket to prevent over-bending the cable when dise

     Window Guide, Removing and Installing

    1 - Window Guide Removing The exterior mirror is moved. Refer to → Chapter "Overview - Exterior Rearview Mirror". Remove the door trim panel and window frame trim panel. Refe

     Component Location Overview - Central Locking

    Component Location Overview - Central Locking, Sedan 1 - Front Passenger Door Control Module -J387- Removing and installing. Refer to → Chapter "Driver Door Control Module -J386-

    SEE MORE:

     Garage door opener (HomeLink)

    Description Applies to: vehicles with garage door opener (HomeLink) Fig. 35 Garage door opener: examples of usage for different systems With the garage door opener (HomeLink), you can activate systems such as the garage doors, security systems or house lights from inside your vehicle. Three buttons

     Radio Installation Instructions

    Retrofitting Radio Systems General Information Before installing radios and telephone systems (radio systems), disconnect the negative terminal of the Battery -A-. Refer to →Electrical Equipment; Rep. Gr.27. Use the applicable wiring diagrams. Refer to → Wiring diagrams, Troubleshoo

    © 2011-2025 Copyright www.aa6.tochrfr.com