Audi A6 Typ 4G: Component Location Overview - Central Locking
Component Location Overview - Central Locking, Sedan
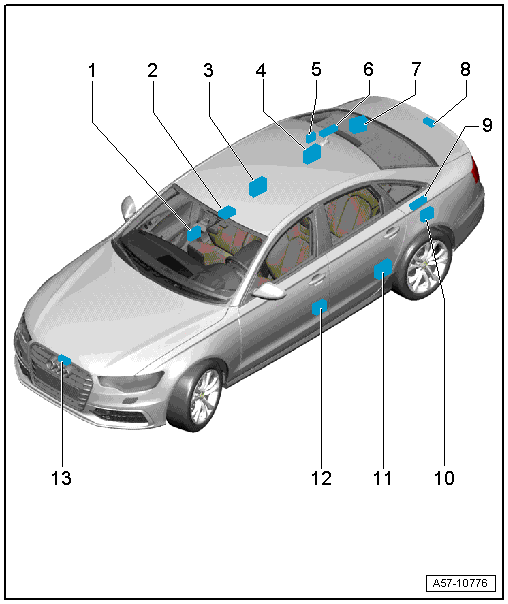
1 - Front Passenger Door Control Module -J387-
- Removing and installing. Refer to → Chapter "Driver Door Control Module -J386- and Front Passenger Door Control Module -J387-, Removing and Installing".
2 - Anti-Theft Alarm System Sensor -G578-
3 - Right Rear Door Control Module -J389-
- Removing and installing. Refer to → Chapter "Left Rear Door Control Module -J388- and Right Rear Door Control Module -J389-, Removing and Installing".
4 - Comfort System Central Control Module -J393-
- Removing and installing. Refer to → Chapter "Comfort System Central Control Module -J393-, Removing and Installing, Sedan".
5 - Fuel Filler Door Unlock Motor -V155-
- Removing and installing. Refer to → Chapter "Fuel Filler Door Unlock Motor -V155-, Removing and Installing".
6 - Rear Lid Motor 1 -V444-
- Removing and installing is identical to removing and installing the Rear Lid Motor 2 -V445-.
7 - Vehicle Positioning System Interface Control Module -J843-
- Removing and installing. Refer to → Chapter "Vehicle Positioning System Interface Control Module -J843-, Removing and Installing".
8 - Rear Lid Closing Assist Motor -V382-
- Removing and installing. Refer to → Chapter "Striker Pin, Removing and Installing, Vehicles with Rear Lid Closing Assist Motor -V382-".
9 - Rear Lid Motor 2 -V445-
- Removing and installing. Refer to → Chapter "Rear Lid Motor 1 -V444-, Removing and Installing, Sedan".
10 - Rear Lid Control Module -J605-
- Removing and installing. Refer to → Chapter "Rear Lid Control Module -J605-, Removing and Installing, Sedan".
11 - Left Rear Door Control Module -J388-
- Removing and installing. Refer to → Chapter "Left Rear Door Control Module -J388- and Right Rear Door Control Module -J389-, Removing and Installing".
12 - Driver Door Control Module -J386-
- Removing and installing. Refer to → Chapter "Driver Door Control Module -J386- and Front Passenger Door Control Module -J387-, Removing and Installing".
13 - Engine Hood Contact Switch -F266-
- Removing and installing. Refer to → Chapter "Engine Hood Contact Switch -F266-, Removing and Installing".
Component Location Overview - Central Locking, Avant
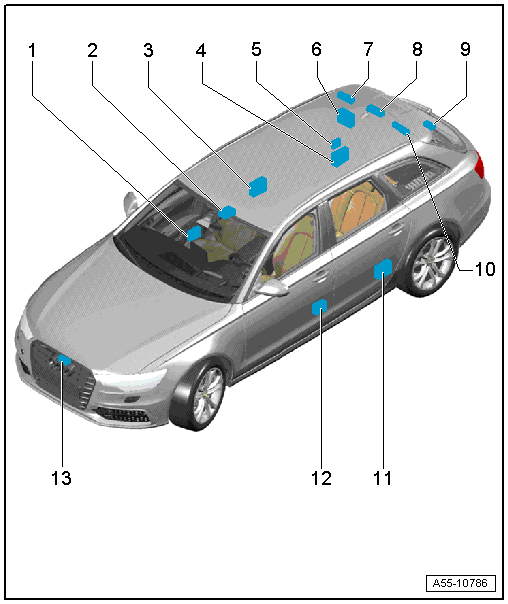
1 - Front Passenger Door Control Module -J387-
- Removing and installing. Refer to → Chapter "Driver Door Control Module -J386- and Front Passenger Door Control Module -J387-, Removing and Installing".
2 - Anti-Theft Alarm System Sensor -G578-
3 - Right Rear Door Control Module -J389-
- Removing and installing. Refer to → Chapter "Left Rear Door Control Module -J388- and Right Rear Door Control Module -J389-, Removing and Installing".
4 - Comfort System Central Control Module -J393-
- Removing and installing. Refer to → Chapter "Comfort System Central Control Module -J393-, Removing and Installing, Avant".
5 - Fuel Filler Door Unlock Motor -V155-
- Removing and installing. Refer to → Chapter "Fuel Filler Door Unlock Motor -V155-, Removing and Installing".
6 - Vehicle Positioning System Interface Control Module -J843-
- Removing and installing. Refer to → Chapter "Vehicle Positioning System Interface Control Module -J843-, Removing and Installing".
7 - Rear Lid Motor 2 -V445-
- Removing and installing. Refer to → Chapter "Rear Lid Motor 1 and 2 -V444-/-V445-, Removing and Installing, Avant".
8 - Rear Lid Control Module -J605-
- Removing and installing. Refer to → Chapter "Rear Lid Control Module -J605-, Removing and Installing, Avant".
9 - Rear Lid Closing Assist Motor -V382-
- Removing and installing. Refer to → Chapter "Striker Pin, Removing and Installing, Vehicles with Rear Lid Closing Assist Motor -V382-".
10 - Rear Lid Motor 1 -V444-
- Removing and installing is identical to removing and installing the Rear Lid Motor 2 -V445-.
11 - Left Rear Door Control Module -J388-
- Removing and installing. Refer to → Chapter "Left Rear Door Control Module -J388- and Right Rear Door Control Module -J389-, Removing and Installing".
12 - Driver Door Control Module -J386-
- Removing and installing. Refer to → Chapter "Driver Door Control Module -J386- and Front Passenger Door Control Module -J387-, Removing and Installing".
13 - Engine Hood Contact Switch -F266-
- Removing and installing. Refer to → Chapter "Engine Hood Contact Switch -F266-, Removing and Installing".
