Audi A6 Typ 4G: Center Console Insert, Removing and Installing
Special tools and workshop equipment required
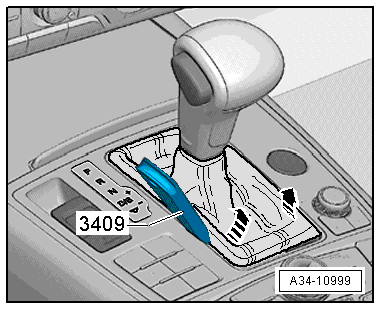
- Trim Removal Wedge -3409-
Removing
- Versions with a selector lever: move the selector lever into "D/S".
- Turn off the ignition.
- Lift the selector lever/shift lever boot by hand or carefully pry it out on the side with the Trim Removal Wedge -3409--arrows- and fold it upward.
- Tape off the center console cover rings around the center console insert with adhesive tape, to prevent damage to the surface.
 Caution
The retainer on the Access/Start Authorization Button -E408- can be damaged if the center console is lifted too high because the electrical wire to the button is short. Loosen and lift the center console insert carefully.
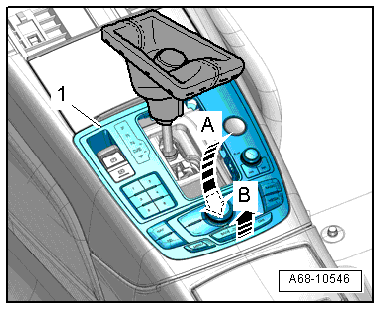
- Reach with the hand under the center console insert -arrow A- and carefully remove it upward from the center console -arrow B-.
- Disconnect the connectors and carefully remove the center console insert -1- over the selector lever/gearshift lever.
Installing
Install in reverse order of removal. Note the following:
Installation notes, for example tightening specifications, replacing components. Refer to → Chapter "Overview - Center Console".
Front Center Console Storage Compartment, Removing and Installing
Removing
- Remove the center console. Refer to → Chapter "Center Console, Removing and Installing".
- Remove the rear bracket for the center console. Refer to → Chapter "Center Console Bracket, Removing and Installing".
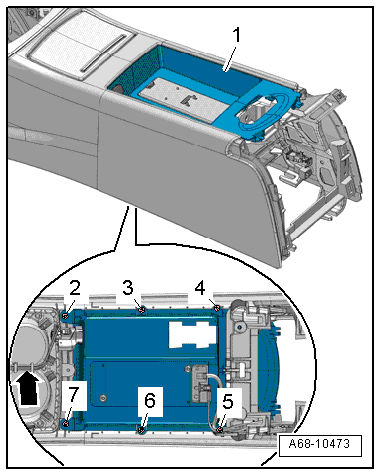
- Free up the electric wires -arrow-.
- Remove the screws -2 through 7- and remove the storage compartment -1- downward.
- Versions with Telephone Baseplate -R126-: Remove the Telephone Baseplate -R126-. Refer to → Communication; Rep. Gr.91; Telephone System; Telephone Baseplate R126, Removing and Installing.
Installing
Install in reverse order of removal. Note the following:
Installation notes, for example tightening specifications, replacing components. Refer to → Chapter "Overview - Center Console".
Front Footwell Center Console Trim Panel, Removing and Installing
Special tools and workshop equipment required
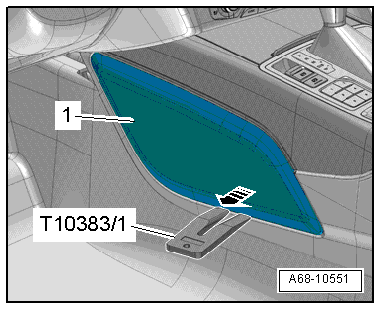
- Wedge Set -T10383-
Removing
- Unclip the center console cover -1- using the Wedge Set -T10383/1--arrow- and remove it.
Installing
Install in reverse order of removal. Note the following:
Installation notes, for example tightening specifications, replacing components. Refer to → Chapter "Overview - Center Console".
Center Console, Removing and Installing
Removing
- Remove the center console insert. Refer to → Chapter "Center Console Insert, Removing and Installing".
- Remove the storage compartment.
- Remove the center console rear trim. Refer to → Chapter "Center Console Rear Trim, Removing and Installing".
- Remove the rear vent air duct. Refer to → Heating, Ventilation and Air Conditioning; Rep. Gr.87; Air Guide; Air Distribution Channels, Removing and Installing.
- Vehicles with a Telephone Baseplate -R126-: disconnect the connectors and free up the wires.
- Versions with USB Connection Baseplate -R193-: remove the External Audio Source Connection -R199-. Refer to → Communication; Rep. Gr.91; Connection for External Multimedia Devices.
- Version with ambient lighting: disconnect the ambient lighting connector and free up the wires.
- Vehicles with a 12V outlet: disconnect the connector -2-.
- Remove the bolts -1 and 3-.
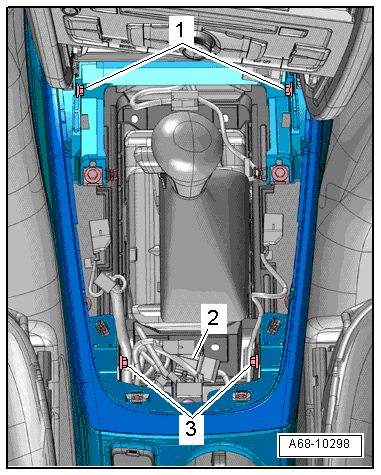
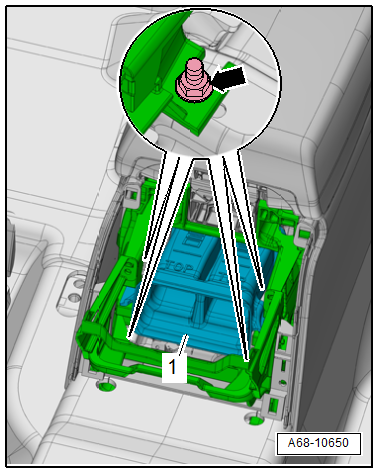
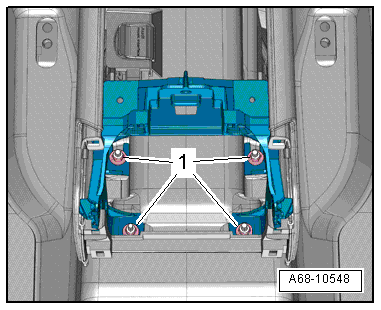
- Remove the nuts -1- from the center console bracket.
 Note
Note
Vehicles without a center armrest: remove the two nuts.
Market-Specific
- Pull the air duct -1- to the rear and remove it.
- Remove the nuts -arrow- from the center console bracket.
Continuation for All Vehicles
- Disconnect the connectors and free up the wiring.
- Lift the center console and remove it back out of the instrument panel and over the selector lever/shift lever.
Installing
Install in reverse order of removal. Note the following:
- Set the center console in place and guide the electrical connectors through the opening in the center console.
Installation notes, for example tightening specifications, replacing components. Refer to → Chapter "Overview - Center Console".