Audi A6 Typ 4G: Overview - Center Armrest
Overview - Center Armrest, Basic
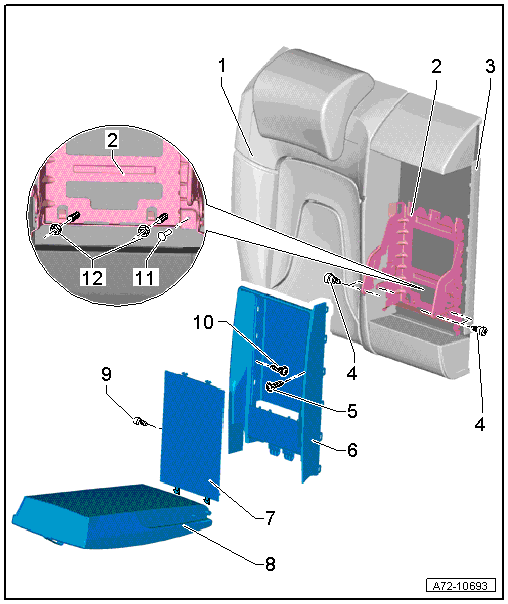
1 - Right 2/3 Split Rear Seat Backrest
- Without pass-through opening
- Equipment levels
2 - Center Armrest Bracket
- With hinges
- Removing and installing. Refer to → Chapter "Center Armrest Bracket/Hinge, Removing and Installing, Divided Rear Seat Backrest".
3 - Cover
- Clipped into the trim for the center armrest
- Removing and installing. Refer to → Chapter "Rear Seat Backrest Center Storage Compartment, Removing and Installing".
- Press on until it engages audibly
4 - Screws
- 11 Nm
- Quantity: 4
- Self-locking
- Replace
- Threaded holes for bolts must be cleaned, for example, with a thread tap
5 - Bolt
- 4 Nm
6 - Trim Panel
- For the center armrest
- Removing and installing. Refer to → Chapter "Center Armrest Bracket/Hinge, Removing and Installing, Divided Rear Seat Backrest".
- Install and press on it until it audibly latches
7 - Trim
- For the center armrest
- Removing and installing. Refer to → Chapter "Center Armrest Bracket/Hinge, Removing and Installing, Divided Rear Seat Backrest".
- Check the hook for damage and replace if damaged
- Install and press on it until it audibly latches
8 - Rear Center Armrest
- Removing and installing. Refer to → Chapter "Center Armrest, Removing and Installing".
9 - Bolt
- 0.9 Nm
10 - Bolt
- 4 Nm
11 - Rivet
- Rivet using the Pop Rivet Pliers -VAG1753B-
12 - Nuts
- 8 Nm
- Quantity: 2
- Self-locking
- Replace
Overview - Center Armrest, Storage Compartment
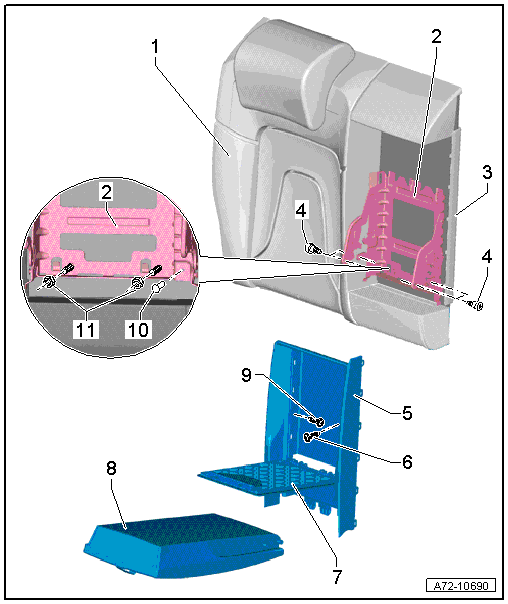
1 - Right 2/3 Split Rear Seat Backrest
- Without pass-through opening
- Equipment levels
2 - Center Armrest Bracket
- With hinges
- Removing and installing. Refer to → Chapter "Center Armrest Bracket/Hinge, Removing and Installing, Divided Rear Seat Backrest".
3 - Cover
- Clipped in the storage compartment
- Removing and installing. Refer to → Chapter "Rear Seat Backrest Center Storage Compartment, Removing and Installing".
- Press on until it engages audibly
4 - Screws
- 11 Nm
- Quantity: 4
- Self-locking
- Replace
- Threaded holes for bolts must be cleaned, for example, with a thread tap
5 - Storage Compartment
- Removing and installing. Refer to → Chapter "Rear Seat Backrest Center Storage Compartment, Removing and Installing".
- Install and press on it until it audibly latches
6 - Bolt
- 4 Nm
7 - Cap
- For the storage compartment
- Version with a storage compartment; cannot be replaced separately
8 - Rear Center Armrest
- Removing and installing. Refer to → Chapter "Center Armrest, Removing and Installing".
9 - Bolt
- 4 Nm
10 - Rivet
- Rivet using the Pop Rivet Pliers -VAG1753B-
11 - Nuts
- 8 Nm
- Quantity: 2
- Self-locking
- Replace
Overview - Center Armrest, Backrest with Pass-Through
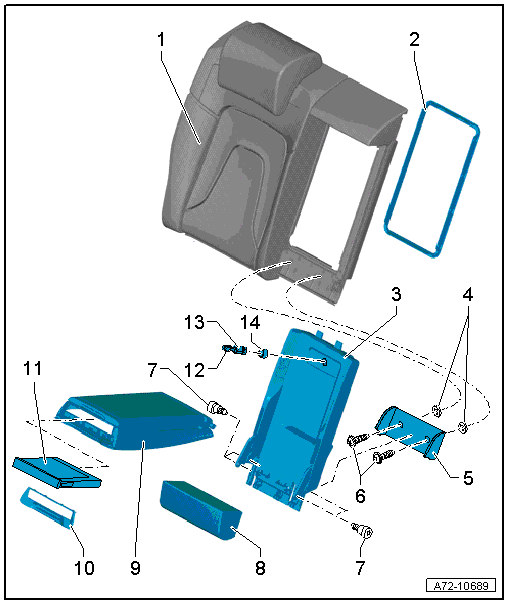
1 - Right 2/3 Split Rear Seat Backrest
- With pass-through opening
- Equipment levels
2 - Cover Frame
- For the pass-through opening
- Clipped into the rear seat backrest
- Removing and installing. Refer to → Chapter "Pass-Through Cover Frame, Removing and Installing".
- Press on until it engages audibly
3 - Door
- For the pass-through opening
- Removing and installing. Refer to → Chapter "Pass-Through Cover, Removing and Installing".
4 - Lock Washer
- For bolt -6-
- Quantity: 2
5 - Bracket
- For the center armrest
- Cannot be replaced separately
6 - Bolt
- 8 Nm
- Quantity: 2
7 - Bolt
- 11 Nm
- Quantity: 4
- Self-locking
- Replace
- Threaded holes for bolts must be cleaned, for example, with a thread tap
8 - Lower Center Cushion
- Removing and installing. Refer to → Chapter "Lower Center Cushion, Removing and Installing".
- Engage the cushion to the pass-through door and press on it until it clicks into place
9 - Rear Center Armrest
- Removing and installing. Refer to → Chapter "Center Armrest, Removing and Installing".
10 - Trim
- For the cupholder
- Removing and installing. Refer to → Chapter "Cupholder, Removing and Installing".
- Press on until it engages audibly
11 - Cupholder
- Removing and installing. Refer to → Chapter "Cupholder, Removing and Installing".
- Install and press on it until it audibly latches
12 - Key
13 - Install The Lock Cylinder
- For the pass-through door
- Removing and installing. Refer to → Chapter "Pass-Through Door Lock Cylinder, Removing and Installing".
 Caution
- Only remove and install the lock cylinder with the key inserted correctly. If that is not done, the tumblers and compression springs can fall out and the lock cylinder will be ruined.
- Check the installation position when installing the lock cylinder. It is not possible to lock the rear seat backrest correctly if the installation position is not correct.
14 - Protective Cap
- For lock cylinder
- Remove before installing the lock cylinder
Caution
The key must be inserted in the lock cylinder correctly before the protective cap is removed. If that is not done, the tumblers and compression springs can fall out and the lock cylinder will be ruined.
Overview - Center Armrest, Fixed Rear Seat Backrest
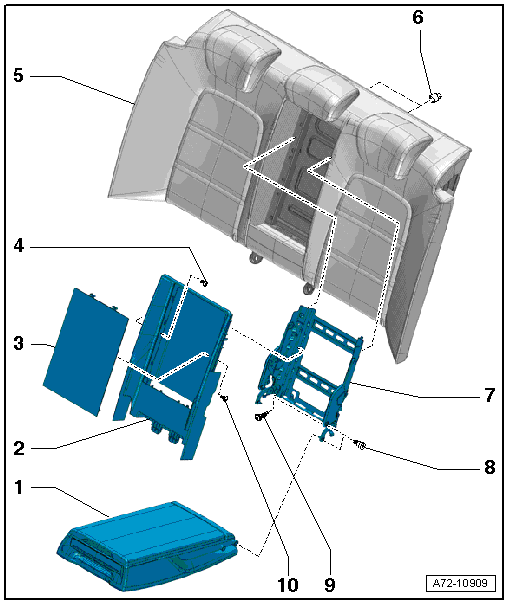
1 - Rear Center Armrest
- Removing and installing. Refer to → Chapter "Center Armrest, Removing and Installing".
Versions with cupholder:
- Cupholder, removing and installing. Refer to → Chapter "Cupholder, Removing and Installing".
2 - Trim Panel
- For the center armrest
- Removing and installing. Refer to → Chapter "Center Armrest Bracket/Hinge, Removing and Installing, Fixed Rear Seat Backrest".
3 - Trim
- For the center armrest
- Removing and installing. Refer to → Chapter "Center Armrest Bracket/Hinge, Removing and Installing, Fixed Rear Seat Backrest".
4 - Bolt
- 4 Nm
- Quantity: 2
5 - Fixed Rear Seat Backrest
- Equipment levels
6 - Nut
- 5 Nm
- Quantity: 2
- Tighten evenly alternating from side to side
7 - Bracket
- With hinges
- Removing and installing. Refer to → Chapter "Center Armrest Bracket/Hinge, Removing and Installing, Fixed Rear Seat Backrest".
8 - Bolt
- 11 Nm
- Quantity: 4
- Self-locking
- Always replace if removed
9 - Bolt
- 8 Nm
- Quantity: 2
10 - Bolt
- 0.9 Nm
Overview - Center Armrest, Sedan
Center Armrest
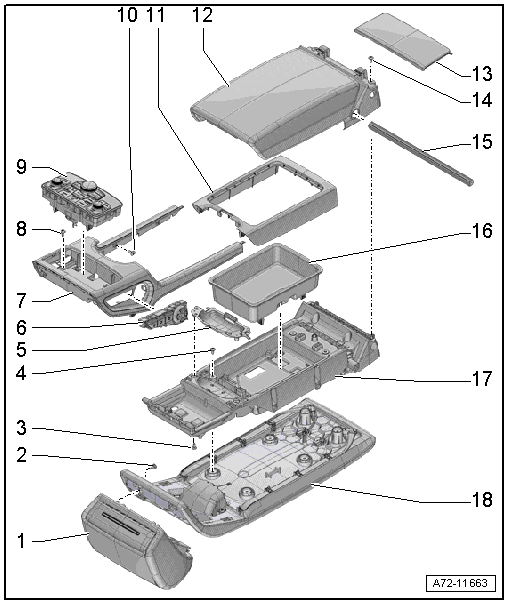
1 - Cushion
- For headrest in the center armrest
- Allocation. Refer to the Parts Catalog.
- Removing and installing. Refer to → Chapter "Rear Center Armrest Cushion, Removing and Installing".
2 - Bolt
- 3 Nm
- Quantity: 4
3 - Bolt
- 1.6 Nm
- Quantity: 4
4 - Bolt
- 1.6 Nm
- Quantity: 8
5 - Grip Recess
- In the lower armrest section
- Removing and installing. Refer to → Chapter "Rear Center Armrest Cushion, Removing and Installing".
6 - Driver Side Rear Multi-contour Seat Switch -E660-
- Right side Passenger Side Rear Multi-contour Seat Switch -E661-
- Equipment levels
- Removing and installing. Refer to → Electrical Equipment; Rep. Gr.96; Controls; Overview - Center Console Controls.
7 - Trim
- For the center armrest
- Removing and installing. Refer to → Chapter "Center Armrest Trim, Removing and Installing, Market-Specific".
- Replace damaged or deformed clips
- Press on until it engages audibly
8 - Bolt
- 1.8 Nm
- Quantity: 2
9 - Multimedia Control Head 2 -E499-
- Equipment levels
- Removing and installing. Refer to → Communication; Rep. Gr.91; Infotainment System; Component Location Overview - Infotainment System.
10 - Bolt
- 1.8 Nm
- Quantity: 4
11 - Trim Panel
- For storage tray
- Removing and installing. Refer to → Chapter "Center Armrest Center Storage Compartment, Removing and Installing, Market-Specific".
- Replace damaged or deformed clips
- Press on until it engages audibly
12 - Rear Armrest
- Removing and installing. Refer to → Chapter "Center Armrest Arm Cushion, Removing and Installing, Market-Specific".
13 - Gap Cover
- Removing and installing. Refer to → Chapter "Mount/Center Armrest, Removing and Installing, Market-Specific".
14 - Bolt
- 2.4 Nm
- Quantity: 4
15 - Shaft
16 - Storage Compartment Shell
- For the center armrest
- Removing and installing. Refer to → Chapter "Center Armrest Center Storage Compartment, Removing and Installing, Market-Specific".
- Replace damaged or deformed clips
- Install and press on it until it audibly latches
17 - Armrest Lower Section
- Removing and installing. Refer to → Chapter "Mount/Center Armrest, Removing and Installing, Market-Specific".
18 - Cushion
- For the rear armrest
- Removing and installing. Refer to → Chapter "Rear Center Armrest Cushion, Removing and Installing".
Center Armrest Mount
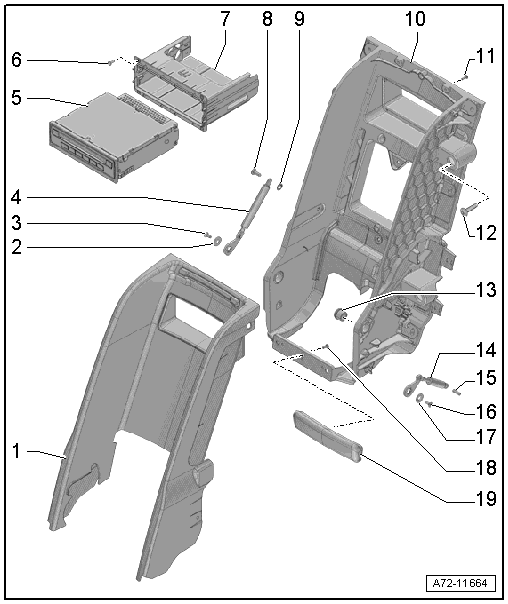
1 - Trim Panel
- For the lifting eye for the center armrest
- Removing and installing. Refer to → Chapter "Center Armrest Pressure Damper/Gas-Filled Strut, Removing and Installing, Market-Specific".
- Press on until it engages audibly
2 - Washer
- Pay attention to the installation direction: the cone must face outward
3 - Bolt
- 4 Nm
4 - Large Gas-Filled Strut
- Removing and installing. Refer to → Chapter "Center Armrest Pressure Damper/Gas-Filled Strut, Removing and Installing, Market-Specific".
5 - Information Electronics Control Module 2 -J829-
- Removing and installing. Refer to → Communication; Rep. Gr.91; Infotainment System; Component Location Overview - Infotainment System.
6 - Bolt
- Quantity: 4
- Tightening specification. Refer to → Communication; Rep. Gr.91; Infotainment System; Component Location Overview - Infotainment System.
7 - Mount
- For the Information Electronics Control Module 2 -J829-
- Removing and installing. Refer to → Communication; Rep. Gr.91; Infotainment System; Component Location Overview - Infotainment System.
8 - Retaining Pin
9 - Clip
- for the retaining pin
10 - Mount
- for the rear center armrest
- Removing and installing. Refer to → Chapter "Center Armrest, Removing and Installing, Market-Specific".
11 - Bolt
- 1.8 Nm
- Quantity: 6
12 - Bolt
- 8 Nm
- Quantity: 8
13 - Bushing
- Quantity: 2
- for the shaft
14 - Small Gas-Filled Strut
- Removing and installing. Refer to → Chapter "Center Armrest Pressure Damper/Gas-Filled Strut, Removing and Installing, Market-Specific".
15 - Retaining Pin
16 - Bolt
- 4 Nm
17 - Washer
- Pay attention to the installation direction: the cone must face outward
18 - Bolt
- 1.8 Nm
- Quantity: 3
19 - Center Cushion
- For the rear center armrest
- Removing and installing. Refer to → Chapter "Center Armrest Center Cushion, Removing and Installing, Market-Specific".
- Install and press on it until it audibly latches
