Audi A6 Typ 4G: Exterior Rearview Mirror
Overview - Exterior Rearview Mirror
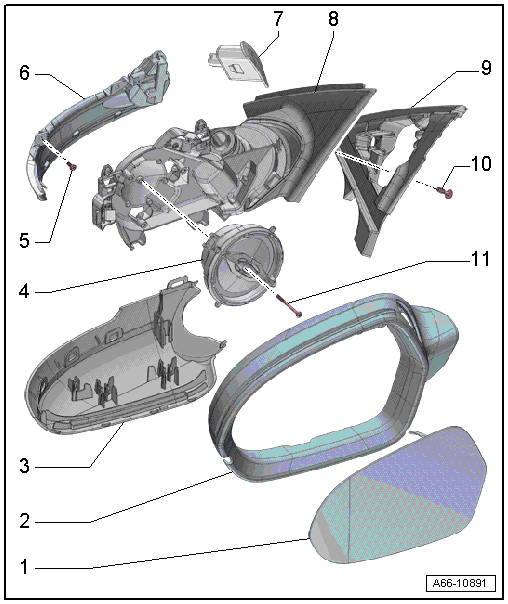
1 - Mirror Glass
- Removing and installing. Refer to → Chapter "Mirror Glass, Removing and Installing".
2 - Exterior Rearview Mirror Housing
- Removing and installing. Refer to → Chapter "Mirror Cap, Removing and Installing".
3 - Mirror cap
- for the mirror adjusting unit mount
- Removing and installing. Refer to → Chapter "Exterior Rearview Mirror Cover, Removing and Installing".
4 - Mirror Adjusting Unit
- Removing and installing. Refer to → Chapter "Mirror Adjusting Unit, Removing and Installing".
5 - Bolt
- Quantity: 2
- Tightening specification. Refer to → Electrical Equipment; Rep. Gr.94; Exterior Rearview Mirror Lamps; Overview - Exterior Rearview Mirror Lamps.
6 - Exterior Mirror Turn Signal Lamp
- Removing and installing. Refer to → Electrical Equipment; Rep. Gr.94; Exterior Rearview Mirror Lamps; Driver/Front Passenger Exterior Rearview Mirror Turn Signal Bulb L131/L132, Removing and Installing.
7 - Lane Change Assistance Warning Lamp inside the Exterior Mirror
- Removing and installing. Refer to → Electrical Equipment; Rep. Gr.96; Lane Change Assistance; Lane Change Assistance Warning Lamp In Driver/Front Passenger Exterior Rearview Mirror K233/K234, Removing and Installing.
8 - Mirror Adjusting Unit Mount
- Common part with cover
- Removing and installing. Refer to → Chapter "Exterior Rearview Mirror, Removing and Installing".
9 - Seal
- For the mirror base
10 - Bolt
- 6 Nm
- Quantity: 3
11 - Bolt
- 1 Nm
Exterior Rearview Mirror, Removing and Installing
Exterior Rearview Mirror, Removing and Installing
Removing
- Remove the window frame trim panel. Refer to → Body Interior; Rep. Gr.70; Front Door Trim Panels; Window Frame Trim, Removing and Installing.
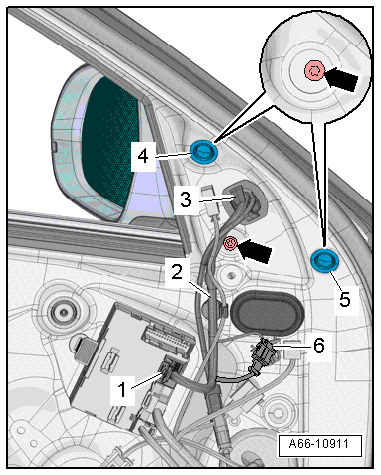
- Pull the retainer -1- and press the release to disconnect the connector -2-.
- Disconnect the connector -6-.
- Remove the plugs -4 and 5-.
- Remove the bolts -arrows-.
- Remove the mirror adjusting unit mount while guiding the grommet -4- and the wiring harness -3- out through the body opening.
Installing
Install in reverse order of removal. Note the following:
- For vehicles with the peripheral camera, the peripheral camera must be recalibrated. Refer to → Communication; Rep. Gr.91; Peripheral Camera; Component Location Overview - Peripheral Camera.
Exterior Rearview Mirror Cover, Removing and Installing
Removing
- Remove the exterior rearview mirror housing. Refer to → Chapter "Mirror Cap, Removing and Installing".
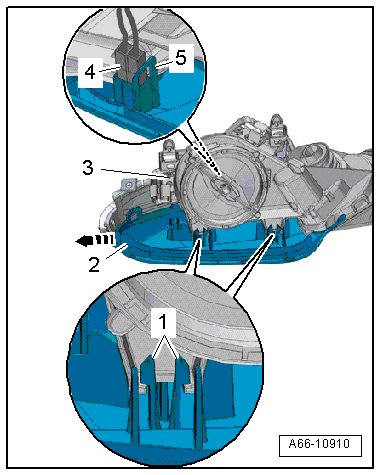
- Push the bracket -5- slightly to the side and remove the connector -4- from the mount.
- For vehicles with a peripheral camera system, disconnect the connector.
- Release the tabs -1-.
- Remove the cover -2- for the mirror adjustment unit mount in direction of -arrow- from the mirror adjustment unit mount -3-.
Installing
Install in reverse order of removal. Note the following:
- For vehicles with the peripheral camera, the peripheral camera must be recalibrated. Refer to → Communication; Rep. Gr.91; Peripheral Camera; Component Location Overview - Peripheral Camera.
Mirror Glass, Removing and Installing
Special tools and workshop equipment required
- Double Suction Lifter -VAG1344-
- Safety Gloves
Removing
 WARNING
Risk of injury.
Wear safety gloves.
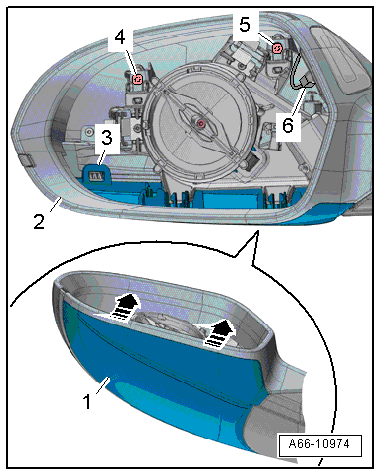
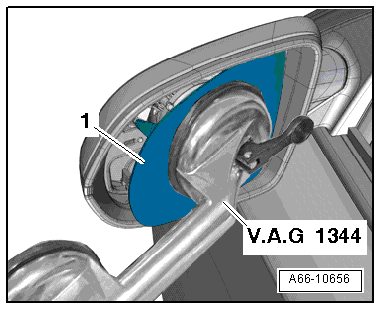
- Position the Double Suction Lifter -VAG1344- on the center of the mirror glass -1-, as illustrated.
- Remove the mirror glass from the mirror adjuster using the Double Suction Lifter - VAG1344-.
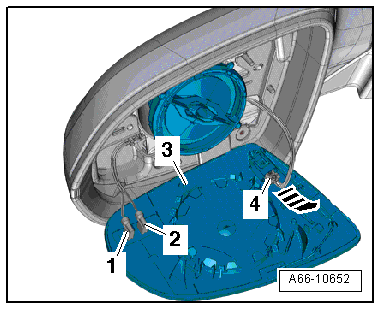
- Disconnect the connectors -1 and 2- for the mirror heating on the back of the mirror glass -3-.
- Unclip the connector -4- (if equipped) from the bracket -arrow-.
Installing
Install in reverse order of removal. Note the following:
- Position the mirror glass on the mirror adjusting unit and press it on.
 Note
Note
Only press the center of the mirror glass when pressing it on.
Mirror Adjusting Unit, Removing and Installing
Removing
- Remove the mirror glass. Refer to → Chapter "Mirror Glass, Removing and Installing".
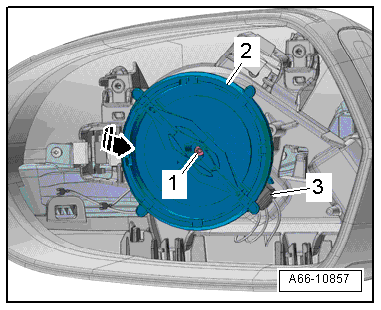
- Remove the bolt -1-.
- Disengage the mirror adjuster -2- from the mount -arrow-.
- Disconnect the connector -3- from the mirror adjuster.
- Remove the mirror adjuster.
Installing
Install in reverse order of removal. Note the following:
- Press the mirror adjusting unit onto the mirror mount until it engages audibly.
Mirror Cap, Removing and Installing
Removing
- Remove the mirror glass. Refer to → Chapter "Mirror Glass, Removing and Installing".
- Remove bolts -4- and -5-.
- Open the four tabs -3-.
- Remove the exterior rearview mirror housing -2- from the cover -1--arrows-.
- If the vehicle has lane change assistance, disconnect the connector -6- for the lane change assistance warning lamp.
- Remove the exterior rearview mirror housing upward and disconnect the connector from the turn signal bulb.
- If the housing is replaced, remove the turn signal bulb. Refer to → Electrical Equipment; Rep. Gr.94; Exterior Rearview Mirror Lamps; Driver/Front Passenger Exterior Rearview Mirror Turn Signal Bulb L131/L132, Removing and Installing.
Installing
Install in reverse order of removal. Note the following:
- Tighten the screws on the housing mounting to 2 Nm.