Audi A6 Typ 4G: Overview - Center Console
Overview - Center Console
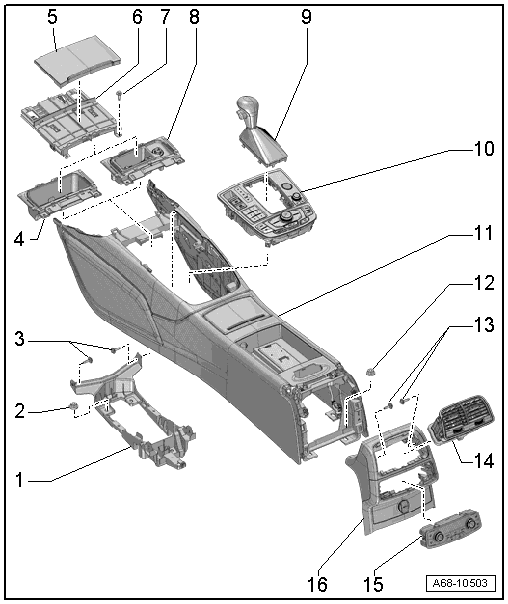
1 - Bracket
- For the center console
- Removing and installing. Refer to → Chapter "Center Console Bracket, Removing and Installing".
2 - Nut
- Quantity: 4
- Tightening specification. Refer to → S tronic Transmission; Rep. Gr.34; Selector Mechanism; Overview - Selector Mechanism or → Automatic Transmission; Rep. Gr.37; Selector Mechanism; Overview - Selector Mechanism.
3 - Bolt
- 3 Nm
- Quantity: 4
4 - Storage Compartment
- Removing and installing
5 - Trim
- Sorage compartment
- Attach trim to the cover and press on it until it audibly engages
- Removing and installing
6 - Cover
- Storage compartment
- Removing and installing
7 - Bolt
- 3 Nm
- Quantity: 2
8 - Front Ashtray
- Removing and installing
9 - Gearshift Lever/Selector Lever
- Removing and installing. Refer to → S tronic Transmission; Rep. Gr.34; Selector Mechanism or → Automatic Transmission; Rep. Gr.37; Selector Mechanism; Selector Lever Handle, Removing and Installing.
10 - Insert
- For the center console
- Removing and installing. Refer to → Chapter "Center Console Insert, Removing and Installing".
- Replace damaged or deformed clips
- Press the center console insert in until it audibly locks into place.
- Multimedia System Control Head -E380-, removing and installing. Refer to → Communication; Rep. Gr.91; Infotainment System; Multimedia System Control HeadE380, Removing and Installing.
11 - Center Console
- Removing and installing. Refer to → Chapter "Center Console, Removing and Installing".
12 - Nut
- 4 Nm
- Quantity: 2
- Tightening specification for vehicles with a center armrest -item 10-.
13 - Screws
- 3 Nm
14 - Rear Vent
- Removing and installing. Refer to → Chapter "Center Console Rear Trim, Removing and Installing".
- Replace damaged or deformed clips
- Press into the installation opening as far as the stop.
15 - Rear A/C Display Control Head -E265-
- Equipment levels
- Removing and installing. Refer to → Heating, Ventilation and Air Conditioning; Rep. Gr.87; Display and Control Head; Display and Control Head, Removing and Installing.
16 - Rear Cover
- For the center console
- Overview. Refer to → Chapter "Overview - Center Console, Rear Trim".
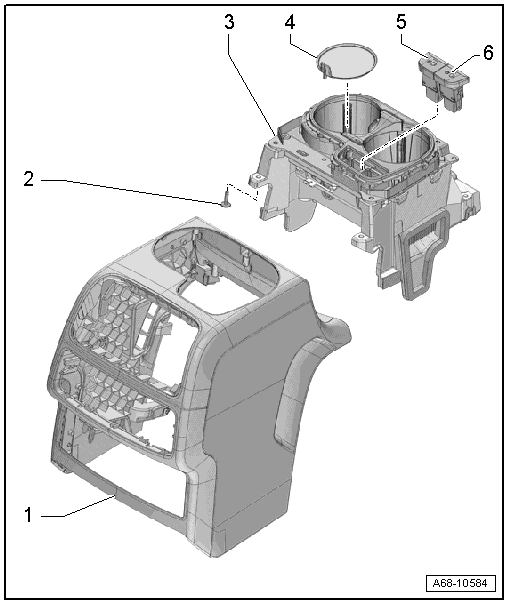
Overview - Center Console, Attachments
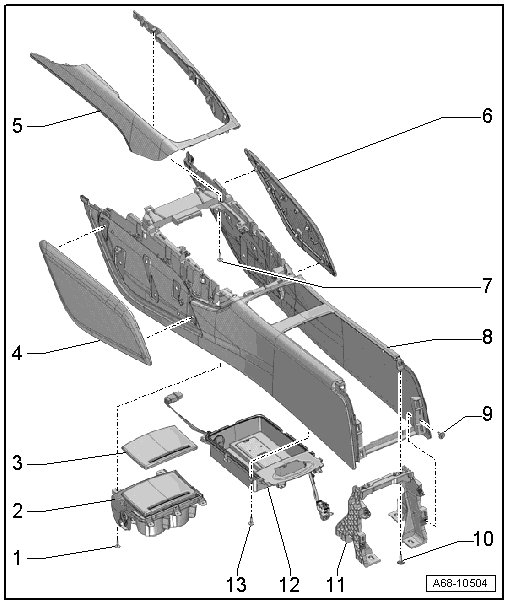
1 - Bolt
- 1.4 Nm
- Quantity: 2
2 - Cupholder
- Removing and installing. Refer to → Chapter "Cupholder, Removing and Installing".
3 - Trim
- For the cupholder
- Removing and installing. Refer to → Chapter "Cupholder, Removing and Installing".
- Attach trim to the cover and press on it until it audibly engages
4 - Side Trim Panel
- For the center console
- Equipment levels
- Removing and installing. Refer to → Chapter "Front Footwell Center Console Trim Panel, Removing and Installing".
- Replace any damaged or deformed clips
- Press the side trim panel back on until it audibly latches.
5 - Trim Molding
- For the center console
- Equipment levels
- Removing and installing. Refer to → Chapter "Center Console Cover, Removing and Installing".
6 - Side Trim Panel
- For the center console
- Equipment levels
- Removing and installing. Refer to → Chapter "Front Footwell Center Console Trim Panel, Removing and Installing".
- Replace any damaged or deformed clips
- Press the side trim panel back on until it audibly latches.
7 - Bolt
- 1.4 Nm
- Quantity: 8
- Tightening sequence.
8 - Center Console
- Removing and installing. Refer to → Chapter "Center Console, Removing and Installing".
9 - Bolt
- 3 Nm
- Quantity: 2
10 - Bolt
- 3 Nm
- Quantity: 2
11 - Rear Bracket
- For the center console
- Removing and installing. Refer to → Chapter "Center Console Bracket, Removing and Installing".
12 - Storage Compartment
- Equipment levels
- Overview.
13 - Bolt
- Tightening specification -item 1-
Overview - Center Console, Storage Compartment
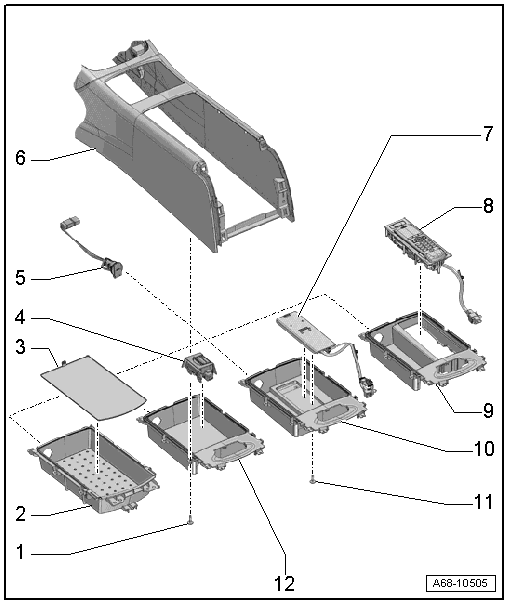
1 - Bolt
- 1.4 Nm
- Quantity: 6
2 - Storage Compartment
- Vehicles without a center armrest
- Removing and installing. Refer to → Chapter "Front Center Console Storage Compartment, Removing and Installing".
3 - Liner
4 - External Audio Source Connection -R199-
- Equipment levels
- Removing and installing. Refer to → Communication; Rep. Gr.91; Connection for External Multimedia Devices.
5 - 12 V Socket -U5-
- Removing and installing. Refer to → Electrical Equipment; Rep. Gr.96; Lamps; Overview - Instrument Panel Lamps.
6 - Center Console
- Removing and installing. Refer to → Chapter "Center Console, Removing and Installing".
7 - Telephone Baseplate -R126-
- Equipment levels
- For Cellular Telephone -R54-
- Removing and installing. Refer to → Communication; Rep. Gr.91; Telephone System; Telephone Baseplate R126, Removing and Installing
8 - Telephone Baseplate -R126-
- Equipment levels
- For Telephone Handset -R37-
- Removing and installing. Refer to → Communication; Rep. Gr.91; Telephone System; Telephone Baseplate R126, Removing and Installing
9 - Storage Compartment
- For equipment levels with Telephone Baseplate -R126--8-
- Removing and installing. Refer to → Chapter "Front Center Console Storage Compartment, Removing and Installing".
10 - Storage Compartment
- For equipment levels with Telephone Baseplate -R126--7-
- Removing and installing. Refer to → Chapter "Front Center Console Storage Compartment, Removing and Installing".
11 - Bolt
- Tightening specification. Refer to → Communication; Rep. Gr.91; Telephone System; Component Location Overview - Telephone System.
12 - Storage Compartment
- For vehicles with External Audio Source Connection -R199-:
- Removing and installing. Refer to → Chapter "Front Center Console Storage Compartment, Removing and Installing".
Overview - Center Console, Rear Trim
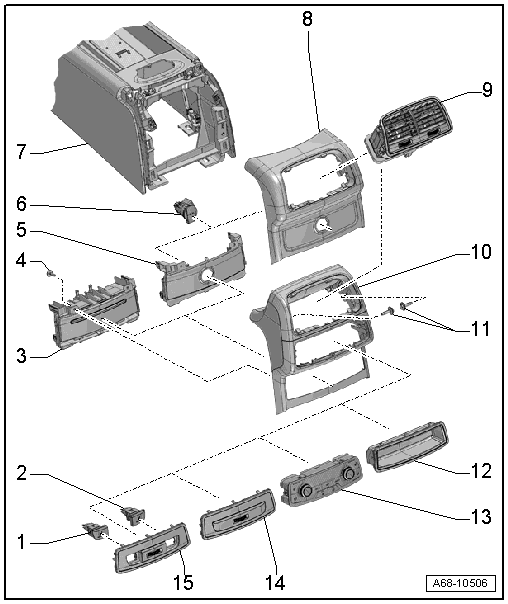
1 - Left Rear Heated Seat Regulating Switch -E128-
- Equipment levels
- Removing and installing. Refer to → Electrical Equipment; Rep. Gr.96; Controls; Left/Right Rear Heated Seat Regulating Switch E128/E129, Removing and Installing
- Press onto the cover until it audibly latches.
2 - Right Rear Heated Seat Regulating Switch -E129-
- Equipment levels
- Removing and installing. Refer to → Electrical Equipment; Rep. Gr.96; Controls; Left/Right Rear Heated Seat Regulating Switch E128/E129, Removing and Installing
- Press onto the cover until it audibly latches.
3 - Mount
- Equipment levels
- Removing and installing. Refer to → Chapter "Center Console Rear Trim, Removing and Installing".
4 - Bolt
- 1.4 Nm
- Quantity: 2
5 - Trim
- For 12 V Socket 2 -U18-
- Equipment levels
- Removing and installing. Refer to → Chapter "Center Console Rear Trim, Removing and Installing".
6 - 12 V Socket 2 -U18-
- Removing and installing
7 - Center Console
- Removing and installing. Refer to → Chapter "Center Console, Removing and Installing".
8 - Rear Cover
- For the center console
- Vehicles without a center armrest
- Removing and installing. Refer to → Chapter "Center Console Rear Trim, Removing and Installing".
9 - Rear Vent
- Removing and installing. Refer to → Chapter "Center Console Rear Trim, Removing and Installing".
- Replace damaged or deformed clips
- Press into the installation opening as far as the stop.
10 - Rear Cover
- For the center console
- Vehicles with a center armrest
- Removing and installing. Refer to → Chapter "Center Console Rear Trim, Removing and Installing".
11 - Screws
- 3 Nm
12 - Storage Compartment
- Equipment levels
- Removing and installing. Refer to → Chapter "Switch/Regulator/Storage Compartment Trim, Removing and Installing".
- Replace damaged or deformed clips
- Press onto the cover until it audibly latches.
13 - Rear A/C Display Control Head -E265-
- Equipment levels
- Removing and installing. Refer to → Heating, Ventilation and Air Conditioning; Rep. Gr.87; Display and Control Head; Display and Control Head, Removing and Installing.
14 - Cover
- Vehicles with Rear Temperature Selection Potentiometer -G538-
- Removing and installing. Refer to → Chapter "Switch/Regulator/Storage Compartment Trim, Removing and Installing".
- Press onto the cover until it audibly latches.
15 - Switch Cover
- Vehicles with Rear Temperature Selection Potentiometer -G538-
- Removing and installing. Refer to → Chapter "Switch/Regulator/Storage Compartment Trim, Removing and Installing".
- Press onto the cover until it audibly latches.
Overview - Center Console, Sedan
1 - Rear Cover
- For the center console
- Market-specific
- Removing and installing. Refer to → Chapter "Center Console Rear Trim, Removing and Installing".
2 - Bolt
- 1.4 Nm
- Quantity: 10
3 - Cupholder with Heating and Cooling Element -Z105-
- Market-specific
- Removing and installing. Refer to → Chapter "Cupholder, Removing and Installing, Market-Specific".
4 - Liner
5 - Cupholder Cooling Element Button -E674-
- Removing and installing. Refer to → Electrical Equipment; Rep. Gr.96; Controls; Overview - Center Console Controls.
6 - Cupholder Heating Element Button -E675-
- Removing and installing. Refer to → Electrical Equipment; Rep. Gr.96; Controls; Overview - Center Console Controls.
