Audi A6 Typ 4G: Overview - Door

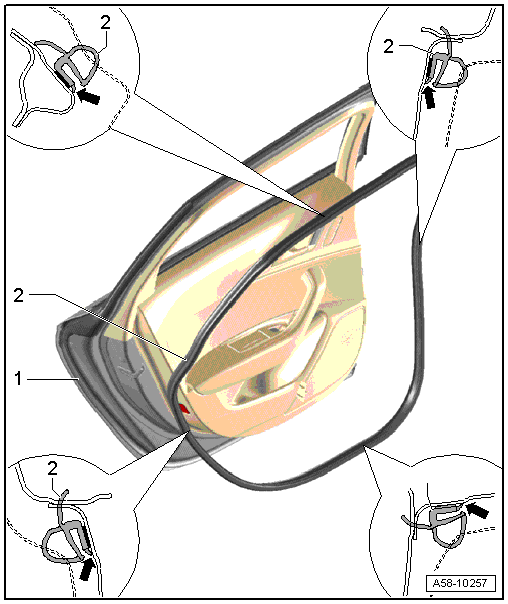
1 - Front Door
2 - Bolt
3 - Seal
4 - Bolt
5 - Cap
6 - Door Arrester
- Removing and installing. Refer to
→ Chapter "Door Arrester, Removing and Installing".
7 - Cap
8 - Upper Door Hinge
9 - Bolt
 Note
Note
- The bolt is a fitting bolt so it is generally not necessary to
adjust the door using it.
- If it is necessary to make an adjustment using these bolts, the bolt
can be replaced with one of the same length and strength category.
10 - Stud Bolt
11 - Nut
12 - Bolt
13 - Bolt
14 - Lower Door Hinge
Overview - Door Seals
Overview - Inner Door Seals

1 - Lower Inner Door Seal
- Removing and installing. Refer to
→ Chapter "Inner Door Seal, Removing and Installing".
2 - Body Flange
3 - Door
Overview - Exterior Door Seals
1 - Rear Door
2 - Outer Door Seal
- Removing and installing. Refer to
→ Chapter "Outer Door Seal, Removing and Installing".
READ NEXT:
Removing
- Disconnect the connector on the A-pillar. Refer to
→ Electrical Equipment; Rep. Gr.97; Connectors.
- Remove the door arrester bolt -2-.
- Remove the cover ca
Removing
- Move the door window into the "closed" position.
- Remove the door trim panel. Refer to
→ Body Interior; Rep. Gr.70; Rear Door Trim Panels; Rear Door
Trim Panel
Overview - Window Regulator
1 - Rear Door
2 - Window Regulator
Note
Vehicles with tinted glass have a different version.
Removing and installing. Refer to
→ Cha
SEE MORE:
Introduction
Drive select makes it possible to experience different
types of vehicle settings in one vehicle.
The driver can select Comfort, Auto and Dynamic
modes in the Infotainment system to switch between,
for example, a sporty and a comfortable
driving mode.
Settings can be adjusted to your p
General Information
Caution
When handling refrigerant oil, pay attention to
local regulations.
Refrigerant oil mixes with the refrigerant (about 20-40%,
depending on compressor type and amount of refrigerant) and
circulates constantly in the system, lubricating the moving
parts.
Special
