Audi A6 Typ 4G: Overview - Rear Seat Backrest
Component Location Overview - Electric and Electronic Components
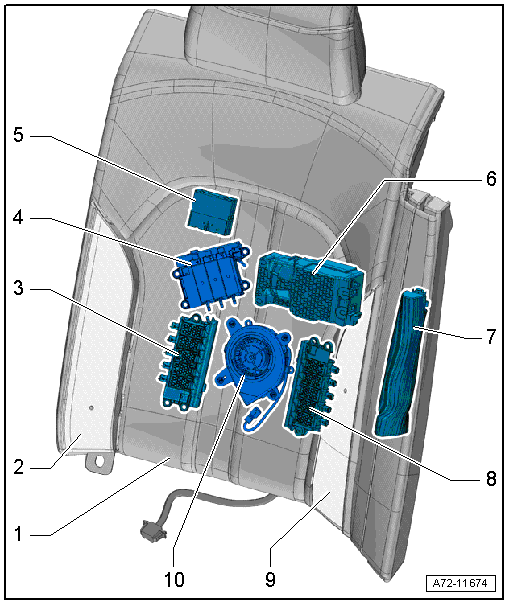
1 - Left Rear Backrest Heating Element -Z11-
- Front passenger side: Right Rear Backrest Heating Element -Z13-
- Allocation. Refer to the Parts Catalog.
- Heating element sewn into backrest cover; if faulty, replace backrest cover. Refer to → Chapter "Cover and Cushion, Separating".
2 - Driver Side Rear Seat Right Backrest Bolster Heating Element -Z87-
- Front passenger side: Passenger Side Rear Seat Right Backrest Bolster Heating Element -Z91-
- Allocation. Refer to the Parts Catalog.
- Heating element, removing and installing. Refer to → Chapter "Backrest Heating Element, Removing and Installing, Multi-contour Seat".
3 - Valve Block 3 In Driver Side Rear Seat -N525-
- For massage mat
- Front passenger side: Valve Block 3 In Passenger Side Rear Seat -N526-
- Allocation. Refer to the Parts Catalog.
- Removing and installing. Refer to → Chapter "Massage Mat Valve Block, Removing and Installing".
4 - Valve Block 1 in Driver Side Rear Seat -N479-
- Front passenger side: Valve Block 1 in Passenger Side Rear Seat -N481-
- Allocation. Refer to the Parts Catalog.
- Removing and installing. Refer to → Chapter "Valve Block 1 in Driver Side Rear Seat -N479-/Valve Block 1 in Passenger Side Rear Seat -N481-, Removing and Installing".
5 - Driver Side Rear Seat Adjustment Control Module -J876-
- Front passenger side: Passenger Side Rear Seat Adjustment Control Module -J877-
- Allocation. Refer to the Parts Catalog.
- Removing and installing. Refer to → Chapter "Seat Adjustment Control Module, Removing and Installing, Multi-contour Seat".
- Press on until it engages audibly
6 - Left Rear Multi-contour Seat Compressor -V441- with the Integrated Driver Side Rear Multi-contour Seat Control Module -J875-
- Front passenger side Right Rear Multi-contour Seat Compressor -V442- with the integrated Passenger Side Rear Multi-contour Seat Control Module -J874-
- Allocation. Refer to the Parts Catalog.
- Removing and installing. Refer to → Chapter "Compressor with Multi-contour Seat Control Module, Removing and Installing".
7 - Rear Side Airbag with Driver Side Rear Thorax Airbag Igniter -N201-
- Front passenger side: rear side airbag with Passenger Side Rear Thorax Airbag Igniter -N202-
 WARNING
Follow all Safety Precautions when working with pyrotechnic components. Refer to → Chapter "Pyrotechnic Components Safety Precautions".
- Overview. Refer to → Chapter "Overview - Rear Side Airbag, Market-Specific".
8 - Valve Block 2 in Driver Side Rear Seat -N480-
- For massage mat
- Front passenger side: Valve Block 2 in Passenger Side Rear Seat -N482-
- Allocation. Refer to the Parts Catalog.
- Removing and installing. Refer to → Chapter "Massage Mat Valve Block, Removing and Installing".
9 - Driver Side Rear Seat Left Backrest Bolster Heating Element -Z86-
- Front passenger side: Passenger Side Rear Seat Left Backrest Bolster Heating Element -Z90-
- Allocation. Refer to the Parts Catalog.
- Heating element, removing and installing. Refer to → Chapter "Backrest Heating Element, Removing and Installing, Multi-contour Seat".
10 - Left Rear Seat Backrest Blower Fan -V273-
- Front passenger side: Right Rear Seat Backrest Blower Fan -V272-
- Allocation. Refer to the Parts Catalog.
- Removing and installing. Refer to → Chapter "Rear Seat Backrest Fan, Removing and Installing".
Overview - Rear Seat Backrest, Standard Seat/Sport Seat
Divided Rear Seat Backrest
 Note
Note
The rear seat backrests in the Sedan are illustrated.
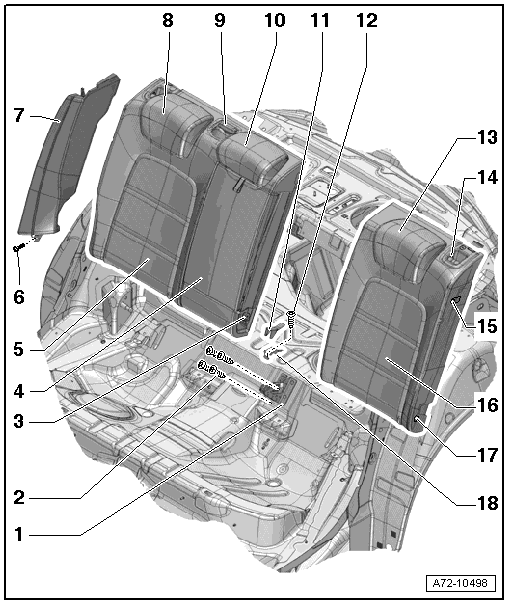
1 - Center Support
- Removing and installing. Refer to → Chapter "Mount/Sleeve/Pins, Removing and Installing, Rear Seat Backrest".
2 - Screws
- 20 Nm
- Quantity: 4
3 - Inner Mounting Pin
- 13.5 Nm
- For the rear seat backrest
- Quantity: 2
- Removing and installing. Refer to → Chapter "Mount/Sleeve/Pins, Removing and Installing, Rear Seat Backrest".
4 - Rear Center Armrest
Vehicles with:
- With pass-through door
- With storage compartment
- Overview. Refer to → Chapter "Overview - Center Armrest".
5 - Right 2/3 Rear Seat Backrest
Vehicles with:
- Backrest release - only Avant
- Backrest heater
- Pass-through
- Removing and installing. Refer to → Chapter "Divided Rear Seat Backrest, Removing and Installing".
6 - Bolt
- 3 Nm
- For the correct tightening specification for vehicles with side airbags. Refer to → Chapter "Overview - Rear Side Airbag".
7 - Side Cushion
Vehicles with:
- Rear side airbag
- Removing and installing. Refer to → Chapter "Side Cushion, Removing and Installing".
- Engage in the seat belt guide at the top first
8 - Right Head Restraint
- Removing and installing. Refer to → Chapter "Headrest, Removing and Installing, Standard/Sport Seat".
9 - Rear Center Belt Guide
- Only with 3-person rear seat
- Replace the entire belt guide if damaged.
- Removing and installing. Refer to → Chapter "Rear Seat Belt Guide in Rear Seat Backrest, Removing and Installing".
10 - Headrest in the Center
- Only with 3-person rear seat
- Removing and installing. Refer to → Chapter "Headrest, Removing and Installing, Standard/Sport Seat".
11 - Cover
- For The center bracket
- Press on until it engages audibly
12 - Bolt
- 9 Nm
13 - Left Head Restraint
- Removing and installing. Refer to → Chapter "Headrest, Removing and Installing, Standard/Sport Seat".
14 - Trim
- For locking with locking cylinder
- Removing and installing. Refer to → Chapter "Locking Mechanism Trim, Removing and Installing".
- Press on until it engages audibly
15 - Locking Mechanism
- For the rear seat backrest
- Quantity: 2
- Removing and installing. Refer to → Chapter "Rear Seat Backrest Locking Mechanism, Removing and Installing".
16 - Left 1/3 Rear Seat Backrest
Vehicles with:
- Backrest release - only Avant
- Backrest heater
- Removing and installing. Refer to → Chapter "Divided Rear Seat Backrest, Removing and Installing".
17 - Outer Bearing Sleeve
- Quantity: 2
- Removing and installing. Refer to → Chapter "Mount/Sleeve/Pins, Removing and Installing, Rear Seat Backrest".
- Press on until it engages audibly
18 - Securing Bracket
- For the center bracket
- Removing and installing. Refer to → Chapter "Divided Rear Seat Backrest, Removing and Installing".
Fixed Rear Seat Backrest
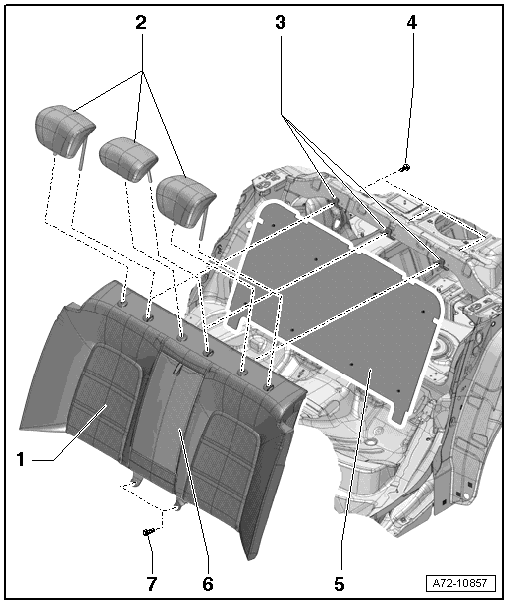
1 - Fixed Rear Seat Backrest
- Removing and installing. Refer to → Chapter "Rear Seat Backrest, Fixed, Removing and Installing".
2 - Head Restraint
- Removing and installing. Refer to → Chapter "Headrest, Removing and Installing, Standard/Sport Seat".
3 - Mounts
- mounted to the body with rivets
4 - Bolt
- 30 Nm
- Quantity: 3
5 - Rear Panel Trim
- Removing and installing. Refer to → Chapter "Luggage Compartment Rear Trim Panel, Removing and Installing".
6 - Rear Center Armrest
- Overview. Refer to → Chapter "Overview - Center Armrest, Fixed Rear Seat Backrest".
7 - Bolt
- 33 Nm
- Quantity: 2
Overview - Rear Seat Backrest, Super Sport Seat
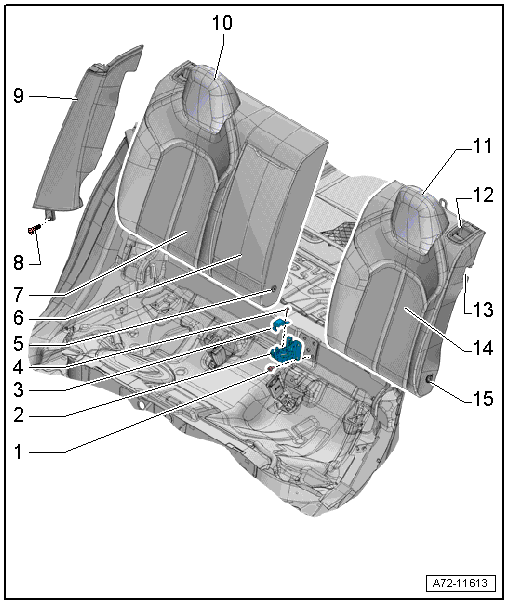
1 - Screws
- 20 Nm
- Quantity: 4
2 - Center Support
- Removing and installing. Refer to → Chapter "Mount/Sleeve/Pins, Removing and Installing, Rear Seat Backrest".
3 - Securing Bracket
- For the center bracket
- Removing and installing. Refer to → Chapter "Divided Rear Seat Backrest, Removing and Installing".
4 - Bolt
- 9 Nm
5 - Inner Mounting Pin
- 13.5 Nm
- For the rear seat backrest
- Quantity: 2
- Removing and installing. Refer to → Chapter "Mount/Sleeve/Pins, Removing and Installing, Rear Seat Backrest".
6 - Rear Center Armrest
Vehicles with:
- With pass-through door
- With storage compartment
- Overview. Refer to → Chapter "Overview - Center Armrest".
7 - Right 2/3 Rear Seat Backrest
Vehicles with:
- Backrest heater
- Pass-through
- Removing and installing. Refer to → Chapter "Divided Rear Seat Backrest, Removing and Installing".
8 - Bolt
- 3 Nm
- For the correct tightening specification for vehicles with side airbags. Refer to → Chapter "Overview - Rear Side Airbag".
9 - Side Cushion
Vehicles with:
- Rear side airbag
- Removing and installing. Refer to → Chapter "Side Cushion, Removing and Installing".
- Engage in the seat belt guide at the top first
10 - Right Head Restraint
- Removing and installing. Refer to → Chapter "Headrest, Removing and Installing, Super Sport Seat".
11 - Left Head Restraint
- Removing and installing. Refer to → Chapter "Headrest, Removing and Installing, Super Sport Seat".
12 - Trim
- for locking
- Removing and installing. Refer to → Chapter "Locking Mechanism Trim, Removing and Installing".
- Press on until it engages audibly
13 - Locking Mechanism
- For the rear seat backrest
- Removing and installing. Refer to → Chapter "Rear Seat Backrest Locking Mechanism, Removing and Installing".
14 - Left 1/3 Rear Seat Backrest
- Removing and installing. Refer to → Chapter "Divided Rear Seat Backrest, Removing and Installing".
15 - Outer Bearing Sleeve
- Quantity: 2
- Removing and installing. Refer to → Chapter "Mount/Sleeve/Pins, Removing and Installing, Rear Seat Backrest".
- Press on until it engages audibly
Overview - Rear Seat Backrest, Multi-contour Seat
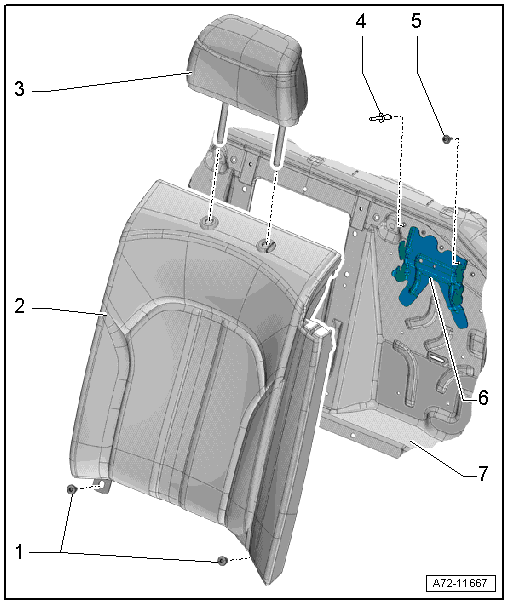
1 - Bolt
- 45 Nm
2 - Multi-contour Seat
- Removing and installing. Refer to → Chapter "Rear Seat Backrest, Removing and Installing, Multi-contour Seat".
3 - Headrest
- Removing and installing. Refer to → Chapter "Headrest, Removing and Installing, Multi-contour Seat".
4 - Rivet
- Quantity 20
- Rivet using the Pop Rivet Pliers -VAG1753B-
5 - Bolt
- 8 Nm
- Quantity: 2
6 - Retaining Bracket
- for the rear seat backrest
- Welded to the rear panel
7 - Rear Bulkhead
- Removing and installing. Refer to → Chapter "Rear Seat Backrest Rear Panel/Mount, Removing and Installing, Multi-contour Seat".

