Audi A6 Typ 4G: Overview - Sill Panel Trim
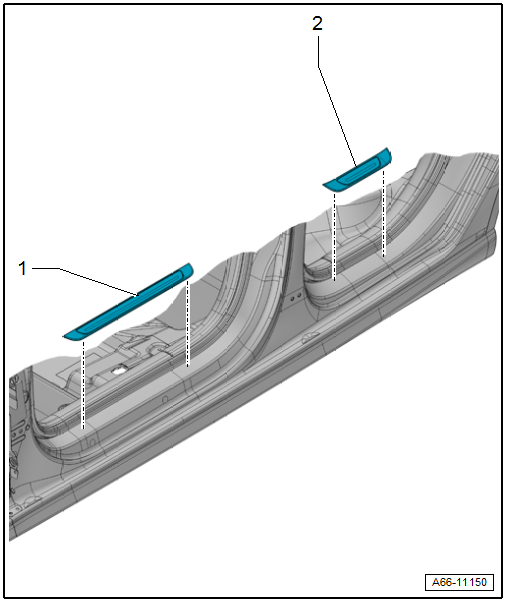
1 - Front Sill Panel Strip
- There are different versions. Refer to the Parts Catalog.
- Removing and installing. Refer to → Chapter "Sill Panel Trim, Removing and Installing".
2 - Rear Sill Panel Strip
- There are different versions. Refer to the Parts Catalog.
- Removing and installing. Refer to → Chapter "Sill Panel Trim, Removing and Installing".
Overview - Sill Panel Trim
Overview - Sill Panel Trim
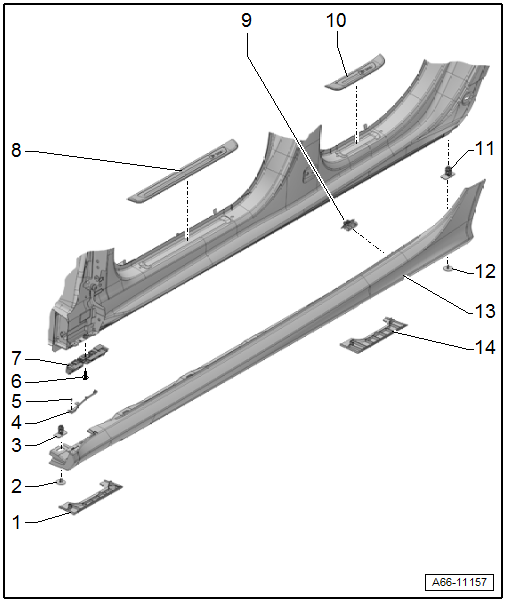
1 - Front Cover
- For vehicle lift point
2 - Quick Release
- Quantity: 7
3 - Front Mount
- For the quick release
- Quantity: 3
- Removing and installing. Refer to → Chapter "Front and Rear Quick Release Mount, Removing and Installing".
4 - Trim
- For the sill panel trim
- Removing and installing. Refer to → Chapter "Trim Piece for Sill Panel Trim, Removing and Installing".
5 - Expanding Clip
- Quantity: 4
6 - Bolt
- 8 Nm
7 - Front Bracket
- For the sill panel trim
- Removing and installing. Refer to → Chapter "Front Bracket for Sill Panel Trim, Removing and Installing".
8 - Front Sill Panel Strip
9 - Rear Bracket
- For the sill panel trim
- Quantity: 9
- Removing and installing. Refer to → Chapter "Rear Bracket for Sill Panel Trim, Removing and Installing".
10 - Rear Sill Panel Strip
11 - Rear Mount
- For the quick release
- Quantity: 4
- Removing and installing. Refer to → Chapter "Front and Rear Quick Release Mount, Removing and Installing".
12 - Quick Release
13 - Sill Panel Trim
- Removing and installing. Refer to → Chapter "Sill Panel Trim, Removing and Installing".
14 - Rear Cover
- For vehicle lift point
Overview - Sill Panel Trim, allroad
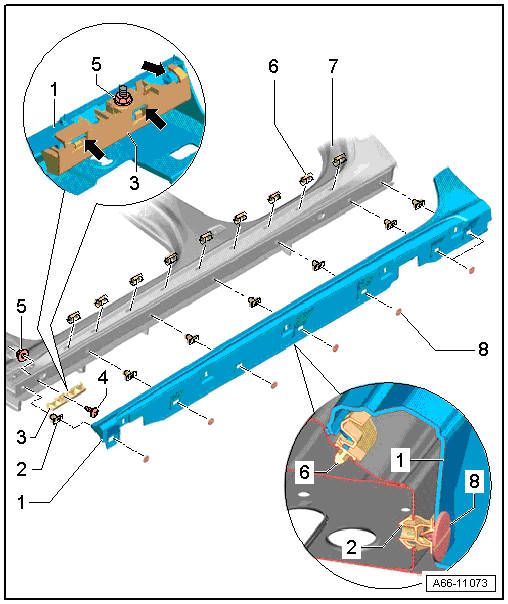
1 - Sill Panel Trim
- Removing
- Turn the twist locks 90º and remove.
- Pull the sill panel trim at the bottom of the A-pillar out of the bracket.
- Warm the sill panel trim at the C-pillar with a hot air gun and carefully loosen the two-side tape.
- Unclip the sill panel trim one clip after the other and remove it.
- Installing
- Remove the chafe protection and the two-sided tape when installing, if necessary.
- Clean the area where the two-side tape is going to be used with Cleaning Solution -D 009 401 04-.
- Position the rear sill panel trim using the centering pin and then push it into the bracket.
- Push the sill panel trim into the sill panel clips -6- starting from the rear and working forward.
- Install the twist locks -8-.
- Press the adhesive surface for the two-side tape using the Roller -3356-.
2 - Clip
- Install in the sill panel.
3 - Bracket
4 - Fitting Bolt
- 8 Nm
5 - Nut
6 - Clip
- Replace any clips that get damaged while removing.
- Install on the sill panel trim as illustrated.
7 - Sill Panel
8 - Twist Lock
- Turn 90º and remove.
- Press in to install.
Overview - Sill Panel Trim, Sill Panel, allroad
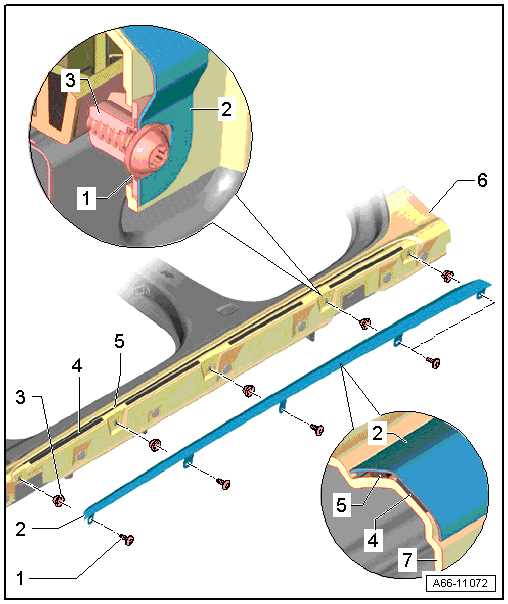
1 - Bolt
- 2.5 Nm
2 - Sill Panel Trim
 Note
Note
It is not possible to remove the sill panel trim without damaging it. It must be replaced.
- Removing
- Remove the screws and then warm the surfaces on the sill panel strip where the adhesive is with a hot air gun.
- Remove the sill panel strip.
- Remove any remaining adhesive on the sill panel trim completely.
- Installing
- Clean the adhesive surfaces using Cleaning Solution -D 009 401 04-.
- Remove the peel-off backing from the tape.
- Insert the sill panel strip into the opening and then push on it.
- Press the sill panel strip using Roller -3356-.
- Tighten bolts to tightening specification.
3 - Grommet
4 - Upper Tape
- For the sill panel strip
5 - Lower Tap
- For the sill panel strip
6 - Sill Panel Trim
