Audi A6 Owners & Service Manuals
Audi A6 Typ 4G (2011–2018) Workshop Manual / Body / Body Exterior / Exterior Equipment / Overview - B-Pillar Trim

Audi A6 Typ 4G: Overview - B-Pillar Trim

Overview - Front Door Window Shaft Strip and B-Pillar Trim
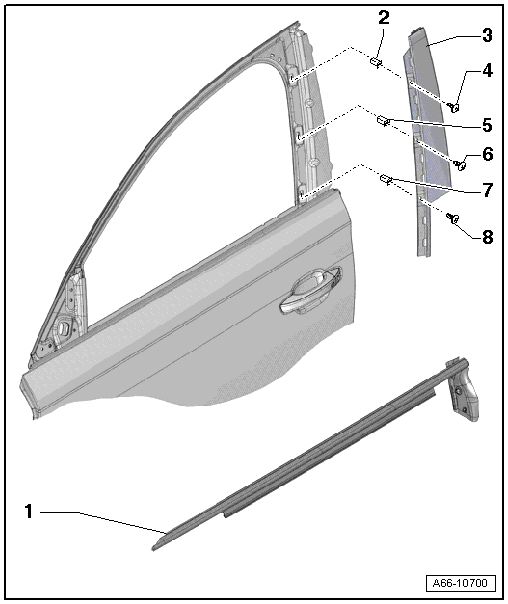
Overview - Front Door Window Shaft Strip and B-Pillar Trim

1 - Window Shaft Strip

  • Overview. Refer to → Chapter "Overview - Window Guides and Window Shaft Strips".

2 - Clip Nut

3 - B-Pillar Trim

  • Removing and installing. Refer to → Chapter "B-Pillar Door Trim, Removing and Installing, Front Door".

4 - Bolt

  • 2.5 Nm

5 - Clip Nut

6 - Bolt

  • 2.5 Nm

7 - Clip Nut

8 - Bolt

  • 2.5 Nm

Overview - Rear Door Window Shaft Strip, B-Pillar Trim
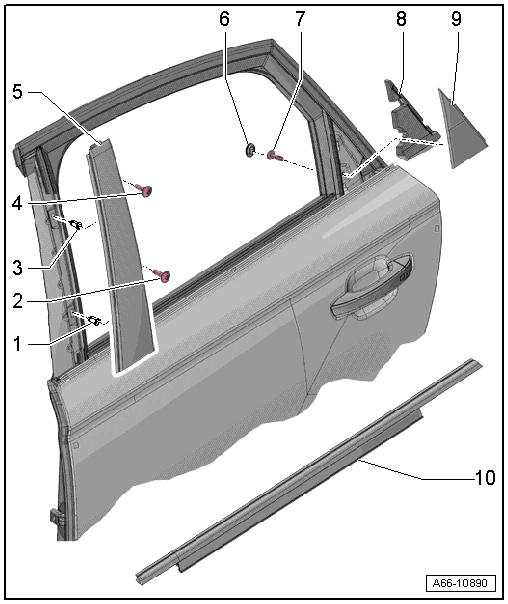
Overview - Rear Door Window Shaft Strip, B-Pillar Trim

1 - Clip nut

2 - Bolt

  • 2.5 Nm

3 - Clip Nut

4 - Bolt

  • 2.5 Nm

5 - B-Pillar Trim

  • Removing and installing. Refer to → Chapter "B-Pillar Door Trim, Removing and Installing, Rear Door".

6 - Grommet

7 - Bolt

8 - Seal

  • For the C-pillar triangular trim

9 - C-Pillar Triangular Trim

10 - Window Shaft Strip

  • Overview. Refer to → Chapter "Overview - Window Guides and Window Shaft Strips".

Overview - C-Pillar Trim

Overview - C-Pillar Trim

1 - Clip Nut

2 - Bolt

3 - Clip Nut

4 - Bolt

5 - B-Pillar Trim

6 - Grommet

7 - Bolt

  • 2.5 Nm

8 - Seal

  • For the C-pillar triangular trim

9 - C-Pillar Triangular Trim

  • Removing and installing. Refer to → Chapter "C-Pillar Door Trim, Removing and Installing".

10 - Window Shaft Strip

  • Overview. Refer to → Chapter "Overview - Window Guides and Window Shaft Strips".

    READ NEXT:

     Overview - Wheel Covers

    Overview - Front Wheel Covers 1 - Wheel Cover Removing and installing. Refer to → Chapter "Fender Molding, Replacing". 2 - Fender 3 - Adhesive Tape 4 -&

     Trim Molding, Removing and Installing

    Roof Trim Molding, Removing and Installing Special tools and workshop equipment required Trim Removal Wedge -3409- Removing   Note Do not bend the roof trim molding. Tape around the roof

     Sill Panel Trim, Removing and Installing

    Special tools and workshop equipment required Trim Removal Wedge -3409- Wiring Harness Repair Set - Hot Air Blower -VAS 1978/14A- Cleaning Solution -D 009 401 04- Removing Vehicles with Fiber Op

    SEE MORE:

     Headlamp, Adjusting

    Headlamp, Adjusting The following test and adjustment description applies to all countries. However, national guidelines or regulations of the country should be observed. LED Headlamp, Adjusting, all Vehicles from MY 2015 Checking and Adjusting Conditions Tire pressure is OK. The headlamp l

     Center Storage Compartment, Removing and Installing

    Bench Seat Center Storage Compartment, Removing and Installing Removing - Remove the rear bench seat. Refer to → Chapter "Seat Bench/Single Seat, Removing and Installing". - Remove the bolts -2-. - Unclip the center support -1- from the seat frame -arrows-. - Remove the

    © 2011-2025 Copyright www.aa6.tochrfr.com