Audi A6 Typ 4G: ATF Circuit
Overview - ATF Circuit
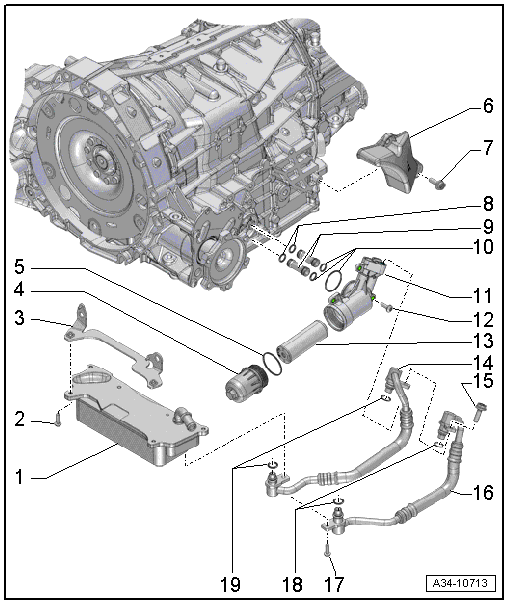
1 - ATF Cooler
2 - Bolt
- 9 Nm
3 - Bracket
- For the ATF cooler
4 - Cover
- 8 Nm
- For the replaceable ATF filter
- Different versions depending on the date of manufacture, pat attention to the correct allocation.
5 - O-Ring
- Replacing
- Coat with ATF before installing
6 - Cover
7 - Bolt
- 20 Nm
8 - O-Rings
- Are replaced together with the ATF pipe (-item 9-)
- Coat with ATF before installing
9 - ATF Pipes
- Replacing, refer to → Chapter "ATF Filter Housing, Removing and Installing".
10 - O-Rings
- Replacing
- Coat with ATF before installing
11 - For the Replaceable ATF Filter Housing
- Different versions depending on the date of manufacture, pat attention to the correct allocation.
12 - Bolt
- 10 Nm
13 - ATF Filter
14 - ATF Pipe/Hose Line
- Replacing, refer to → Chapter "ATF Pipes, Removing and Installing".
- Cleaning
15 - Bolt
- 20 Nm
16 - ATF Pipe/Hose Line
- Replacing, refer to → Chapter "ATF Pipes, Removing and Installing".
- Cleaning
17 - Bolt
- 8 Nm
18 - O-Rings
- Replacing
- Coat with ATF before installing
19 - O-Rings
- Replacing
- Coat with ATF before installing
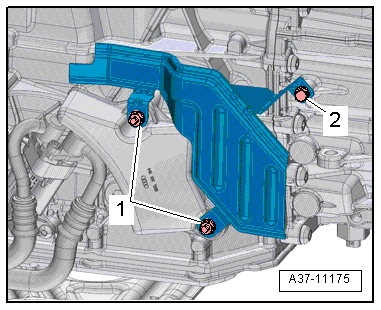
heat shield, tightening specifications
- Tighten the bolts -2- and nut -1- to 9 Nm.
ATF Cooler, Removing and Installing
Special tools and workshop equipment required
- Engine Bung Set -VAS6122-
- Used Oil Collection and Extraction Unit -SMN372500-
Removing
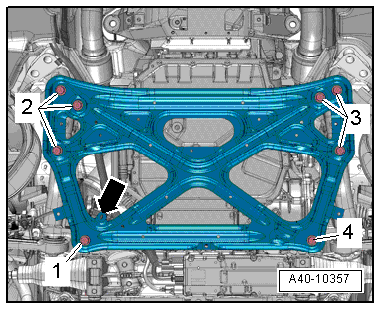
- Remove the subframe crossbrace, refer to → Suspension, Wheels, Steering; Rep. Gr.40; Subframe; Subframe Crossbrace, Removing and Installing.
 Caution
The suspension components could be damaged.
Do not rest the vehicle on its wheels if the subframe mount, the steering gear or the subframe crossbrace are not installed correctly.
- Drain the coolant, refer to → Rep. Gr.19; Cooling System/Coolant; Coolant, Draining and Filling.
- Place the Used Oil Collection and Extraction Unit -SMN372500- under the separating points.
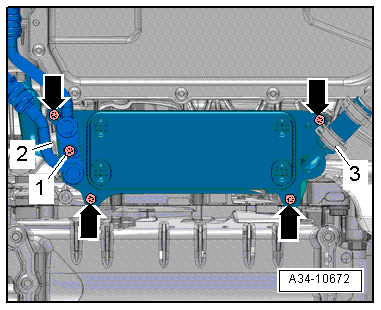
- Remove the bolt -1- and then remove the ATF pipe/hose lines from the ATF cooler.
- Seal the open lines and connections with clean plugs from the Engine Bung Set -VAS6122-.
- Remove the bolts -arrows-.
- Loosen the hose clamps -2, 3- to remove the coolant hoses and then remove the ATF cooler.
Installing
 Caution
Danger of leaks!
- Always replace the seals on the oil lines and the filter housing and coat with ATF.
- Ensure a clean sealing surface.
 Caution
Danger of causing damage to the transmission.
- When disassembling, remove all the plugs, which were taken from the Engine Bung Set -VAS6122-, and the ATF pipe/hose line and from the transmission.
- The ATF cooling function will not work and the transmission will be damaged if the plugs are forgotten.
Install in reverse order of removal. Note the following:
- Clean the sealing surfaces and replace the oil line seals.
- Fill the engine coolant, refer to → Rep. Gr.19; Cooling System/Coolant; Coolant, Draining and Filling.
Tightening Specifications
- Subframe crossbrace, refer to → Suspension, Wheels, Steering; Rep. Gr.40; Subframe; Overview - Subframe.
ATF Filter, Removing and Installing
Description of the procedure, refer to → S tronic Transmission Internal Components; Rep. Gr.34; Mechatronic.
ATF Filter, Removing and Installing
Special tools and workshop equipment required
- Engine Bung Set -VAS6122-
- Used Oil Collection and Extraction Unit -SMN372500-
Removing
 Note
Note
- Rules for cleanliness when working on the S tronic transmission, refer to → Chapter "Guidelines for Clean Working Conditions".
- Replace the ATF filter each time the ATF is changed.
- Before installing a replacement transmission, always clean out the ATF cooler and ATF pipe/hose line using compressed air (maximum 10 bar (145 psi) ).
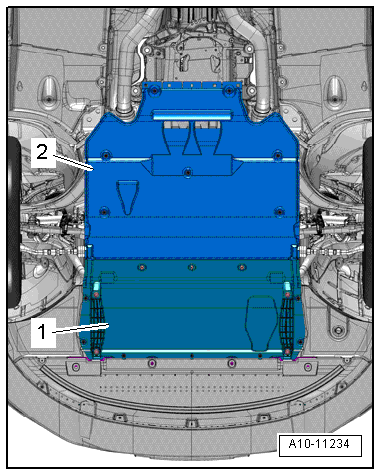
- Remove the rear noise insulation -2-, refer to → Body Exterior; Rep. Gr.66; Noise Insulation; Noise Insulation, Removing and Installing.
- Drain the ATF, refer to → Chapter "ATF, Draining and Filling".
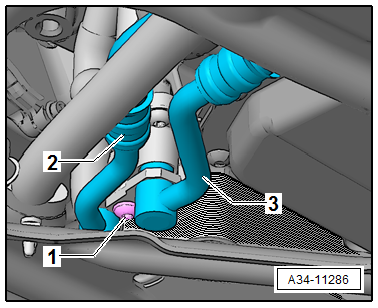
- Place the Used Oil Collection and Extraction Unit -SMN372500- under the oil lines -2- and -3-.
- Loosen bolt -1- and remove oil lines -2- and -3-, bleed the ATF.
- Seal the open lines and connections with clean plugs from the Engine Bung Set -VAS6122-.
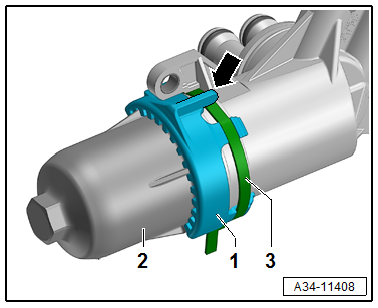
- If equipped loosen the securing strap -3- and remove the anti-twist mechanism -1-.
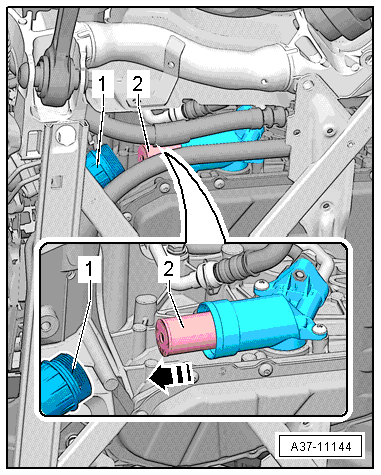
- Remove the cover for the ATF filter -1- and drain the ATF.
- Remove the ATF filter -2- in the direction of the -arrow- and remove from below.
Installing
 Caution
Danger of leaks!
- Always replace the seals on the oil lines and the filter housing and coat with ATF.
- Ensure a clean sealing surface.
Install in reverse order of removal. Note the following:
There are two different versions of ATF filter housing.
If the factory installed anti-twist mechanism -arrow- is not present, install an ATF-filter cover with upgradable anti-twist mechanism.
 Note
Note
The convertible anti-twist mechanism and its ATF-filter cover are available from approximately 06/2014, refer to the Parts Catalog.
 Caution
Leaking ATF filter.
Only use the assigned respective ATF-filter cover for the respective ATF filter housing/
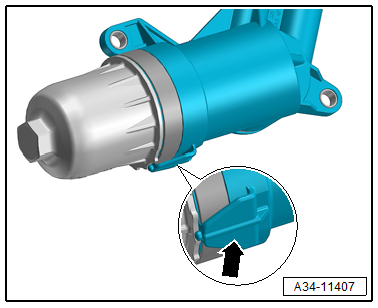
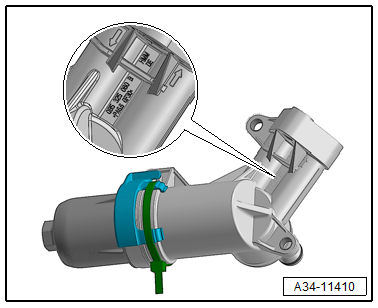
Allocation of the ATF-filter cover to the ATF filter housing:
 Note
Note
Position of the part number for the ATF filter housing.
.png)
 Note
Note
- Replace the o-ring on the ATF filter cover.
- Replace the ATF filter.
 Caution
Danger of causing damage to the transmission.
The new ATF filter must not come in contact with water. Even the smallest amount of water, such as a drip of water from the engine compartment or moisture from hands will cause the surface of the ATF filter to swell up. Small paper particles from the filter can come loose and contaminate the Mechatronic.
- Coat the o-ring -2- on the new ATF filter -1- with ATF before installing.
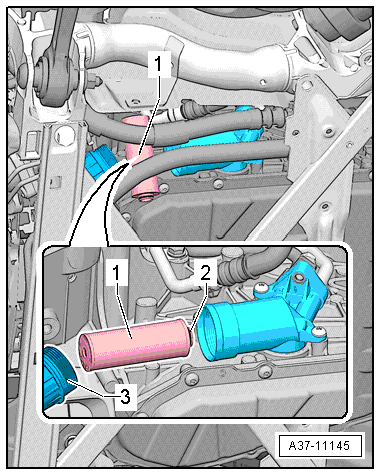
- Coat the o-ring -2- on the ATF filter cover -1- with ATF.
- Install the ATF filter cover -1- and tighten to tightening specifications.
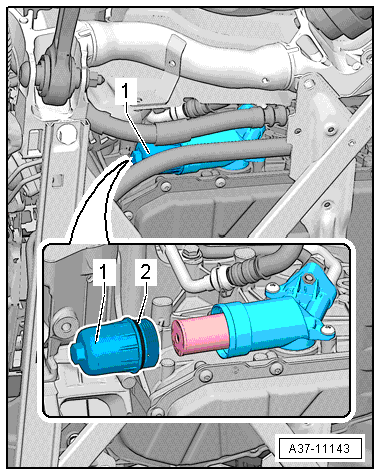
Vehicles without a factory installed anti-twist mechanism:
 Caution
Filter housing leak.
On filter housing without a factory installed anti-twist mechanism the filter cover must always be replaced with upgradable anti-twist mechanism -1-.
- Secure the anti-twist mechanism -1- on the ATF-filter cover -2- with the securing strap -3-.
 Note
Note
The anti-twist mechanism retaining tab -arrow- must touch the filter housing as shown.

All vehicles:
- Replace the seals for oil lines -2- and -3-.
- Install oil seals -2- and -3-, install and tighten bolt -1-.
 Caution
Danger of causing damage to the transmission.
- When disassembling, remove all the plugs, which were taken from the Engine Bung Set -VAS6122-, and the ATF pipe/hose line and from the transmission.
- The ATF cooling function will not work and the transmission will be damaged if the plugs are forgotten.
- Clean the transmission and subframe crossbrace.
- Fill the ATF, refer to → Chapter "ATF, Draining and Filling".

ATF Filter Housing, Removing and Installing
Special tools and workshop equipment required
- Engine Bung Set -VAS6122-
- Used Oil Collection and Extraction Unit -SMN372500-
Removing
 Note
Note
Rules for cleanliness when working on the S tronic transmission, refer to → Chapter "Guidelines for Clean Working Conditions".
- Remove the rear noise insulation -2-, refer to → Body Exterior; Rep. Gr.66; Noise Insulation; Noise Insulation, Removing and Installing.

- Remove the nuts -1- and the bolt -2- and then remove the heat shield.

- Remove the bolts -arrows- and then remove the side cover -1- from the transmission.
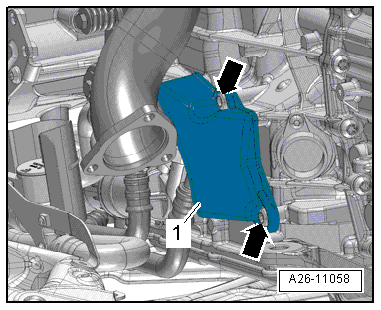
- Place the Used Oil Collection and Extraction Unit -SMN372500- under the separating points.
- Drain the ATF, refer to → Chapter "ATF, Draining and Filling".
- Remove the bolts -arrows- and remove the ATF hose lines.
- Seal the open lines and connections with clean plugs from the Engine Bung Set -VAS6122-.
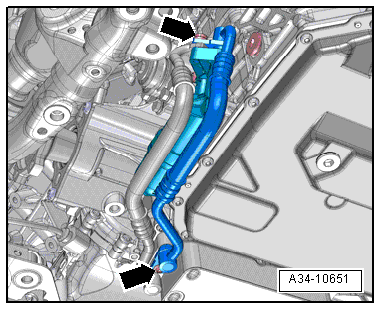
- Remove the bolts -arrows- and remove the filter housing.
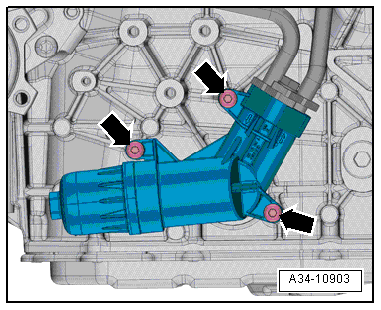
Installing
 Caution
Danger of leaks!
- Always replace the seals on the oil lines and the filter housing and coat with ATF.
- Ensure a clean sealing surface.
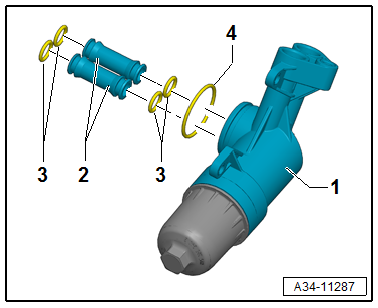
- Remove the ATF pipes -2- from the filer housing -1- and with new seals -3- press all the way to the stop.
- Replace seal -4-.
Install in reverse order of removal. Note the following:
- First insert the ATF pipe/hose lines into the filter housing and radiator by hand as far as the stop and then bolt them on.
- Fill the ATF, refer to → Chapter "ATF, Draining and Filling".
ATF Pipes, Removing and Installing
Special tools and workshop equipment required
- Engine Bung Set -VAS6122-
- Used Oil Collection and Extraction Unit -SMN372500-
- Hose diameter approximately 18 mm
- Compressed air gun, commercially available
- Protective eyewear
Removing
 Note
Note
Rules for cleanliness when working on the S tronic transmission, refer to → Chapter "Guidelines for Clean Working Conditions".
- Remove the rear noise insulation -2-, refer to → Body Exterior; Rep. Gr.66; Noise Insulation; Noise Insulation, Removing and Installing.

- Remove the nuts -1- and the bolt -2- and then remove the heat shield.

- Remove the bolts -arrows- and then remove the side cover -1- from the transmission.

- Place the Used Oil Collection and Extraction Unit -SMN372500- under the separating points.
- Remove the bolts -arrows- and then remove the ATF hose lines.
- Seal the open lines and connections with clean plugs from the Engine Bung Set -VAS6122-.
- Remove the ATF pipe/hose line.
Installing
Install in reverse order of removal. Note the following:
 Note
Note
Replace the O-rings.
 Caution
Danger of causing damage to the transmission.
- When disassembling, remove all the plugs, which were taken from the Engine Bung Set -VAS6122-, and the ATF pipe/hose line and from the transmission.
- The ATF cooling function will not work and the transmission will be damaged if the plugs are forgotten.
- First insert the ATF pipe/hose lines into the transmission and radiator by hand as far as the stop and then bolt them on.
- Check and adjust the ATF level after installing the transmission, refer to → Chapter "ATF Level, Checking".
Clean
 Note
Note
- Rules for cleanliness when working on the S tronic transmission, refer to → Chapter "Guidelines for Clean Working Conditions".
- Always clean the oil lines and oil cooler before installing a new transmission.
 WARNING
Danger of eye injury.
Wear protective eyewear.

- Place the Used Oil Collection and Extraction Unit -SMN372500- under the separating points.
- Remove the bolts -arrows- and then remove the ATF hose lines.
- Clean the ATF cooler and the ATF pipe/hose lines use compressed air (maximum 10 bar (145 psi) ).
- Install in reverse order of removal, refer to → Chapter "ATF Pipes, Removing and Installing"
 Note
Note
If extremely dirty ATF flows out when cleaning using compressed air, flush the ATF cooler and the ATF pipe/hose line using clean ATF.


