Audi A6 Typ 4G: Catch, Removing and Installing
Catch, Removing and Installing
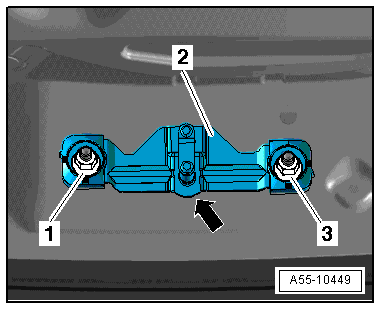
Removing
- Remove the lock carrier trim panel. Refer to → Body Interior; Rep. Gr.70; Luggage Compartment Trim Panels; Lock Carrier Trim Panel, Removing and Installing.
- Remove the nuts -1- and -3- and remove the striker pin -2-.
Installing
Install in reverse order of removal. Note the following:
- Insert the catch on the proper side.
- The round side -arrow- on the catch faces upward.
- Adjust the catch. Refer to → Chapter "Rear Lid, Adjusting, Vehicles with Fixed Striker Pin".
Tightening Specifications
- 23 Nm
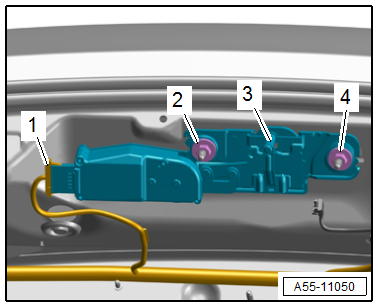
Striker Pin, Removing and Installing, Vehicles with Rear Lid Closing Assist Motor -V382-
Removing
- Remove the lock carrier trim panel. Refer to → Body Interior; Rep. Gr.70; Luggage Compartment Trim Panels; Lock Carrier Trim Panel, Removing and Installing.
- Remove nuts -2 and 4- and remove the Rear Lid Lock Unit -3-.
- Disconnect the connector -1-.
Installing
Install in reverse order of removal. Note the following:
 Note
Note
- The striker pin must only be installed in the "Closed rear lid" position.
- A new striker pin will always be in the "Closed rear lid" position.
- If the same striker pin is reinstalled, connect the connector to the Door Closing Assist Control Module, and when the rear lid is open, close the rotary latch in the rear lid latch with, for example, a screwdriver.
- Closing aid operates in "Closed rear lid" position = basic position.
- Disconnect the connector on the Door Closing Assist Control Module.
- Open the latch again via the Rear Lid Lock Cylinder Unlock Button.
- Adjust the catch. Refer to → Chapter "Rear Lid, Adjusting, Vehicles with Rear Lid Closing Assist Motor -V382-".
Tightening Specifications
- 23 Nm