Audi A6 Typ 4G (2011–2018) Workshop Manual / Electrical System / Communication / Radio / Component Location Overview - Radio
Audi A6 Typ 4G: Component Location Overview - Radio
RMC, 8DN, 8DP
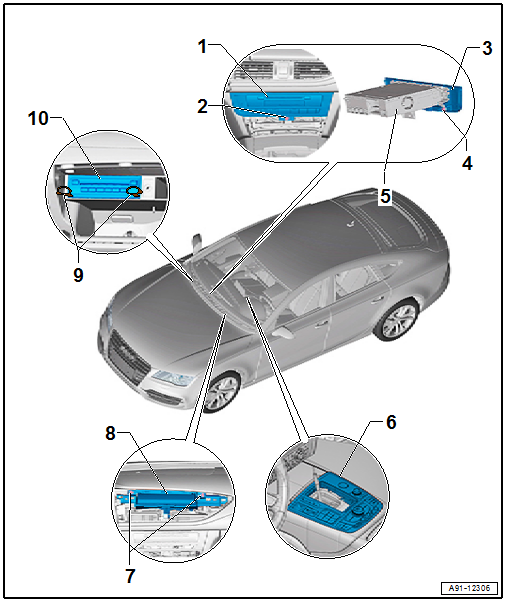
1 - Information Electronics Control Module 1 -J794-
- Radio RMC connector assignment. Refer to → Chapter "Connector Assignment, RMC and 8DN".
- Radio RMC plus connector assignment. Refer to → Chapter "RMC, 8DN, 8DP".
- Removing and installing. Refer to → Chapter "Information Electronics Control Module 1 -J794-, Removing and Installing".
2 - Bolt
- 3 Nm
3 - Trim
4 - Bolt
- 1 Nm
- Quantity: 4
5 - Information Electronics Control Module 1 -J794-
6 - Multimedia System Control Head -E380-
- Connector assignment. Refer to → Chapter "Multimedia System Control Head -E380- Connector Assignment".
- Removing and installing. Refer to → Chapter "Multimedia System Control Head -E380-, Removing and Installing, QW1".
7 - Bolt
- 3 Nm
- Quantity: 2
8 - Front Information Display Control Head -J685-
- Connector assignment. Refer to → Chapter "Front Information Display Control Head -J685- Connector Assignment".
- 6.5 inch display with kinematics, removing and installing. Refer to → Chapter "6.5 Inch Display with Kinematics, Removing and Installing".
- Front and rear cover, removing and installing. Refer to → Chapter "Front Display Front and Rear Cover, Removing and Installing".
9 - Radio Removal Tool -T10057-
10 - CD Changer -R41-
- Connector assignment. Refer to → Chapter "CD Changer -R41- Connector Assignment".
- Removing and installing. Refer to → Chapter "CD Changer, Removing and Installing".
MMI, 8YQ, I8H
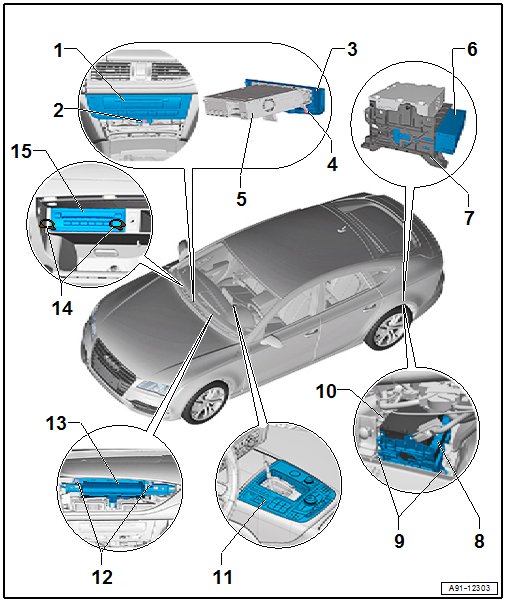
1 - Information Electronics Control Module 1 -J794-, I8H
- Connector assignment. Refer to → Chapter "Connector Assignment, MMI, I8H".
- Navigation plus Japan connector assignment. Refer to → Chapter "Navigation Plus Connector Assignment, 7T6, Japan".
- Removing and installing. Refer to → Chapter "Information Electronics Control Module 1 -J794-, Removing and Installing".
2 - Bolt
- 3 Nm
3 - Trim
4 - Bolt
- 1 Nm
- Quantity: 4
5 - Information Electronics Control Module 1 -J794-
6 - Radio -R-, 8YQ
- Connector assignment. Refer to → Chapter "Connector Assignment, MMI, 8YQ".
- Removing and installing. Refer to → Chapter "Radio -R-, Removing and Installing, MMI, 8YQ, through MY 2014".
7 - Rack
8 - Rack
9 - Nut
- 4 Nm
- Quantity: 2
10 - Nut
- 4 Nm
11 - Multimedia System Control Head -E380-
- Connector assignment. Refer to → Chapter "Multimedia System Control Head -E380- Connector Assignment".
- Removing and installing. Refer to → Chapter "Multimedia System Control Head -E380-, Removing and Installing, QW1".
- With Touchpad Control Module -J929-
- Replace with Touchpad Control Module - J929-. Refer to → Chapter "Touchpad Control Module -J929-, Removing and Installing, UJ1".
12 - Bolt
- 3 Nm
- Quantity: 2
13 - Front Information Display Control Head -J685-
- Connector assignment. Refer to → Chapter "Front Information Display Control Head -J685- Connector Assignment".
- 6.5 inch display with kinematics, removing and installing. Refer to → Chapter "6.5 Inch Display with Kinematics, Removing and Installing".
- 8 inch display with kinematics, removing and installing. Refer to → Chapter "8 Inch Display with Kinematics, Removing and Installing".
- Front and rear cover, removing and installing. Refer to → Chapter "Front Display Front and Rear Cover, Removing and Installing".
- Display service position. Refer to → Chapter "8-Inch Front Display Service Position ".
14 - Radio Removal Tool -T10057-
15 - DVD Changer -R161-/CD Changer -R41-
- DVD connector assignment. Refer to → Chapter "DVD Changer -R161- Connector Assignment, through MY 2014".
- DVD connector assignment, MY 2015. Refer to → Chapter "DVD Changer -R161- Connector Assignment, from MY 2015".
- CD connector assignment. Refer to → Chapter "CD Changer -R41- Connector Assignment".
- DVD, removing and installing. Refer to → Chapter "DVD Changer, Removing and Installing".
- CD, removing and installing. Refer to → Chapter "CD Changer, Removing and Installing"
