Audi A6 Typ 4G: Component Location Overview - Seat Belts and Attaching Points
 Note
Note
In the illustration, seat belts in a sedan model with a fixed backrest is shown.
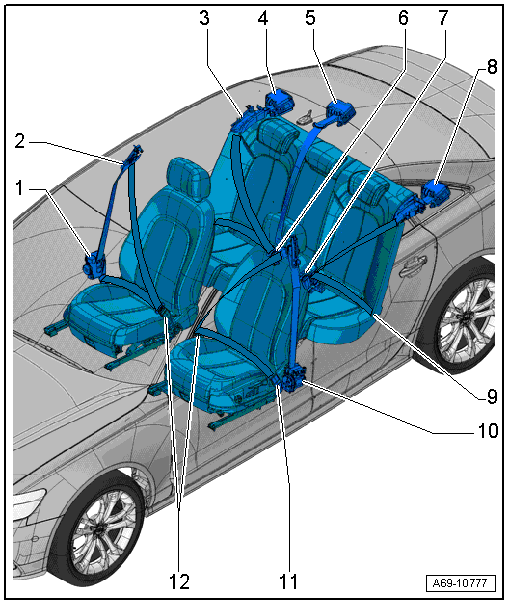
1 - Automatic Belt Retractor
- For the front three-point seat belt
- With Front Passenger Seat Belt Tensioner Igniter 1 -N154-, Right Front Seat Belt Tensioner Control Module -J855- and Front Passenger Belt Force Limiter -G552-
- Overview. Refer to → Chapter "Overview - Front Three-Point Seat Belt".
2 - Seat Belt Height Adjuster
- Overview. Refer to → Chapter "Overview - Front Three-Point Seat Belt".
3 - Rear Outside Belt Guide
- Removing and installing. Refer to → Chapter "Rear Seat Belt Guide, Removing and Installing".
4 - Automatic Belt Retractor
- For rear outer three-point seat belt
- Market-specific: with Passenger Side Rear Seat Belt Tensioner Igniter -N197-
- Overview. Refer to → Chapter "Overview - Rear Outer Three-Point Seat Belt".
5 - Automatic Belt Retractor
- For the rear three-point seat belt in the center
- Only with 3-person rear seat
- Market-specific: with Center Rear Seat Belt Tensioner Igniter -N198-
Vehicles with:
- For fixed backrest
- For folding backrest
- Overview. Refer to → Chapter "Overview - Rear Center Three-Point Seat Belt".
6 - Rear Belt Anchor in the Center with rear Belt Latch
- Only with 3-person rear seat
- Assembly Overview. Refer to → Chapter "Overview - Rear Center Three-Point Seat Belt", and → Chapter "Overview - Rear Seat Belt Latch".
7 - Rear Seat Belt Latch
- Overview. Refer to → Chapter "Overview - Rear Seat Belt Latch".
8 - Automatic Belt Retractor
- For rear outer three-point seat belt
- Market-specific: with Driver Side Rear Seat Belt Tensioner Igniter -N196-
- Overview. Refer to → Chapter "Overview - Rear Outer Three-Point Seat Belt".
9 - Outer Rear Belt End Fitting
- Overview. Refer to → Chapter "Overview - Rear Outer Three-Point Seat Belt".
10 - Automatic Belt Retractor
- For the front three-point seat belt
- With Driver Seat Belt Tensioner Igniter 1 -N153-, Left Front Seat Belt Tensioner Control Module -J854- and Driver Belt Force Limiter -G551-
- Overview. Refer to → Chapter "Overview - Front Three-Point Seat Belt".
11 - Front Belt End Fitting
- Overview. Refer to → Chapter "Overview - Front Three-Point Seat Belt".
12 - Front Seat Belt Latch
- Overview. Refer to → Chapter "Overview - Front Seat Belt Latch".
Overview - Front Three-Point Seat Belt

1 - Bolt
- 45 Nm
- If it was removed because of an accident, replace the bolt
2 - Automatic Belt Retractor
- Drivers side: with Driver Seat Belt Tensioner Igniter 1 -N153- and Driver Belt Force Limiter -G551-
- Front passenger side: with Front Passenger Seat Belt Tensioner Igniter 1 -N154- and Front Passenger Belt Force Limiter -G552-
- Vehicles without an electric seat belt tensioner
- Removing and installing. Refer to → Chapter "Front Three-Point Seat Belt, Removing and Installing".
3 - Bolt
- 5 Nm
- If it was removed because of an accident, replace the bolt
- Install with locking compound. For the correct locking compound. Refer to the Parts Catalog.
4 - Front Seat Belt Guide
- Removing and installing. Refer to → Chapter "Front Seat Belt Guide, Removing and Installing".
5 - Front Belt End Fitting
- Removing and installing. Refer to → Chapter "Front Belt End Fitting, Removing and Installing".
6 - Bolt
- 45 Nm
- If it was removed because of an accident, replace the bolt
7 - Seat Belt Height Adjuster
- Removing and installing. Refer to → Chapter "Seat Belt Height Adjuster, Removing and Installing".
- Always replaced if the belt tensioner has deployed with the belt on
8 - Bolt
- 27 Nm
- If it was removed because of an accident, replace the bolt
9 - Connector
- Driver side: for the Driver Belt Force Limiter -G551-
- Front passenger side: for Front Passenger Belt Force Limiter -G552-
- Vehicles without an electric seat belt tensioner
- For disconnecting and connecting. Refer to → Chapter "Front Three-Point Seat Belt, Removing and Installing".
10 - Connector
- Driver side: for Driver Seat Belt Tensioner Igniter 1 -N153-
- Front passenger side: for Front Passenger Seat Belt Tensioner Igniter 1 -N154-
- Vehicles without an electric seat belt tensioner
- For disconnecting and connecting. Refer to → Chapter "Front Three-Point Seat Belt, Removing and Installing".
11 - Connector
- Drivers side: for Driver Seat Belt Tensioner Igniter 1 -N153- and Driver Belt Force Limiter -G551-
- Front passenger side for Front Passenger Seat Belt Tensioner Igniter 1 -N154- and Front Passenger Belt Force Limiter -G552-
- Vehicles with an electric seat belt tensioner
- For disconnecting and connecting. Refer to → Chapter "Front Three-Point Seat Belt, Removing and Installing".
12 - Connector
- Driver side: for Left Front Seat Belt Tensioner Control Module -J854-
- For Right Front Seat Belt Tensioner Control Module -J855-
- Vehicles with an electric seat belt tensioner
- For disconnecting and connecting. Refer to → Chapter "Front Three-Point Seat Belt, Removing and Installing".
13 - Bolt
- 45 Nm
- If it was removed because of an accident, replace the bolt
14 - Automatic Belt Retractor
- Driver side: with Driver Seat Belt Tensioner Igniter 1 -N153-, Left Front Seat Belt Tensioner Control Module -J854- and Driver Belt Force Limiter -G551-
- Front passenger side: with Front Passenger Seat Belt Tensioner Igniter 1 -N154-, Right Front Seat Belt Tensioner Control Module -J855- and Front Passenger Belt Force Limiter -G552-
- Vehicles with an electric seat belt tensioner
- Removing and installing. Refer to → Chapter "Front Three-Point Seat Belt, Removing and Installing".
15 - Bolt
- 2 Nm
- Only for vehicles with an electric seat belt tensioner
Overview - Rear Outer Three-Point Seat Belt
Note
The illustration shows a three-point seat belt in a sedan.
1 - Bolts
- Do not change the bolt position when removing and installing the belt guide. It is set by the manufacturer.
2 - Belt Guide
- Removing and installing. Refer to → Chapter "Rear Seat Belt Guide, Removing and Installing".
3 - Nut
4 - Bolt
- 45 Nm
- If it was removed because of an accident, replace the bolt
5 - Automatic Belt Retractor
- Driver side: market-specific with Driver Side Rear Seat Belt Tensioner Igniter -N196-
- Front passenger side: market-specific with Passenger Side Rear Seat Belt Tensioner Igniter -N197-
- Removing and installing. Refer to → Chapter "Rear Three-Point Seat Belt, Removing and Installing".
6 - Noise Insulation
- For the automatic belt retractor
7 - Connector
- Driver side: for vehicles with Driver Side Rear Seat Belt Tensioner Igniter -N196-
- Front passenger side: for vehicles with Passenger Side Rear Seat Belt Tensioner Igniter -N197-
8 - Bolt
- 45 Nm
- If it was removed because of an accident, replace the bolt
9 - Rear Belt Anchor
- Removing and installing. Refer to → Chapter "Rear Outer Belt End Fitting, Removing and Installing".
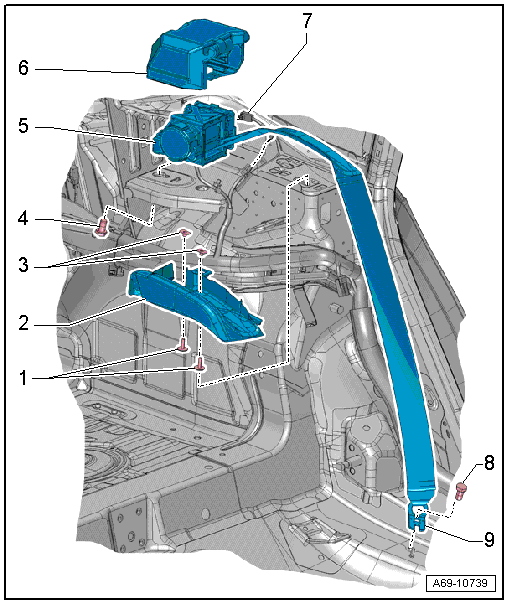
Overview - Rear Center Three-Point Seat Belt
Note
Both folding and fixed rear seat backrests are shown in the illustrations.
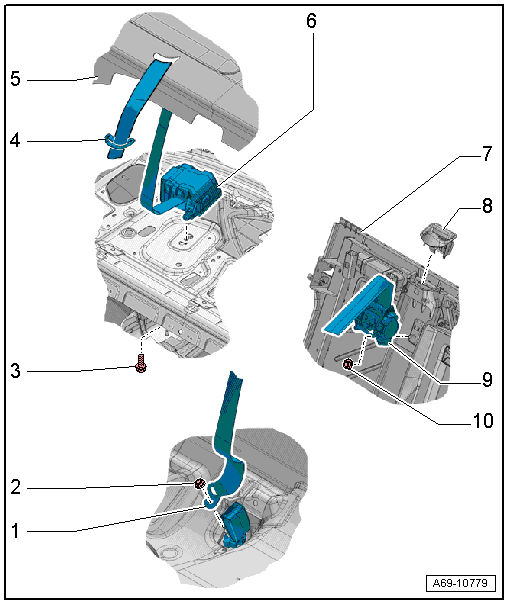
1 - Center Rear Belt End Fitting
- Removing and installing. Refer to → Chapter "Rear Seat Belt Latch, Removing and Installing".
2 - Nut
- Tightening specification. Refer to → Chapter "Overview - Rear Seat Belt Latch".
3 - Bolt
- 45 Nm
- If it was removed because of an accident, replace the bolt
4 - Rear Center Belt Guide
- For versions equipped with a fixed rear seat backrest
- Replace the entire belt guide if damaged.
- Removing and installing. Refer to → Chapter "Rear Seat Belt Guide, Removing and Installing".
5 - Rear Shelf
6 - Automatic Belt Retractor
- For versions equipped with a fixed rear seat backrest
- Market-specific: with Center Rear Seat Belt Tensioner Igniter -N198-
- Removing and installing. Refer to → Chapter "Rear Three Point Seat Belt in Rear Shelf, Removing and Installing".
7 - Right 2/3 Split Rear Seat Backrest
8 - Rear Center Belt Guide
- For vehicles equipped with a folding rear seat backrest
- Replace the entire belt guide if damaged.
- Removing and installing. Refer to → Chapter "Rear Seat Belt Guide, Removing and Installing".
9 - Automatic Belt Retractor
- For vehicles equipped with a folding rear seat backrest
- Market-specific: with Center Rear Seat Belt Tensioner Igniter -N198-
- Removing and installing. Refer to → Chapter "Rear Three Point Seat Belt in Rear Seat Backrest, Removing and Installing".
10 - Nut
- 45 Nm
- If it was removed because of an accident, replace the nut
