Audi A6 Typ 4G: Front Three-Point Seat Belt, Removing and Installing
Removing
 WARNING
- Follow all Safety Precautions when working with pyrotechnic components. Refer to → Chapter "Pyrotechnic Components Safety Precautions".
- Follow all regulations when disposing of pyrotechnic components. Refer to → Chapter "Airbag, Belt Tensioner and Battery Cut-Out Units, Storing, Transporting and Disposing".
- Disconnect the battery Ground (GND) cable with the ignition turned on. Refer to → Electrical Equipment; Rep. Gr.27; Battery; Battery, Disconnecting and Connecting.
- Remove the front belt end fitting. Refer to → Chapter "Front Belt End Fitting, Removing and Installing".
- Remove the upper trim from the B-pillar and guide the seat belt out. Refer to → Chapter "Upper B-Pillar Trim, Removing and Installing".
- Remove the lower B-pillar trim panel. Refer to → Chapter "Lower B-Pillar Trim Panel, Removing and Installing".
- Remove the B-pillar air guide. Refer to → Heating, Ventilation and Air Conditioning; Rep. Gr.87; Air Guide; Air Distribution Channels, Removing and Installing.
WARNING
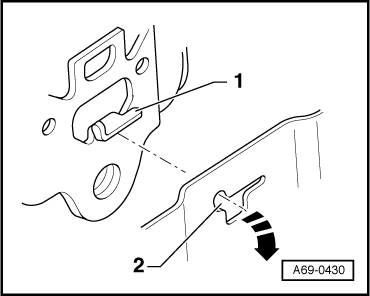
Before handling belt tensioner units (for example, disconnecting electrical connector), the person handling it must "discharge static electricity". This can be done by touching the door striker, for example.
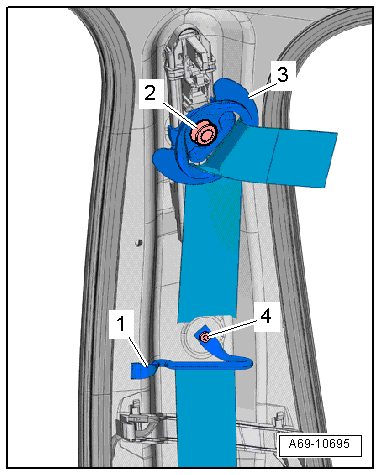
- Remove bolt -4- and front belt guide -1-.
- Remove bolt -2- for the seat belt pulley -3-.
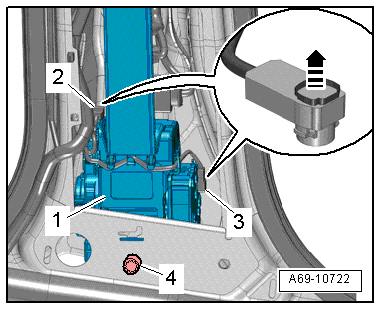
Vehicles without An Electric Seat Belt Tensioner
- Unlock the connector lock with a small screwdriver -arrow- and disconnect the connectors from the seat belt force limiter -2- and from seat belt igniter 1 -3-.
- Disconnect and free up the wire on the belt tensioner.
- Remove the bolt -4- and the automatic belt retractor -1- from the mount.
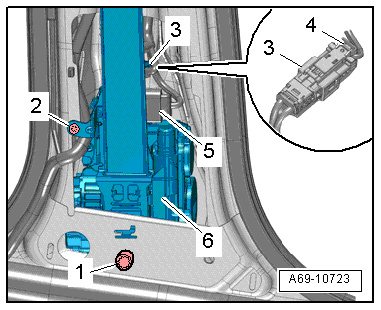
Vehicles with An Electric Seat Belt Tensioner
- Disconnect the connector -5- from the seat belt tensioner control module.
- Pull the connector lock -4- out and push it down, then disconnect the connector -3- from the seat belt igniter and seat belt force limiter.
- Remove the bolts -1 and 2- and then remove the automatic belt retractor -6- from the mount.
Installing
WARNING
- Follow all Safety Precautions when working with pyrotechnic components. Refer to → Chapter "Pyrotechnic Components Safety Precautions".
- Before handling pyrotechnic components (for example, connecting the connector), the person handling it must "discharge static electricity". This can be done by touching the door striker, for example.
Install in reverse order of removal. Note the following:
- If parts of the seat belt system are removed due to an accident, replace the belt system bolts.
 Note
Note
Make sure the connectors are installed correctly and are secure.
- Insert the automatic belt retractor with the anti-twist mechanism -1- in the mount -2- in direction of -arrow- and tighten the bolt.
WARNING
Ignition must be on when connecting battery. If pyrotechnic components (for example, airbag, belt tensioner) are not repaired correctly, they may deploy unintentionally after connecting battery. There must not be anyone inside the vehicle when connecting the battery.
DANGER!
When working on vehicles with the ignition already switched on or that are ready to drive there is a danger of the engine starting unexpectedly and of being poisoned by gas in enclosed areas. Risk of body parts and/or clothing being clamped or pulled.
Perform the following before switching on the ignition:
- Move the selector lever into P.
- Activate the parking brake
- Turn off the ignition.
- Open the hood
- Connect the charger, such as the Battery Charger -VAS5095A- to the jump start of the 12V vehicle electrical system.
- Turn on the ignition.
- Connect the battery Ground (GND) cable with the ignition turned on. Refer to → Electrical Equipment; Rep. Gr.27; Battery; Battery, Disconnecting and Connecting.
- After replacing the front three-point seat belt with the Driver Seat Belt Tensioner Igniter 1 -N153-/Driver Belt Force Limiter -G551-/Left Front Seat Belt Tensioner Control Module -J854-/Front Passenger Seat Belt Tensioner Igniter 1 -N154-/Front Passenger Belt Force Limiter -G552-/Right Front Seat Belt Tensioner Control Module -J855-, it must be coded using the Vehicle Diagnostic Tester.
- After installing the three-point seat belt on the front passenger side, check the child seat anchorage function (depending on the country) of the belt. Refer to → Chapter "Seat Belt for Child Seat, Checking Child Seat Restraint Function, Market-Specific".
Installation notes, for example tightening specifications, replacing components. Refer to → Chapter "Overview - Front Three-Point Seat Belt".