Audi A6 Typ 4G: Door Handle, Removing and Installing
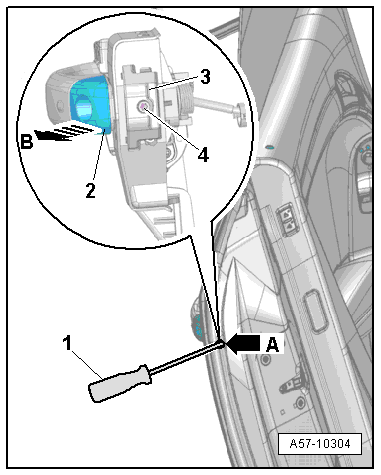
Lock Cylinder, Removing and Installing
Removing
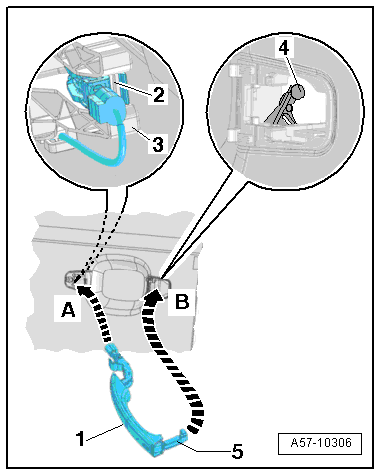
- Press the door outer seal to the side and remove the cover over the hole -arrow A-.
- Remove the locking bolt -4- as far as the stop using a screwdriver -1-.
- Press the lock cylinder retaining bracket -3- inward.
- Remove the lock cylinder -2- from the mounting bracket -arrow B-.
 Note
Note
If the lock cylinder cannot be pressed out, slide the key into it and remove it with the key turned slightly.
Installing
Install in reverse order of removal. Note the following:
- Slide the lock cylinder into the mounting bracket and then check if the door lock closing and opening position is activated.
Lock Cylinder Cap, Removing and Installing
Removing
- Remove the lock cylinder. Refer to → Chapter "Lock Cylinder, Removing and Installing".
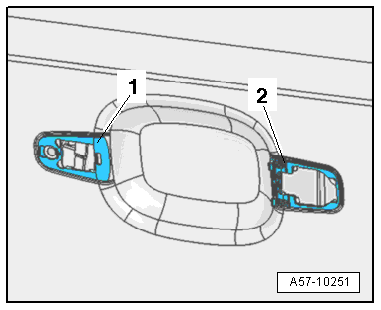
- Expand the clips -arrows- and remove the cap -2- from the lock cylinder -1- using a screwdriver if necessary.
Installing
Install in reverse order of removal. Note the following:
 Caution
The magnet must be pushed into the cap if the vehicle has a "keyless access authorization system".
- Press the lock cylinder cover cap on until it engages audibly.

Exterior Door Handle, Removing and Installing
Removing
- Remove the lock cylinder. Refer to → Chapter "Lock Cylinder, Removing and Installing".
- Pull the exterior door handle -1- in the direction of the -arrow-. This disengages the handle from the operating lever in the mounting bracket.
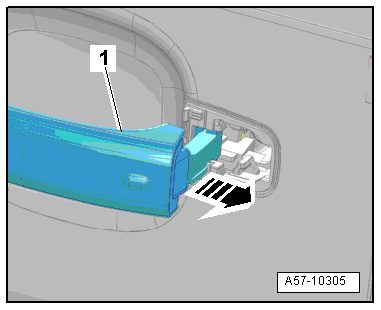
- Tilt the exterior door handle -1- outward -arrow- and remove it from the mount on the mounting bracket.
- In vehicles with the "keyless entry system", disconnect the connector -2- from the exterior door handle.
Installing
Install in reverse order of removal. Note the following:
- Replace the exterior door handle washers -1- and -2- if damaged or brittle.
- Insert the exterior door handle -1--arrow A-. It must engage in the mount -2- on the mounting bracket -3-.
- Tilt the exterior door handle -1- in the direction of -arrow B- and slide the "coupling plate"-5- into the mounting bracket in front of the operating lever -4-.
- Press lock cylinder retaining bracket onto the exterior door handle.
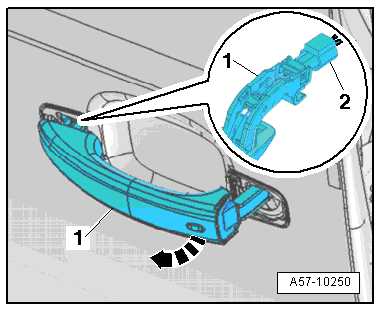
Exterior Door Handle Trim, Removing and Installing
In vehicles without "keyless entry", trim installed instead of the outer door handle touch sensor.
Removing
- Remove the outside door handle. Refer to → Chapter "Exterior Door Handle, Removing and Installing".
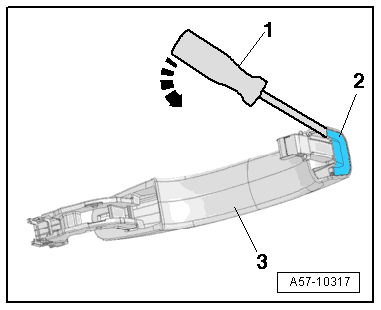
- Pry the exterior door handle trim -2- out using an awl -1- at the location shown in the illustration -arrow-.
- Remove the trim from the exterior door handle -3-.
Installing
Install in reverse order of removal. Note the following:
- Slide the exterior door handle trim in until it engages audibly.
Door Handle Trim Molding, Removing and Installing
Door Handle Trim Molding, Removing and Installing
Removing
- Remove the outside door handle. Refer to → Chapter "Exterior Door Handle, Removing and Installing".
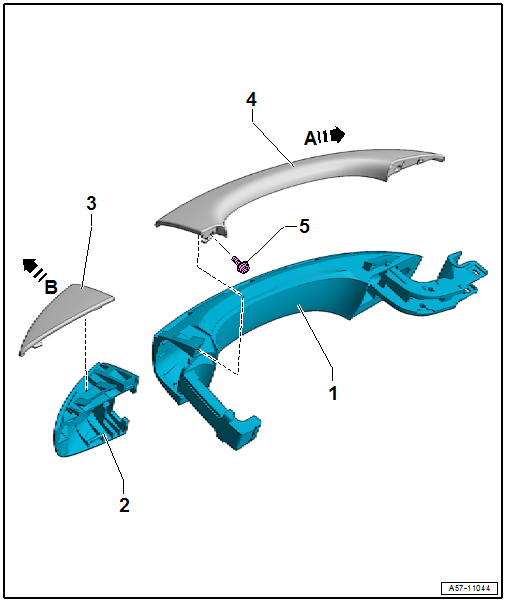
- Remove the bolt -5-.
- Remove the trim molding -4- from the door handle -1--arrow A-.
Installing
Install in reverse order of removal and note the following:
- Tighten the screw -5- 0.2 Nm.
- The bolt head must not project over the contact surface for the tread.
Cap Trim Molding, Removing and Installing
Removing
- Remove the cap. Refer to → Chapter "Lock Cylinder Cap, Removing and Installing".
- Remove the trim molding -3- from the cap -2--arrow B-.
Installing
Install in reverse order of removal.
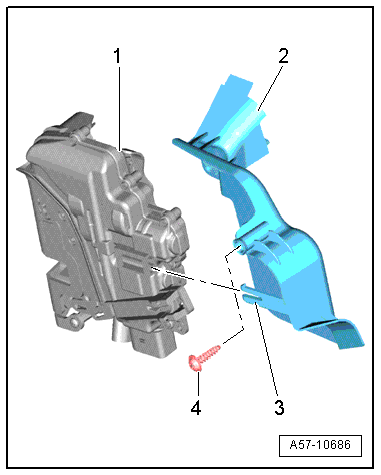
Lock Cylinder Guide, Removing and Installing
Removing
- Close the door window completely.
- Remove the lock cylinder. Refer to → Chapter "Lock Cylinder, Removing and Installing".
- Remove the door trim panel. Refer to → Body Interior; Rep. Gr.70; Front Door Trim Panels; Front Door Trim Panel, Removing and Installing.
- Remove the inner door panel cover. Refer to → Chapter "Door Inner Cover, Removing and Installing".
- Remove the screw -4- and then remove the guide -2- with the tab -3- from the door lock -1-.
Installing
Install in reverse order of removal. Note the following:
- Insert the tab -3- into the door lock. The hooks must lock completely.
- Tighten the bolt -4- to the tightening specification. Refer to -item 9-.