Audi A6 Typ 4G: Foot Rest, Removing and Installing
Special tools and workshop equipment required
- Trim Removal Wedge -3409-
Removing
- Remove the instrument panel cover on the driver side. Refer to → Chapter "Driver Side Instrument Panel Cover, Removing and Installing".
- Remove the front driver side sill panel trim. Refer to → Chapter "Front Sill Panel Strip, Removing and Installing".
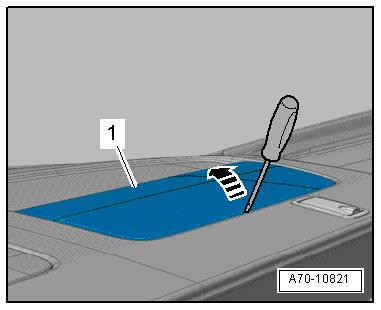
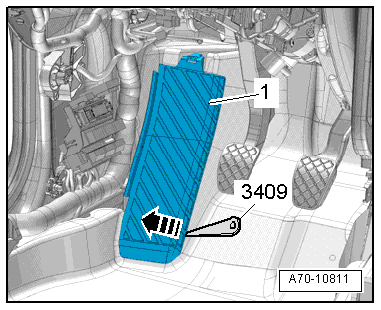
- Unclip the foot rest -1- using the Trim Removal Wedge -3409--arrow- and remove.
Installing
Install in reverse order of removal. Note the following:
Installation notes, for example tightening specifications, replacing components. Refer to → Chapter "Overview - Foot Rest and Carpet".
Carpet, Removing and Installing
Removing
- Remove the front seats. Refer to → Chapter "Front Seat, Removing and Installing".
- Remove the rear bench seat. Refer to → Chapter "Seat Bench/Single Seat, Removing and Installing".
- Remove the lower B-pillar trim panel. Refer to → Chapter "Lower B-Pillar Trim Panel, Removing and Installing".
- Remove the front sill panel strip. Refer to → Chapter "Front Sill Panel Strip, Removing and Installing".
- Remove the rear sill panel strip. Refer to → Chapter "Rear Sill Panel Strip, Removing and Installing".
- Remove the glove compartment. Refer to → Chapter "Glove Compartment, Removing and Installing".
- Remove the instrument panel cover on the driver side. Refer to → Chapter "Driver Side Instrument Panel Cover, Removing and Installing".
- Remove the center console. Refer to → Chapter "Center Console, Removing and Installing".
- Remove the front footwell cover. Refer to → Chapter "Front Footwell Cover, Removing and Installing".
- Remove the center console bracket and lower the shift mechanism. Refer to → Chapter "Center Console Bracket, Removing and Installing".
- Remove the rear air guide channel. Refer to → Heating, Ventilation and Air Conditioning; Rep. Gr.87; Air Guide; Air Distribution Channels, Removing and Installing.
- Remove the floor mat.
- Disengage the floor covering at brackets -1 and 2-.
- Pull the floor covering -3- back.
 Note
Note
Make sure the floor covering does not tear at the openings.
- Fold floor covering together and remove it through the rear door.
Installing
- Fold floor covering and lay it in the vehicle.
- Push floor covering forward and align it so that the openings align.
Installation is performed in reverse order of removal, noting the following:
Installation notes, for example tightening specifications, replacing components. Refer to → Chapter "Overview - Foot Rest and Carpet".

Rear Shelf, Removing and Installing
Special tools and workshop equipment required
- Pry Lever -80-200-
- Omega Clip Tool -T40280-
Removing
- Versions with foldable rear seat backrest: for the rear seat backrest forward.
- For vehicles with a fixed rear seat backrest: remove the rear seat backrest. Refer to → Chapter "Rear Seat Backrest, Removing and Installing".
- For vehicles with a Multi-contour seat: remove the Multi-contour seat. Refer to → Chapter "Rear Seat Backrest, Removing and Installing, Multi-contour Seat".
- Remove the rear center belt guide. Refer to → Chapter "Rear Seat Belt Guide, Removing and Installing".
- Remove the center rear belt end fitting. Refer to → Chapter "Rear Seat Belt Latch, Removing and Installing".
- Remove the D-pillar trim panel. Refer to → Chapter "D-Pillar Trim, Removing and Installing, Sedan".
Vehicles with A Sound System
- Remove the speaker trim on the left side on the rear shelf. Refer to → Chapter "Speaker Trim, Removing and Installing".
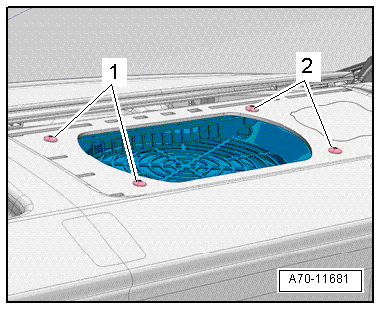
- Remove the bolts -1 and 2-.
- Remove the bolt -1- for the rear shelf in the luggage compartment.

Versions with a Sun Shade
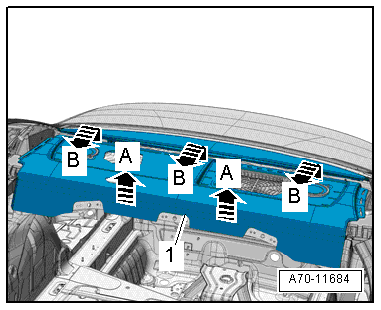
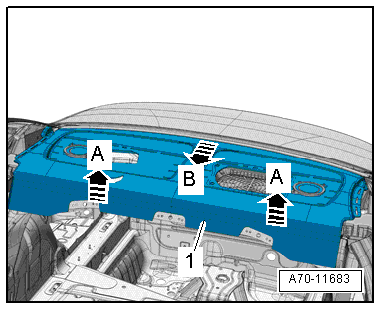
- Unclip the front rear shelf -1- using the Pry Lever -80-200- in direction of -A arrows-.
- Detach the rear shelf in the back of the sun shade in direction of -B arrows- and remove it by pulling it toward the front.
Vehicle Versions without Sun Shade
- Unclip the front rear shelf -1- using the Pry Lever -80-200- in direction of -A arrows-.
- Pull the rear shelf forward out of its mount in the rear window frame in direction of -arrow B- and remove.
Installing
Install in reverse order of removal. Note the following:
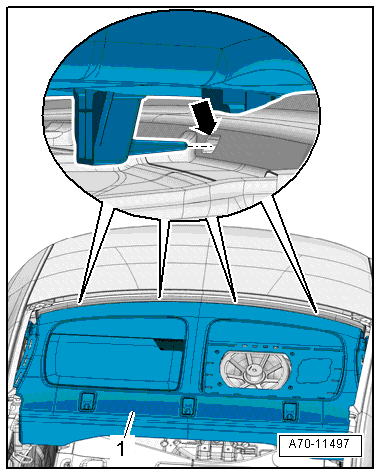
- Insert the rear shelf -1- into the rear window frame and tighten the screws.
- The pins on the rear shelf must catch on the holding mounts and remain in place -arrow- on the rear window frame.
Installation notes, for example tightening specifications, replacing components. Refer to → Chapter "Overview - Rear Shelf".
Speaker Trim, Removing and Installing
Note
Be extremely careful when removing and installing because it is easy to damage the speaker trim.
Special tools and workshop equipment required
- Wedge Set -T10383-
Removing
- Versions with foldable rear seat backrest: for the rear seat backrest forward.
- Use the wedge Wedge Set -T10383/1- or a screwdriver to carefully unclip front and sides of the speaker trim -1- along the seam for the rear shelf in direction of -arrow-.
- Vehicles equipped with a speaker: disconnect the electrical connector and remove the speaker trim in a forward direction.
Installing
Install in reverse order of removal. Note the following:
Installation notes, for example tightening specifications, replacing components. Refer to → Chapter "Overview - Rear Shelf".