Audi A6 Typ 4G: Head Curtain Airbags
Overview - Head Curtain Airbag
Overview - Head Curtain Airbag
 Note
Note
In the image, the head curtain airbag in the Sedan is illustrated.
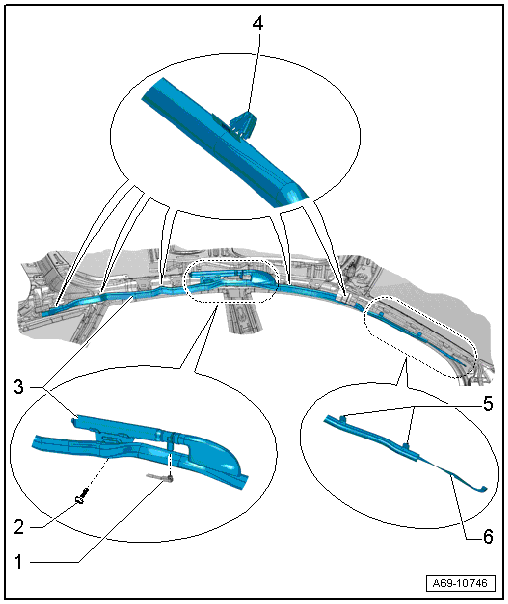
1 - Connector
- Driver side: for Driver Head Curtain Airbag Igniter -N251-
- Front passenger side: for the Front Passenger Head Curtain Airbag Igniter -N252-
- Disconnecting and connecting.
2 - Bolt
- 5 Nm
- Replace
3 - Head Curtain Airbag
- Driver side: with Driver Head Curtain Airbag Igniter -N251-
- Passenger side: with Front Passenger Head Curtain Airbag Igniter -N252-
 WARNING
Follow all Safety Precautions when working with pyrotechnic components. Refer to → Chapter "Pyrotechnic Components Safety Precautions".
- Removing and installing. Refer to → Chapter "Head Curtain Airbag with Igniter, Removing and Installing".
- Black line serves as anti-rotation protector
- Line must be visible after installation.
4 - Retaining Clip
- Quantity: 5
- Replace
5 - Retaining Clip
- Quantity: 2
- Assembly aid
6 - Strap
- Removing and installing.
Overview - Head Curtain Airbag, Market-Specific
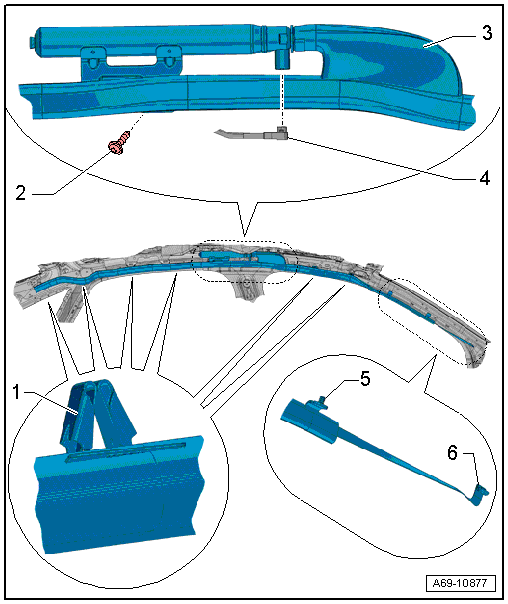
1 - Retaining Clip
- Quantity: 6
- Replace
2 - Bolt
- 5 Nm
- Replace
3 - Head Curtain Airbag
- Driver side: with Driver Head Curtain Airbag Igniter -N251-
- Passenger side: with Front Passenger Head Curtain Airbag Igniter -N252-
WARNING
Follow all Safety Precautions when working with pyrotechnic components. Refer to → Chapter "Pyrotechnic Components Safety Precautions".
- Removing and installing. Refer to → Chapter "Head Curtain Airbag with Igniter, Removing and Installing".
- Black line serves as anti-rotation protector
- Line must be visible after installation.
4 - Connector
- Driver side: for Driver Head Curtain Airbag Igniter -N251-
- Front passenger side: for the Front Passenger Head Curtain Airbag Igniter -N252-
- Disconnecting and connecting.
5 - Retaining Clip
- Quantity: 2
- Assembly aid
6 - Strap
- Removing and installing
Head Curtain Airbag with Igniter, Removing and Installing
Special tools and workshop equipment required
- Hook Tool -T40207-
Removing
- Tilt backrests forward 45º.
WARNING
- Follow all Safety Precautions when working with pyrotechnic components. Refer to → Chapter "Pyrotechnic Components Safety Precautions".
- Follow all regulations when disposing of pyrotechnic components. Refer to → Chapter "Airbag, Belt Tensioner and Battery Cut-Out Units, Storing, Transporting and Disposing".
- Disconnect the battery Ground (GND) cable with the ignition turned on. Refer to → Electrical Equipment; Rep. Gr.27; Battery; Battery, Disconnecting and Connecting.
- Remove the upper instrument panel cover. Refer to → Chapter "Instrument Panel Upper Cover, Removing and Installing".
Sedan
- Remove the headliner and lay it on the seats, do not remove the windshield. Refer to → Chapter "Headliner, Removing and Installing, Sedan".
Wagon
- Remove the headliner. Refer to → Chapter "Headliner, Removing and Installing, Avant".
Continuation for All Vehicles
 Caution
- Remove the headliner and lay it on the seats when performing the following work. Do this very carefully because the headliner can be creased easily.
- Replace the headliner if it is bent.
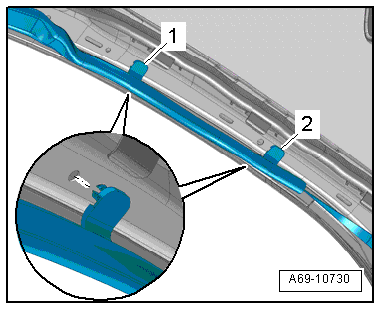
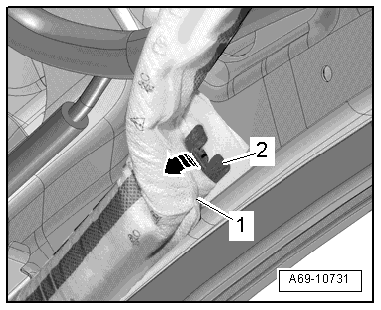
- Remove the clips -1 and 2- from the A-pillar.
Caution
- Remove the head curtain airbag from the clips as carefully as possible.
- Small tears in the head curtain airbag dust protector material can be serviced with a repair patch.
- Replace the head curtain airbag if a long tear occurs in the material for the dust protector during removal.
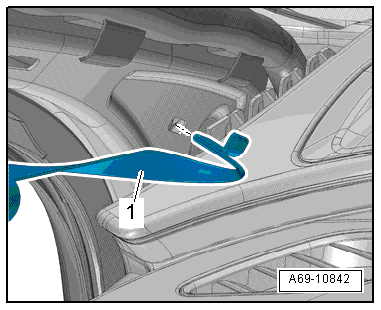
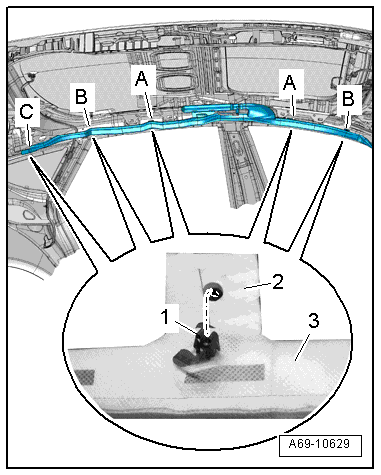
- Disengage the head curtain airbag -1- from the clip -2- as carefully as possible -arrow-.
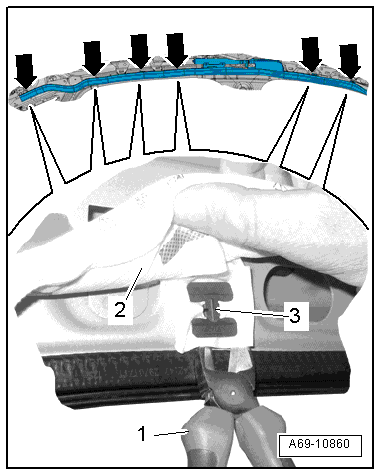
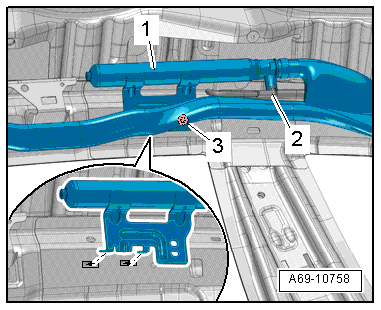
- Remove the clips -arrows- for the head curtain airbag -2- with pliers (side cutters) -1-.
Note
- The clip -3- will get damaged during the removal.
- Be careful not to damage the head curtain airbag while removing it.
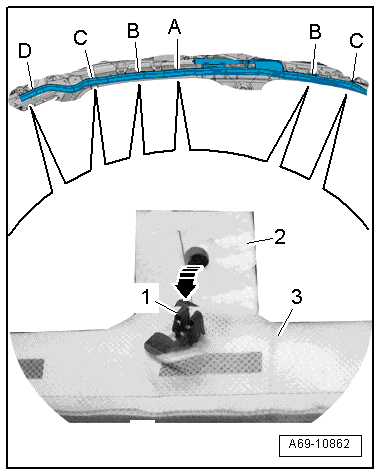
Market-Specific
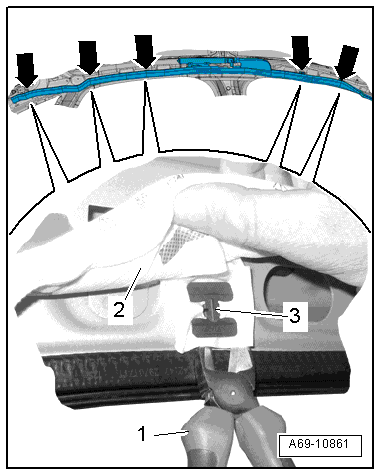
- Remove the clips -arrows- for the head curtain airbag -2- with pliers (side cutters) -1-.
Note
- The clip -3- will get damaged during the removal.
- Be careful not to damage the head curtain airbag while removing it.
Continuation for All Vehicles
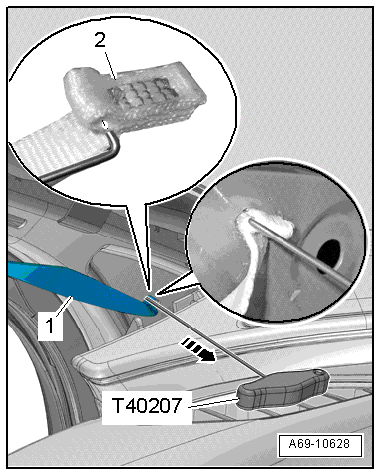
- Remove the head curtain airbag limiting strap -1- from the A-pillar.
- Carefully position the Hook Tool -T40207- and then guide it into the opening in the body.
- Hook the Hook Tool -T40207- into the loop -2- on the head curtain airbag strap and carefully remove -arrow-.
Disconnecting and Connecting
WARNING
Before handling pyrotechnic components (for example, disconnecting the connector), the person handling it must "discharge static electricity". This can be done by touching the door striker, for example.
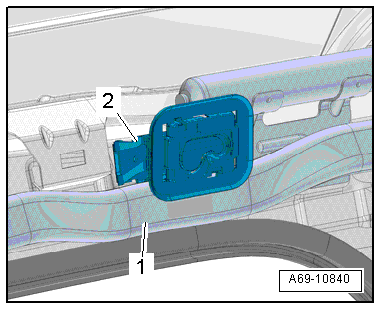
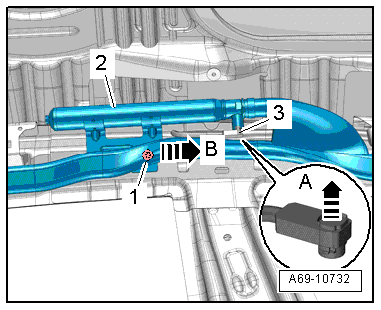
- Release the connector lock using a small screwdriver in direction of -arrow A- and disconnect the connector -3-.
- Remove the bolt -1- from the gas generator.
- Push the head curtain airbag -2- forward in direction of -arrow B- and remove it from the mount.
Installing
WARNING
- Follow all Safety Precautions when working with pyrotechnic components. Refer to → Chapter "Pyrotechnic Components Safety Precautions".
- Always follow head curtain airbag installation procedure.
WARNING
Before handling pyrotechnic components (for example, connecting the connector), the person handling it must "discharge static electricity". This can be done by touching the door striker, for example.
- Apply a dust protector to the head curtain airbag if there is a short tear near the slit for the clip. Refer to the Parts Catalog.
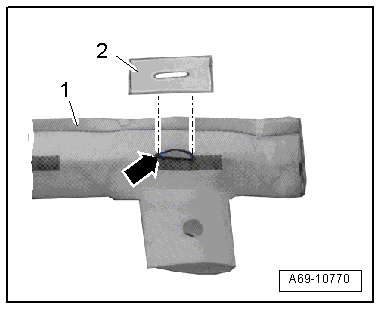
- Flatten out the head curtain airbag -1- around the slit -arrow- and apply the repair patch -2- so that the slits in the dust protector and repair patch are touching each other.
- Replace the dust protector if the tears are longer than what the repair patch can cover.
- Attach the gas generator -1- to the body -arrows-.
- Tighten the bolt -3-.
- Connect the connector -2- to the head curtain airbag igniter.
- Press in the connector lock. This slides the connector into the head curtain airbag igniter as far as the stop and simultaneously locks it.
- Attach the head curtain airbag limiting strap -1- to the A-pillar.
- Insert the clip -1- carefully into the head curtain airbag -3- and then attach the tab -2- to the clip -arrow-.
- Install the clips for the head curtain airbag in the following sequence: -A to C-. They must audibly clip into the body.
Market-Specific
- Insert the clip -1- carefully into the head curtain airbag -3- and then attach the tab -2- to the clip in direction of -arrow-.
- Install the clips for the head curtain airbag in the following sequence: -A to D-. They must audibly clip into the body.
Continuation for All Vehicles
- Install the clips -1 and 2- in the A-pillar.
- Make sure the "black line" is visible over the entire length. By making sure that the head curtain airbag is NOT twisted.
Wagon
- After clipping the head curtain airbag -1- in, press it under the screen separator mount -2-, as shown in the illustration.
Installation is performed in reverse order of removal, while noting the following:
Note
- Make sure the connectors are installed correctly and are secure.
- Make sure the wires do not get caught.
WARNING
Ignition must be on when connecting battery. If pyrotechnic components (for example, airbag, belt tensioner) are not repaired correctly, they may deploy unintentionally after connecting battery. There must not be anyone inside the vehicle when connecting the battery.
DANGER!
When working on vehicles with the ignition already switched on or that are ready to drive there is a danger of the engine starting unexpectedly and of being poisoned by gas in enclosed areas. Risk of body parts and/or clothing being clamped or pulled.
Perform the following before switching on the ignition:
- Move the selector lever into P.
- Activate the parking brake
- Turn off the ignition.
- Open the hood
- Connect the charger, such as the Battery Charger -VAS5095A- to the jump start of the 12V vehicle electrical system.
- Turn on the ignition.
- Connect the battery GND cable with the ignition turned on. Refer to → Electrical Equipment; Rep. Gr.27; Battery; Battery, Disconnecting and Connecting.
Note
If the Airbag Indicator Lamp -K75- indicates a fault, check the Diagnostic Trouble Code (DTC) memory, erase it and check it again. Refer to Vehicle Diagnostic Tester.
Installation notes, for example tightening specifications, replacing components. Refer to → Chapter "Overview - Head Curtain Airbag".