Audi A6 Typ 4G: Instruments
Instrument cluster overview
The instrument cluster is the central information center for the driver.
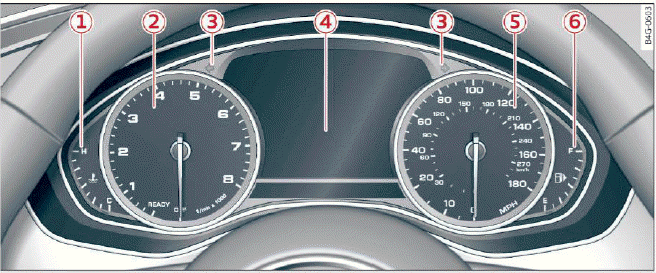
Fig. 3 Instrument cluster overview
- Engine coolant temperature gauge
- Tachometer
- With OFF status indicator
- With READY status indicator
- Turn signals
- Display with
- Driver information system
- Indicator lights
- Speedometer
- Fuel level
Tips
The instrument illumination for the needles and dials turns on when the ignition is turned on and the lights are turned off. The illumination for the gauges reduces automatically and eventually turns off as brightness outside increases.
This function reminds the driver to turn the low beams on at the appropriate time.
Coolant temperature indicator
The coolant temperature display 1,
 fig. 3 only functions when the ignition
is switched on. To prevent engine damage, please observe
the following notes about the temperature ranges.
fig. 3 only functions when the ignition
is switched on. To prevent engine damage, please observe
the following notes about the temperature ranges.
Cold range
If only the LEDs at the bottom of the gauge turn on, the engine has not reached operating temperature yet. Avoid high engine speeds, full accelerating and heavy engine loads.
Normal range
The engine has reached its operating temperature
once the LEDs up to the center of the gauge
turn on. If the  indicator light in the instrument
cluster display turns on, the coolant temperature
is too high.
indicator light in the instrument
cluster display turns on, the coolant temperature
is too high.
Note
- Auxiliary headlights and other accessories in front of the cooling-air intake impair the cooling effect of the coolant. This increases the risk of the engine overheating during high outside temperatures and heavy engine load.
- The front spoiler also helps to distribute cooling air while driving. If the spoiler is damaged, the cooling effect will be impaired and the risk of the engine overheating will increase. See an authorized Audi dealer or authorized Audi Service Facility for assistance.
Tips
Applies to: vehicles with diesel engines
Due to the high efficiency of these engines, the engine may not always reach operating temperature in cold outside temperatures.
This is normal and not a cause for concern.
Tachometer
The tachometer displays the engine speed in revolutions per minute (RPM).
You should shift to the next lowest gear when the speed is below 1,500 RPM. The beginning of the red zone in the tachometer indicates the maximum permissible engine speed for all gears once the engine has been broken in and when it is warmed up to operating temperature. Before reaching the red zone, you should shift into the next higher gear, choose the D or S selector lever position, or remove your foot from the accelerator pedal.
Note
The needle in the tachometer 2,
fig. 3 may only be in the red area of the gauge
for a short time or there is a risk of engine
damage.
For the sake of the environment
Upshifting early helps you to save fuel and reduce operating noise.
Tips
Applies to: S models
The engine speed is limited when the engine is cold - the full engine output is not available.
When the engine is at operating temperature, the red area in the tachometer moves to a higher RPM range.
Fuel level
The display 6 only works when the ignition is
switched on. If the fuel level drops below 2.6 gal
(10 L), a red LED will turn on and the
 indicator light will turn on. The LED blinks
red when the fuel level is very low.
indicator light will turn on. The LED blinks
red when the fuel level is very low.
The possible range based on the current fuel level
is shown in tab (A),
fig. 4.
For the tank capacity in your vehicle, refer to the Technical Data.
Note
Never drive until the tank is completely empty.
The irregular supply of fuel that results from that can cause engine misfires. Uncombusted fuel will then enter the exhaust system.
This can cause overheating and damage to the catalytic converter.
