Audi A6 Typ 4G: Left/Right Headlamp Beam Adjustment Motor -V48-/-V49-, Removing and Installing
Left/Right Headlamp Beam Adjustment Motor -V48-/-V49-, Removing and Installing, Halogen Headlamps
Special tools and workshop equipment required
- Protective Gloves
- Protective Eyewear
- Box Cutter
Removing
- Remove the headlamp housing. Refer to → Chapter "Headlamp Housing, Removing and Installing, Halogen Headlamp".
 Note
Note
- The headlamp housing must be cut at the designated location with a sharp box cutter to replace the headlamp beam adjustment motor.
- A housing cover can be ordered to seal the installation opening. Refer to the Parts Catalog.
 WARNING
There is a risk of injury and damage.
- Wear protective gloves and eyewear.
- To avoid damaged electrical wires in the headlamp housing, do not cut too deep.
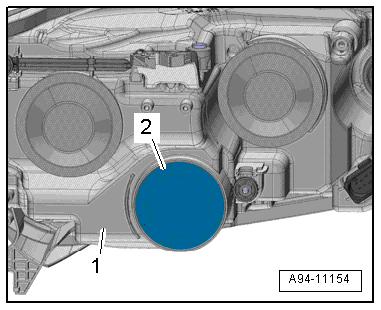
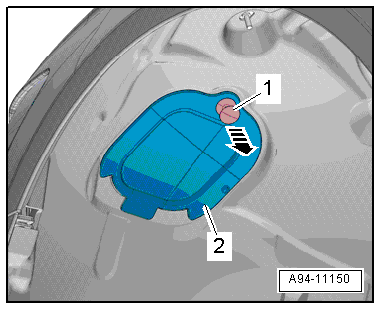
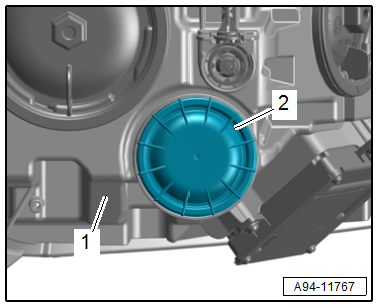
- Cut the cover -1- out of the headlamp housing -2- with a sharp box cutter.
Note
Remove any shavings and grit on the blind cover from the headlamp housing.
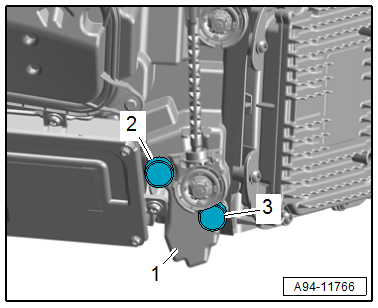
- Turn the adjustment motor -3- counter-clockwise -arrow- and remove it upward. This disengages the ball head -1- downward from the ball head mount.
- Remove the adjustment motor.
- Disconnect the connector -2-.
Installing
Install in reverse order of removal. Note the following:
- Connect the connector when guiding in.
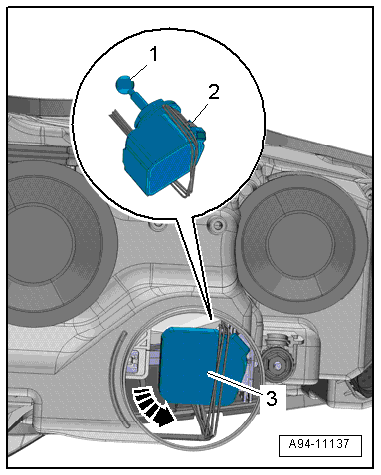
- Pull the reflector -1- back and engage the ball head on the adjusting axle in the reflector ball head mount.
- Lock the adjustment motor -3- clockwise -arrow-.
- Close the opening in the headlamp housing with the housing cover -2- from the repair kit. Refer to the Parts Catalog.
- Adjust the headlamp. Refer to → Chapter "Headlamp, Adjusting".
Left/Right Headlamp Beam Adjustment Motor -V48-/-V49-, Removing and Installing, HID Headlamps through MY 2014
Removing
- On the right: remove the air filter housing. Refer to → 6-Cylinder TDI Common Rail 3.0L 4V Engine; Rep. Gr.23; Air Filter; Air Filter Housing, Removing and Installing or → Rep. Gr.24; Air Filter; Air Filter Housing, Removing and Installing.
- Loosen the expanding clip -1- and disengage the cap -2- from the front wheel housing liner in direction of -arrow-.
Note
Depending on the date of manufacture, a bolt may be installed instead of the expanding clip.
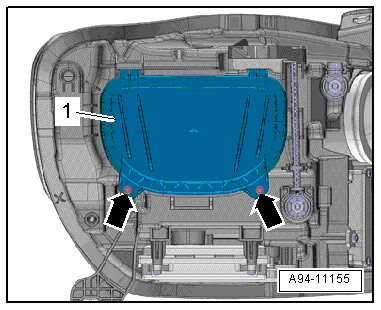
- Remove the bolts -arrows-.
- Remove the housing cover -1- by pushing the front wheel housing liner slightly to the rear.
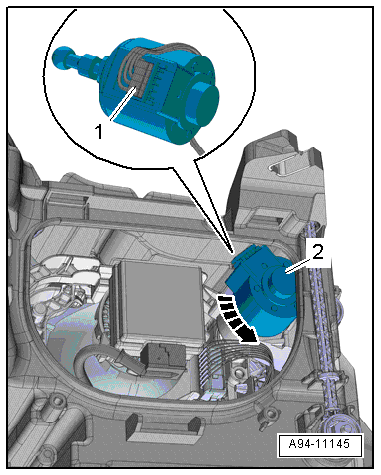
- Turn the adjustment motor -2- counter-clockwise -arrow- and remove it downward. This disengages the ball head upward from the ball head mount.
- Remove the adjustment motor.
- Disconnect the connector -1-.
Installing
Install in reverse order of removal. Note the following:
- Connect the connector when guiding in.
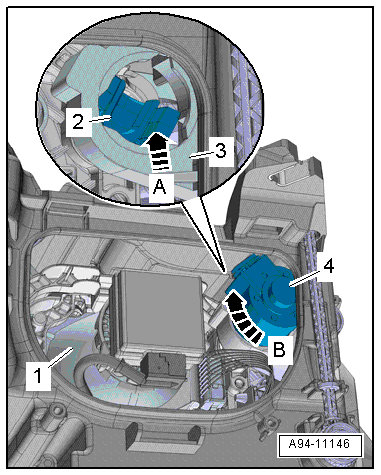
- Pull the reflector -1- toward the rear. When doing this, the ball head mount -2- must fit into the guide -3- on the housing in direction of -arrow A-.
- Engage the ball head into the mount on the reflector and lock the adjustment motor -4- clockwise in direction of -arrow B-.
- Close the housing cover and tighten the bolts.
- Adjust the headlamp. Refer to → Chapter "Headlamp, Adjusting".
Left/Right Headlamp Beam Adjustment Motor -V48-/-V49-, Removing and Installing, HID Headlamps from MY 2015
Special tools and workshop equipment required
- Protective Gloves
- Protective Eyewear
- Box Cutter
Removing
- Remove the headlamp housing. Refer to → Chapter "Headlamp Housing, Removing and Installing, HID Headlamp and LED Headlamp from MY 2015".
Note
- The headlamp housing must be cut at the designated location with a sharp box cutter to replace the headlamp beam adjustment motor.
- A housing cover can be ordered to seal the installation opening. Refer to the Parts Catalog.
WARNING
There is a risk of injury and damage.
- Wear protective gloves and eyewear.
- To avoid damaged electrical wires in the headlamp housing, do not cut too deep.
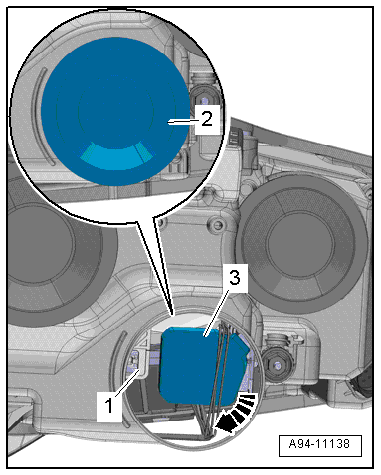
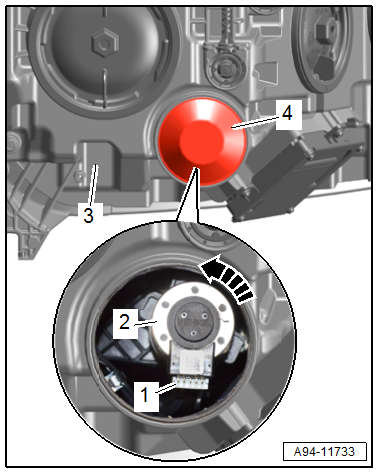
- Cut the blind cover -4- out of the headlamp housing -1- with a sharp box cutter.
Note
Remove any shavings and grit on the blind cover from the headlamp housing.
- Turn the adjustment motor -3- counter-clockwise -arrow- and remove it downward. This disengages the ball head upward from the ball head mount.
- Remove the adjustment motor.
- Disconnect the connector -2-.
Installing
Install in reverse order of removal. Note the following:
- Connect the connector when guiding in.
- Close the opening in the headlamp housing -1- with the housing cover -2- from the repair kit. Refer to the Parts Catalog.
- Adjust the headlamp. Refer to → Chapter "Headlamp, Adjusting".
Left/Right Headlamp Beam Adjustment Motor -V48-/-V49-, Removing and Installing, LED Headlamps through MY 2014
 Caution
Danger of causing damage to the vehicle electronics.
- Requirement: Make sure nothing, especially metal or other light weight particles, can get into the headlamp housing.
- Make sure also no oil, grease, silicone or other such materials can get into an open headlamp, otherwise they can turn into steam and fog up the headlamp.
- Touching electronic circuits with bare hands can lead to migration.
- ESD (electrostatic discharge) protection: Always follow standard DIN EN 613-40-5-1 when handling.
- Do not use any components or electronics that have fallen down.
- ESD Work Surface -VAS6613-. Refer to → Electrical System General Information; Rep. Gr.97; ESD Work Surface VAS6613.
Removing
- Remove the front wheel housing liner. Refer to → Body Exterior; Rep. Gr.66; Wheel Housing Liner; Front Wheel Housing Liner, Removing and Installing.
- Remove the bolts -arrows-.
- Remove the housing cover -1-.

- Remove the bolts -2 and 4-.
- Move the adjustment motor -1- upward in direction of -arrow-. The ball head on the adjusting axle will disengage downward from the ball head mounting when doing this.
- Remove the adjustment motor.
- Disconnect the connector -4-.
Installing
Install in reverse order of removal. Note the following:
- Connect the connector when guiding in.
- Engage the ball head into the ball head mount on the reflector.
- Close the housing cover and tighten the bolts.
- Adjust the headlamp. Refer to → Chapter "Headlamp, Adjusting".

Left/Right Headlamp Beam Adjustment Motor -V48-/-V49-, Removing and Installing, LED Headlamps from MY 2015
Removing
- Remove the headlamp housing. Refer to → Chapter "Headlamp Housing, Removing and Installing, HID Headlamp and LED Headlamp from MY 2015".
- Remove the LED headlamp power output module 2. Refer to → Chapter "Right/Left LED Headlamp Power Output Module 2 -A28-/-A32-, Removing and Installing, from MY 2015".
- Remove bolts -1, 3, 7 and 8- and remove the mount -2-.
- Release the retainers -4 and 6- and guide the connector -5- out of the mount.
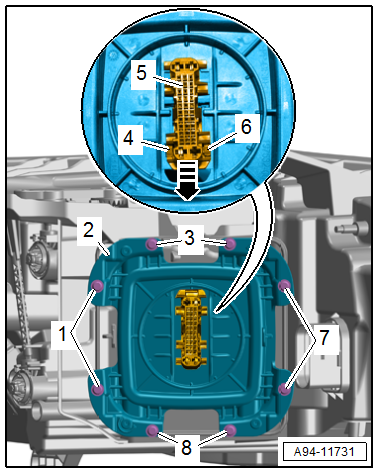
- Remove the pins -1 and 2- from the headlamp housing.
Note
Remove any shavings and grit from the pins from the headlamp housing.
- Remove the bolts through the openings in direction of -arrows-.
- Turn the upper adjusting screw -3- clockwise all the way.

- Remove the screws -1 and 3- and bracket -2-.
- Remove the headlamp beam adjustment motor by pushing the ball head of the positioning stem upward -arrow- and out of the ball head mount -4- by turning the adjustment motor.
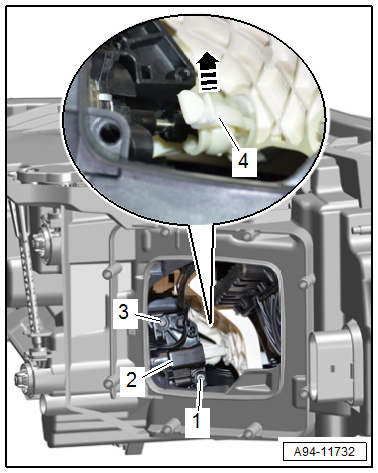
- Remove the adjustment motor -1- from the headlamp housing, as shown in the image.
- Disconnect the connector -2-.

Installing
Install in reverse order of removal. Note the following:
- Close the opening in the headlamp housing -1- with the grommets -2 and 3- from the repair kit. Refer to the Parts Catalog.
- Adjust the headlamp. Refer to → Chapter "Headlamp, Adjusting".