Audi A6 Typ 4G: Overview - Seat Pan, Seat Angle Adjuster
Seat Angle Adjuster (Manual)
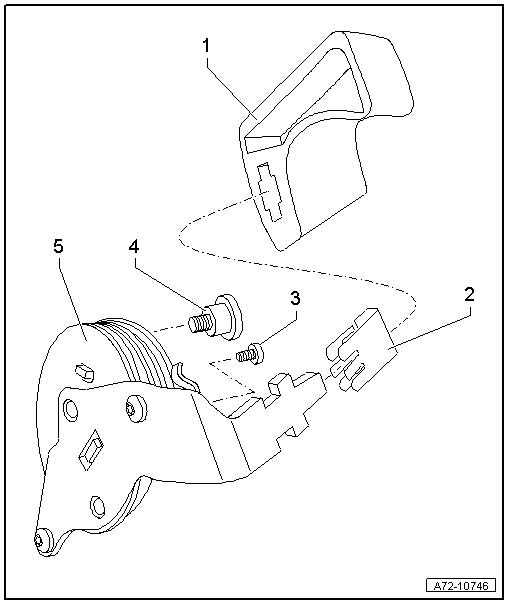
1 - Handle
- For seat inclination adjustment
- Removing and installing. Refer to → Chapter "Seat Angle Adjustment Handle, Removing and Installing".
- Press until it engages completely
2 - Clip
- Replace the seat angle adjustment handle each time it is removed
- Installed position
3 - Bolt
- 6.5 Nm
- Self-locking
- Replace
- Threaded holes for bolts must be cleaned, for example, with a thread tap
4 - Shoulder Pin
- 6 Nm
- Self-locking
- Replace
- Threaded hole for shoulder pin must be cleaned, for example, with thread cutter
5 - Seat Angle Adjuster
- Removing and installing. Refer to → Chapter "Seat Angle Adjuster, Removing and Installing".
Seat Angle Adjustment Motor
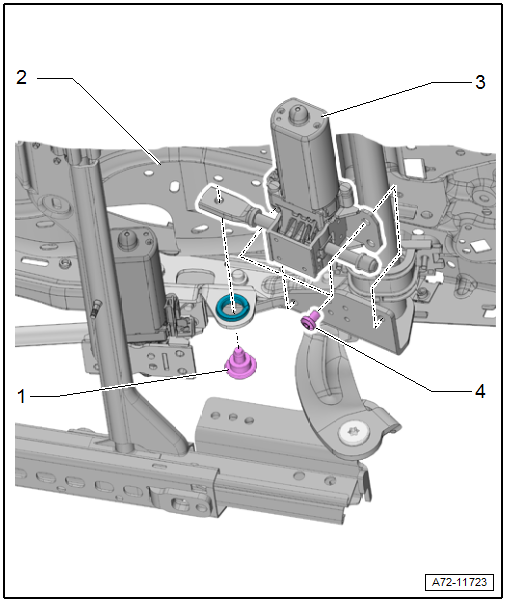
1 - Bolt
- 20 Nm
- Self-locking
- Replace
- Clean the threaded hole with a thread tap.
2 - Seat Pan
3 - Driver Seat Angle Adjustment Motor -V243-
- Front passenger side: Front Passenger Seat Angle Adjustment Motor -V224-
- Removing and installing. Refer to → Chapter "Seat Angle Adjustment Motor, Removing and Installing".
4 - Bolts
- 10 Nm
- Quantity: 2
- Self-locking
- Replace
- Threaded holes for bolts must be cleaned, for example, with a thread tap
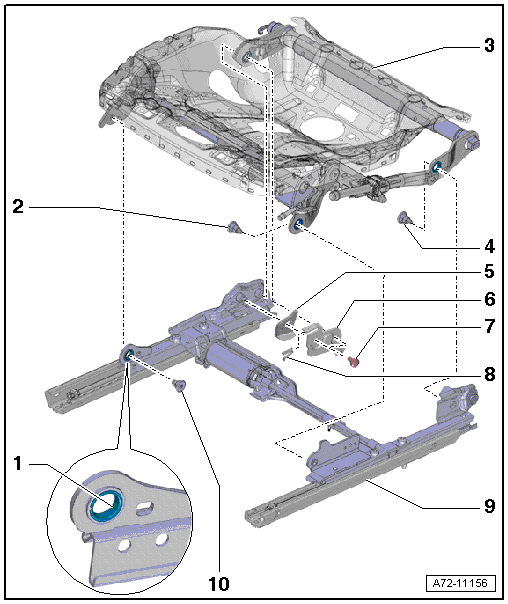
Overview - Seat Pan, Seat Forward/Back Adjustment
Seat Forward/Back Adjustment (Manual)
 Note
Note
To repair the seat forward/back adjustment, there is a repair kit available. Refer to the Parts Catalog.
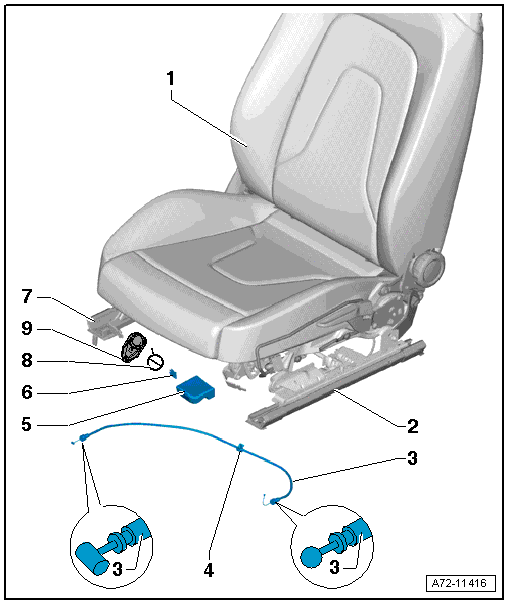
1 - Front Seat
2 - Seat Forward/Back Adjuster
- Unit with seat upper section (seat pan)
- Cannot be replaced separately. For the repair kit. Refer to the Parts Catalog.
- Servicing. Refer to → Chapter "Seat Forward/Back Adjustment, Servicing".
3 - Seat Forward/Back Adjuster Release Cable
- Removing and installing. Refer to → Chapter "Seat Forward/Back Adjustment Release Cable, Removing and Installing".
- It is not possible to adjust the release cable
4 - Clip or Cable Tie
5 - Handle
- For seat forward/back adjustment
- Removing and installing. Refer to → Chapter "Seat Forward/Back Adjustment Handle, Removing and Installing".
- Must lock with the clip
6 - Clip
- Replace
- Installed position. Refer to → Fig. "Clip Installed Position"
7 - Actuator
- For seat forward/back adjustment
8 - Spring
- For lever for seat forward/back adjuster release cable retainer
- Different components for driver and front passenger side
- Removing and installing. Refer to → Chapter "Release Cable Retainer/Seat Forward/Back Adjustment Lever and Spring, Removing and Installing".
9 - Lever
- For seat forward/back adjuster release cable retainer
- Same part for driver and front passenger seat
- Removing and installing. Refer to → Chapter "Release Cable Retainer/Seat Forward/Back Adjustment Lever and Spring, Removing and Installing".
Clip Installed Position
- The springs -arrows- (quantity: two) on the clip -2- must be on the inner side of the lever -1-.

Seat Forward/Back Adjustment (Power), Standard Seat/Sport Seat/Super Sport Seat
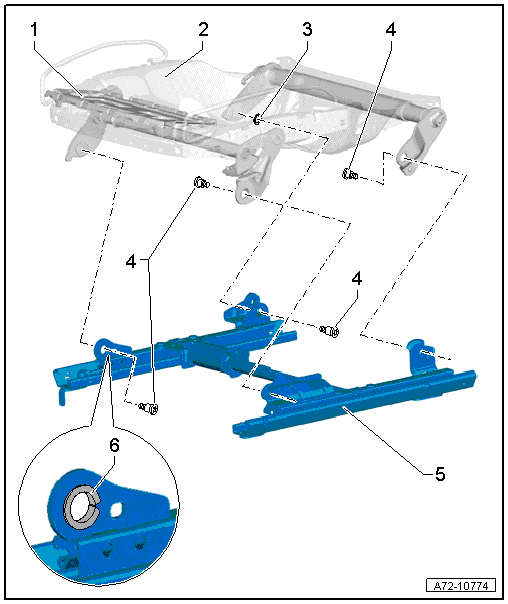
1 - Seat Depth Adjuster
- Only for Sport seat/Super Sport seat
- Removing and installing. Refer to → Chapter "Seat Depth Adjuster, Removing and Installing, Sport Seat/Super Sport Seat".
- Allocation. Refer to the Parts Catalog.
2 - Upper Seat Frame
- Removing and installing. Refer to → Chapter "Upper Seat Frame, Removing and Installing".
- Allocation. Refer to the Parts Catalog.
- Install all electrical and electronic components and wires in the new upper frame.
3 - Washer
4 - Bolt
- 22 Nm
- Quantity: 4
- Self-locking
- Replace
- Threaded holes for bolts must be cleaned, for example, with a thread tap
5 - Lower Seat Frame
- Driver side: with Driver Seat Forward/Back Adjustment Motor -V28-
- Front passenger side: with Front Passenger Seat Forward/Back Adjustment Motor -V31-
- Cannot be disassembled
- Removing and installing. Refer to → Chapter "Lower Seat Frame/Forward/Back Adjustment Motor, Removing and Installing".
- For replacing, install the Removing and Installing and seat belt latch in the new lower frame
6 - Bushing
- Inserted in all bearing locations
- Cannot be replaced
- The assembly component must be replaced if the bushing is damaged
Seat Forward/Back Adjustment, Multi-contour Seat
1 - Bushing
- Inserted in all bearing locations
- Cannot be replaced
- The assembly component must be replaced if the bushing is damaged
2 - Bolt
- 22 Nm
- Self-locking
- Replace
- Threaded holes for bolts must be cleaned, for example, with a thread tap
3 - Upper Seat Frame
- Removing and installing. Refer to → Chapter "Upper Seat Frame, Removing and Installing".
- Allocation. Refer to the Parts Catalog
- Install all electrical and electronic components and wires in the new upper frame.
4 - Bolt
- 22 Nm
- Self-locking
- Replace
- Threaded holes for bolts must be cleaned, for example, with a thread tap
5 - Safety Ground Lock
- Removing and installing. Refer to → Chapter "Safety Ground Lock, Removing and Installing".
- Check for ease of movement
6 - Retaining Plate
7 - Bolt
- Quantity: 2
- Tightening specifications. Refer to → Chapter "Overview - Seat Pan, Safety Ground Lock".
8 - Spring
9 - Lower Seat Frame
- Driver side: with Driver Seat Forward/Back Adjustment Motor -V28-
- Front passenger side: with Front Passenger Seat Forward/Back Adjustment Motor -V31-
- Cannot be disassembled
- Removing and installing. Refer to → Chapter "Lower Seat Frame/Forward/Back Adjustment Motor, Removing and Installing".
- For replacing, install the Removing and Installing and seat belt latch in the new lower frame
10 - Bolt
- 22 Nm
- Self-locking
- Replace
- Threaded holes for bolts must be cleaned, for example, with a thread tap
Overview - Seat Pan, Seat Depth Adjuster
Seat Depth Adjustor, Sport Seat/Super Sport Seat
1 - Nut
- Quantity: 4
- Replace
2 - Sport Seat
- With a seat depth adjuster
3 - Trim
- For seat depth adjustment
- Removing and installing. Refer to → Chapter "Seat Depth Adjuster, Removing and Installing, Sport Seat/Super Sport Seat".
- Press on until it engages audibly
4 - Seat Depth Adjuster
- Removing and installing. Refer to → Chapter "Seat Depth Adjuster, Removing and Installing, Sport Seat/Super Sport Seat".
5 - Bushing
6 - Bolt
- 4 Nm
- Replace
- Use locking fluid when installing the bolt. For the correct locking fluid. Refer to the Parts Catalog.
7 - Screws
- 4 Nm
- Replace
- Use locking fluid when installing the bolt. For the correct locking fluid. Refer to the Parts Catalog.
8 - Bolt
- 4 Nm
- Replace
- Use locking fluid when installing the bolt. For the correct locking fluid. Refer to the Parts Catalog
9 - Bushing
Seat Depth Adjuster, Multi-contour Seat
1 - Trim
- For seat depth adjustment
- Quantity: 2
- Press on until it engages audibly
2 - Support
- For Driver Seat Depth Adjustment Motor -V256-/Front Passenger Seat Depth Adjustment Motor -V257-
- Removing and installing. Refer to → Chapter "Seat Depth Adjuster, Removing and Installing, Multi-contour Seat".
3 - Driver Seat Depth Adjustment Motor -V256-
- Front passenger side: Front Passenger Seat Depth Adjustment Motor -V257-
- Removing and installing. Refer to → Chapter "Seat Depth Adjuster, Removing and Installing, Multi-contour Seat".
- Install cable ties at the same locations when installing.
4 - Cover
- For seat depth adjustment
- Removing and installing. Refer to → Chapter "Seat Depth Adjuster, Removing and Installing, Multi-contour Seat".
- Clipped to the seat cover and seat cushion
- Engaged to the seat depth adjuster and press on it until it clicks into place
5 - Multi-contour Seat
6 - Bolt
- 3.5 Nm
- Quantity: 4
Overview - Seat Pan, Torsion Bar
1 - Seat Pan
2 - Mount
- For the torsion bar
- Slide into the guide
- Removing and installing. Refer to → Chapter "Torsion Bar, Removing and Installing".
3 - Torsion Bar
- Lubricated. For the correct grease. Refer to the Parts Catalog.
- Removing and installing. Refer to → Chapter "Torsion Bar, Removing and Installing".
