Audi A6 Typ 4G: Overview - Instrument Panel Controls
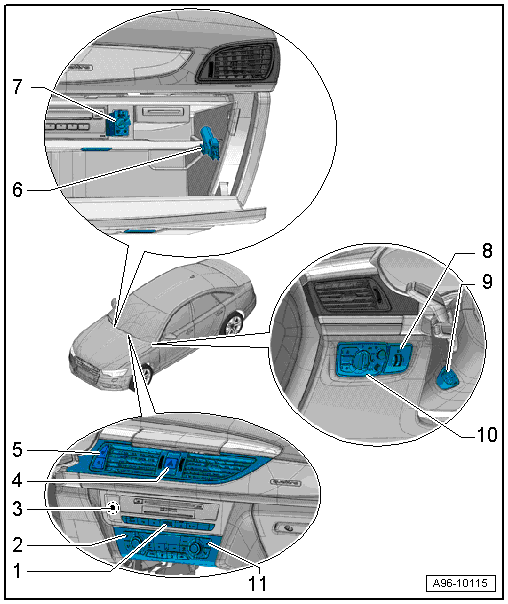
1 - Instrument Panel Buttons
- With Start/Stop Mode Button -E693-, Parallel Parking Assistance Button -E581-, Parking Aid Button -E266-, Front Passenger Airbag -Disabled- Indicator Lamp -K145-, ASR/ESP Button -E256-
- Removing and installing. Refer to → Chapter "Instrument Panel Button, Removing and Installing".
2 - Left Seat Heating Button -E653-
- Integrated in the Climatronic Control Module -J255- (also called the "display and control head"). Cannot be replaced separately if faulty.
- Replacing the Climatronic Control Module -J255-. Refer to → Heating, Ventilation, and Air Conditioning; Rep. Gr.87; Display and Control Head; Display and Control Head, Removing and Installing.
3 - Anti-Theft Immobilizer Reader Coil -D2-
- Overview. Refer to → Chapter "Overview - Steering Column Switch Module".
4 - Emergency Flasher Button -E229-
- Removing and installing. Refer to → Chapter "Emergency Flasher Button -E229-, Removing and Installing".
5 - Display Unit Button
- With Front Display Open/Close Button -E462-, Display Unit Button -E506-
- Removing and installing. Refer to → Chapter "Front Display Open/Close Button -E462-/Display Unit Button -E506-, Removing and Installing".
6 - Glove Compartment Lamp Switch -E26-
- Removing and installing. Refer to → Chapter "Glove Compartment Lamp Switch -E26-, Removing and Installing".
7 - Valet Parking Lock Button/Front Passenger Airbag Deactivation Key Switch
- Not available for North American market
8 - Headlamp Range Control Adjuster -E102-
- Removing and installing. Refer to → Chapter "Headlamp Range Control Adjuster -E102-, Removing and Installing".
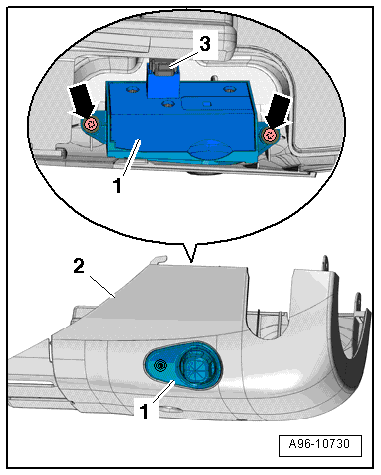
9 - Steering Column Adjustment Switch -E167-
- With Steering Wheel Heating Button -E522-
- Removing and installing. Refer to → Chapter "Steering Column Adjustment Switch -E167- and Steering Wheel Heating Button -E522-, Removing and Installing".
10 - Light Switch -E1-
- With Instrument Panel and Switch Illumination Dimmer Switch -E20-
- With Rear Fog Lamp Button -E314-, Fog Lamp Button -E315-, and Night Vision System Button -E680-
- Removing and installing. Refer to → Chapter "Light Switch -E1-, Removing and Installing".
11 - Right Seat Heating Button -E654-
- Integrated in the Climatronic Control Module -J255- (also called the "display and control head"). Cannot be replaced separately if faulty.
- Replacing the Climatronic Control Module -J255-. Refer to → Heating, Ventilation, and Air Conditioning; Rep. Gr.87; Display and Control Head; Display and Control Head, Removing and Installing.
Tightening Specification Steering Column Adjustment Switch -E167-/Steering Wheel Heating Button -E522-
- Tighten the screws -arrows- to 1.5 Nm.
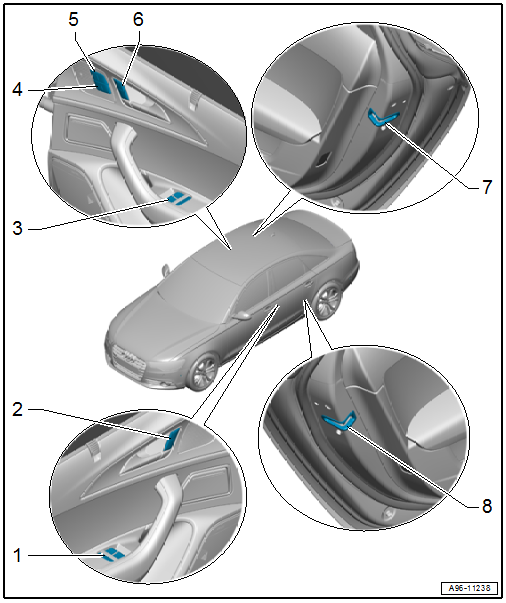
Overview - Front Door Controls
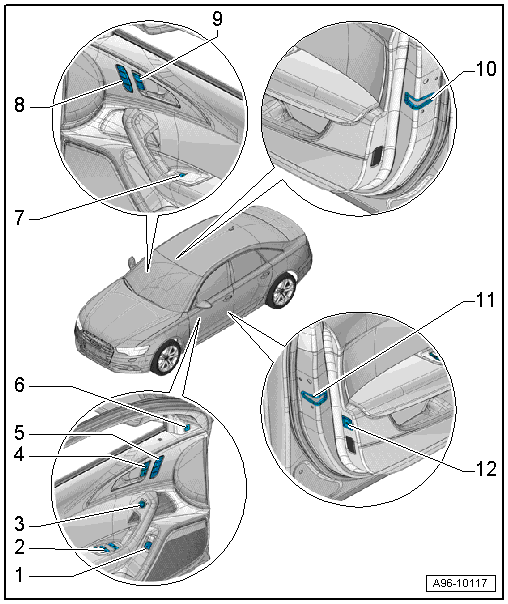
1 - Rear Lid Remote Release Button -E233-
- Removing and installing. Refer to → Chapter "Rear Lid Remote Release Button -E233-, Removing and Installing".
2 - Power Window Control Head In Driver Door -E512-
- With Left Front Window Regulator Switch -E40-, Right Front Window Switch -E81-Left Rear Window Regulator Switch in Driver Door -E53-, Right Rear Window Regulator Switch in Driver Door -E55- and Child Safety Lock Button -E318- or Left Child Safety Lock Button -E510-, Left Front Window Regulator Switch -E511-
- Removing and installing. Refer to → Chapter "Power Window Control Head In Driver Door -E512-, Removing and Installing".
3 - Mirror Adjusting Switch -E43- or Folding Mirror Adjustment Switch -E168-
- Removing and installing. Refer to → Chapter "Mirror Adjusting Switch -E43-/Folding Mirror Adjustment Switch -E168-, Removing and Installing".
4 - Driver Interior Locking Switch -E150-
- Removing and installing. Refer to → Chapter "Driver/Front Passenger Interior Locking Switch -E150-/-E198-, Removing and Installing".
5 - Driver Memory Seat Control Head -E97-
- Removing and installing. Refer to → Chapter "Driver/Front Passenger Memory Seat Control Head -E97-/-E277-, Removing and Installing".
6 - Lane Change Assistance Button -E530-
- Overview. Refer to → Chapter "Overview - Lane Change Assistance".
7 - Front Passenger Door Window Regulator Switch -E107-
- Removing and installing. Refer to → Chapter "Front Passenger Door Window Regulator Switch -E107-, Removing and Installing".
8 - Front Passenger Memory Seat Control Head -E277-
- Removing and installing. Refer to → Chapter "Driver/Front Passenger Memory Seat Control Head -E97-/-E277-, Removing and Installing".
9 - Front Passenger Interior Locking Switch -E198-
- Removing and installing. Refer to → Chapter "Driver/Front Passenger Interior Locking Switch -E150-/-E198-, Removing and Installing".
10 - Front Passenger Door Contact Switch -F3-
- Integrated in the door lock. Cannot be replaced separately if faulty.
- Replace the door lock. Refer to → Body Exterior; Rep. Gr.57; Door Components; Door Lock, Removing and Installing.
11 - Driver Door Contact Switch -F2-
- Integrated in the door lock. Cannot be replaced separately if faulty.
- Replace the door lock. Refer to → Body Exterior; Rep. Gr.57; Door Components; Door Lock, Removing and Installing.
12 - Alarm System Deactivation Switch -E217-
- Removing and installing. Refer to → Chapter "Alarm System Deactivation Switch -E217-, Removing and Installing".
Overview - Rear Door Controls
Overview - Rear Door Controls
1 - Left Rear Power Window Button in Left Rear Door -E700-
- Vehicles with Right Rear Power Window Button in Left Rear Door -E701-
- Removing and installing. Refer to → Chapter "Rear Window Regulator Button in Rear Door, Removing and Installing".
2 - Left Rear Interior Locking Switch -E273-
- Removing and installing. Refer to → Chapter "Left/Right Rear Interior Locking Switch -E273-/-E274-, Removing and Installing".
3 - Right Rear Power Window Button in Right Rear Door -E705-
- Vehicles with Left Rear Power Window Button In Right Rear Door -E706-
- Removing and installing. Refer to → Chapter "Rear Window Regulator Button in Rear Door, Removing and Installing".
4 - Right Rear Interior Locking Switch -E274-
- Removing and installing. Refer to → Chapter "Left/Right Rear Interior Locking Switch -E273-/-E274-, Removing and Installing".
5 - Right Rear Door Contact Switch -F11-
- Integrated in the door lock. Cannot be replaced separately if faulty.
- Replace the door lock. Refer to → Body Exterior; Rep. Gr.58; Door Components; Door Lock, Removing and Installing.
6 - Left Rear Door Contact Switch -F10-
- Integrated in the door lock. Cannot be replaced separately if faulty.
- Replace the door lock. Refer to → Body Exterior; Rep. Gr.58; Door Components; Door Lock, Removing and Installing.
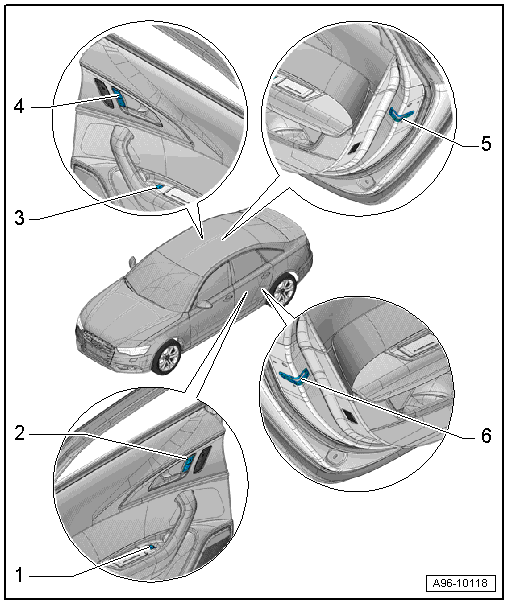
Overview - Rear Door Controls, Market-Specific
1 - Left Rear Window Regulator Button
- With Left Rear Power Window Button in Left Rear Door -E700-, Right Rear Power Window Button in Left Rear Door -E701-, Sunroof Button in Left Rear Door -E702-, Sunroof Shade Button in Left Rear Door -E703- and Rear Window Shade Button in Left Rear Door -E699-
- Removing and installing. Refer to → Chapter "Rear Window Regulator Button in Rear Door, Removing and Installing, Market-Specific".
2 - Left Rear Interior Locking Switch -E273-
- Removing and installing. Refer to → Chapter "Left/Right Rear Interior Locking Switch -E273-/-E274-, Removing and Installing".
3 - Right Rear Window Regulator Button
- With Right Rear Power Window Button in Right Rear Door -E705-, Left Rear Power Window Button in Right Rear Door -E706-, Sunroof Button in Right Rear Door -E707-, Sunroof Shade Button in Right Rear Door -E708- and Rear Window Shade Button in Right Rear Door -E704-
- Removing and installing. Refer to → Chapter "Rear Window Regulator Button in Rear Door, Removing and Installing, Market-Specific".
4 - Front Passenger Seat Forward/Back Adjustment Button -E603-
- Removing and installing. Refer to → Chapter "Backrest Adjustment Button -E425-/Front Passenger Seat Forward/Back Adjustment Button -E603-, Removing and Installing".
5 - Backrest Adjustment Button -E425-
- Removing and installing. Refer to → Chapter "Backrest Adjustment Button -E425-/Front Passenger Seat Forward/Back Adjustment Button -E603-, Removing and Installing".
6 - Right Rear Interior Locking Switch -E274-
- Removing and installing. Refer to → Chapter "Left/Right Rear Interior Locking Switch -E273-/-E274-, Removing and Installing".
7 - Right Rear Door Contact Switch -F11-
- Integrated in the door lock. Cannot be replaced separately if faulty.
- Replace the door lock. Refer to → Body Exterior; Rep. Gr.58; Door Components; Door Lock, Removing and Installing.
8 - Left Rear Door Contact Switch -F10-
- Integrated in the door lock. Cannot be replaced separately if faulty.
- Replace the door lock. Refer to → Body Exterior; Rep. Gr.58; Door Components; Door Lock, Removing and Installing.
