Audi A6 Typ 4G: Overview - Rear Door Trim Panel
Overview - Rear Door Trim Panel
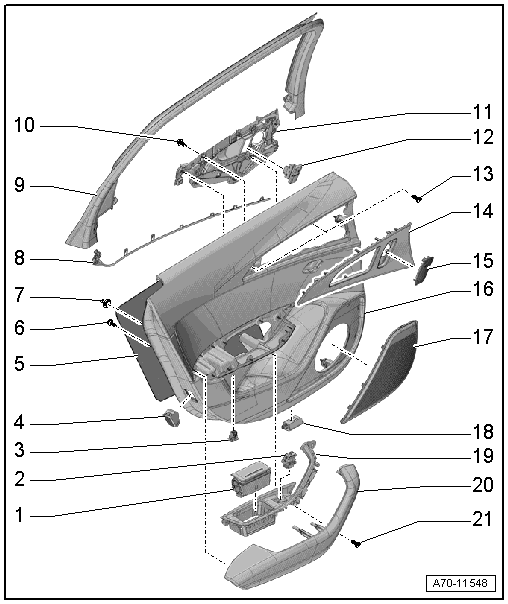
1 - Rear Ashtray
- Removing and installing
2 - Left Rear Power Window Button in Left Rear Door -E700-
- Right: Right Rear Power Window Button in Right Rear Door -E705-
- Equipment levels: at left with Right Rear Power Window Button in Left Rear Door -E701-
- Equipment levels: at right with Left Rear Power Window Button in Right Rear Door -E706-
- Removing and installing. Refer to → Electrical Equipment; Rep. Gr.96; Controls; Overview - Rear Door Controls.
3 - Left Rear Door Storage Compartment Illumination Bulb -L170-
- Right: Right Rear Door Storage Compartment Illumination Bulb -L171-
- Removing and installing. Refer to → Electrical Equipment; Rep. Gr.96; Lamps; Left and Right Rear Door Storage Compartment Illumination Bulb L170/L171, Removing and Installing.
4 - Rear Reflector
- Vehicles with a Left Rear Door Warning Lamp -W37-
- Vehicles with a Right Rear Door Warning Lamp -W38-
- Door warning lamps, removing and installing. Refer to → Electrical Equipment; Rep. Gr.96; Lamps; Left/Right Rear Door Warning Lamp W37/W38, Removing and Installing.
5 - Insulation
6 - Bolt
- 1.2 Nm
- For pull handle/armrest
- Quantity: 13
7 - Clip
- Quantity: 6 one-piece
- Quantity: 1 two-piece
- Replace any damaged two-piece clips
8 - Left Rear Door Ambient Lighting Bulb -L166-
- Right: Right Rear Door Ambient Lighting Bulb -L167-
- Equipment levels
- Removing and installing. Refer to → Electrical Equipment; Rep. Gr.96; Lamps; Left and Right Ambient Lighting Bulb for Rear Doors L166/L167, Removing and Installing.
9 - Trim Panel
- For the window frame
- Removing and installing. Refer to → Chapter "Window Frame Trim Panel, Removing and Installing".
10 - Bolt
- 1.2 Nm
- For inside door release mechanism
- Quantity: 9
11 - Interior Door Mechanism
- Removing and installing. Refer to → Chapter "Interior Door Mechanism, Removing and Installing".
12 - Left Rear Interior Locking Switch -E273-
- Right: Right Rear Interior Locking Switch -E274-
- Equipment levels
- Removing and installing. Refer to → Electrical Equipment; Rep. Gr.96; Controls; Left/Right Rear Interior Locking Switch E273/E274, Removing and Installing.
13 - Bolt
- 2.5 Nm
- For door trim
- Quantity: 2
14 - Trim
- For inside door release mechanism
- Removing and installing. Refer to → Chapter "Trim Molding, Removing and Installing".
- Insert in the door trim panel and press on it until it engages audibly.
15 - Trim
- For high range speaker
- Removing and installing. Refer to → Chapter "Treble Speaker Trim, Removing and Installing".
- Press on until it engages audibly
16 - Rear Door Trim Panel
- Removing and installing. Refer to → Chapter "Rear Door Trim Panel, Removing and Installing".
17 - Speaker Trim
- For bass speaker
- Removing and installing. Refer to → Chapter "Bass Speaker Trim, Removing and Installing".
18 - Left Rear Entry Lamp -W33-
- Right: Right Rear Entry Lamp -W34-
- Equipment levels
- Removing and installing. Refer to → Electrical Equipment; Rep. Gr.96; Lamps; Left/Right Rear Entry Lamp W33/W34, Removing and Installing.
19 - Grip Recess
- With switch mount
- Removing and installing. Refer to → Chapter "Button Trim, Removing and Installing".
20 - Pull Handle/Armrest
- Removing and installing. Refer to → Chapter "Rear Armrest, Removing and Installing".
21 - Bolt
- 2.5 Nm
- For door trim
Overview - Rear Door Trim Panel, Market-Specific
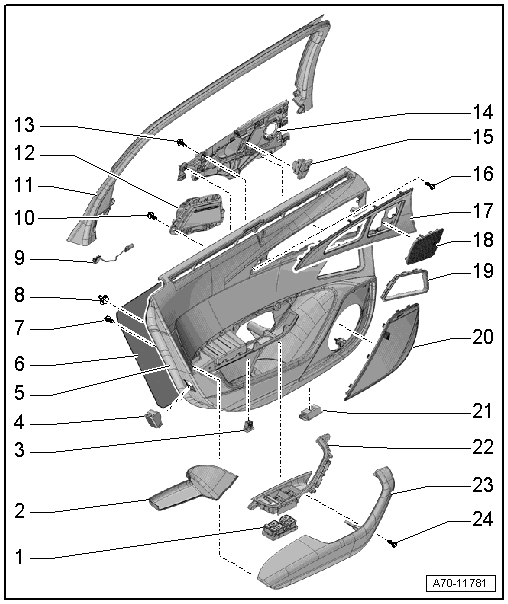
1 - Button for Rear Window Regulator
- Left: Left Rear Power Window Button in Left Rear Door -E700-, Right Rear Power Window Button in Left Rear Door -E701-, Sunroof Button in Left Rear Door -E702-, Sunroof Button in Right Rear Door -E703- and Rear Window Shade Button in Left Rear Door -E699-
- Right: Right Rear Power Window Button in Right Rear Door -E705-, Left Rear Power Window Button in Right Rear Door -E706-, Sunroof Button in Right Rear Door -E707-, Sunroof Shade Button in Right Rear Door -E708- and Rear Window Shade Button in Right Rear Door -E704-
- Removing and installing. Refer to → Electrical Equipment; Rep. Gr.96; Controls.
2 - Liner
- For door pocket
3 - Left Rear Door Storage Compartment Illumination Bulb -L170-
- Right: Right Rear Door Storage Compartment Illumination Bulb -L171-
- Allocation. Refer to the Parts Catalog.
- Removing and installing. Refer to → Electrical Equipment; Rep. Gr.96; Lamps; Left and Right Rear Door Storage Compartment Illumination Bulb L170/L171, Removing and Installing.
4 - Rear Reflector
- Vehicles with a Left Rear Door Warning Lamp -W37-
- Vehicles with a Right Rear Door Warning Lamp -W38-
- Door warning lamps, removing and installing. Refer to → Electrical Equipment; Rep. Gr.96; Lamps; Left/Right Rear Door Warning Lamp W37/W38, Removing and Installing.
5 - Rear Door Trim Panel
- Removing and installing. Refer to → Chapter "Rear Door Trim Panel, Removing and Installing".
6 - Insulation
7 - Bolt
- 1.2 Nm
- For pull handle/armrest
- Quantity: 15
8 - Clip
- Quantity: 7 one-piece
- Quantity: 1 two-piece
- Replace any damaged two-piece clips
9 - Left Rear Door Ambient Lighting Bulb -L166-
- Right: Right Rear Door Ambient Lighting Bulb -L167-
- Equipment levels
- Removing and installing. Refer to → Electrical Equipment; Rep. Gr.96; Lamps; Left and Right Ambient Lighting Bulb for Rear Doors L166/L167, Removing and Installing.
10 - Bolt
- 1.2 Nm
- Quantity: 6
11 - Trim Panel
- For the window frame
- Removing and installing. Refer to → Chapter "Window Frame Trim Panel, Removing and Installing".
12 - Rear Ashtray
- Removing and installing
13 - Bolt
- 1.2 Nm
- For inside door release mechanism
- Quantity: 9
14 - Interior Door Mechanism
- Removing and installing. Refer to → Chapter "Interior Door Mechanism, Removing and Installing".
15 - Left Rear Interior Locking Switch -E273-
- Right: Right Rear Interior Locking Switch -E274-
- Equipment levels
- Removing and installing. Refer to → Electrical Equipment; Rep. Gr.96; Controls; Left/Right Rear Interior Locking Switch E273/E274, Removing and Installing.
16 - Bolt
- 2.5 Nm
- For door trim
- Quantity: 2
17 - Trim
- For inside door release mechanism
- Removing and installing. Refer to → Chapter "Trim Molding, Removing and Installing".
- Insert in the door trim panel and press on it until it engages audibly.
18 - Trim
- For high range speaker
- Removing and installing. Refer to → Chapter "Treble Speaker Trim, Removing and Installing".
- Press on until it engages audibly
19 - Frame
- Clip into the door trim panel
20 - Speaker Trim
- For bass speaker
- Removing and installing. Refer to → Chapter "Bass Speaker Trim, Removing and Installing".
- Press on until it engages audibly
21 - Left Rear Entry Lamp -W33-
- Right: Right Rear Entry Lamp -W34-
- Equipment levels
- Removing and installing. Refer to → Electrical Equipment; Rep. Gr.96; Lamps; Left/Right Rear Entry Lamp W33/W34, Removing and Installing.
22 - Grip Recess
- With switch mount
- Removing and installing. Refer to → Chapter "Button Trim, Removing and Installing".
23 - Pull Handle/Armrest
- Removing and installing. Refer to → Chapter "Rear Armrest, Removing and Installing".
24 - Bolt
- 2.5 Nm
- For door trim
Overview - Door Window Sun Shade
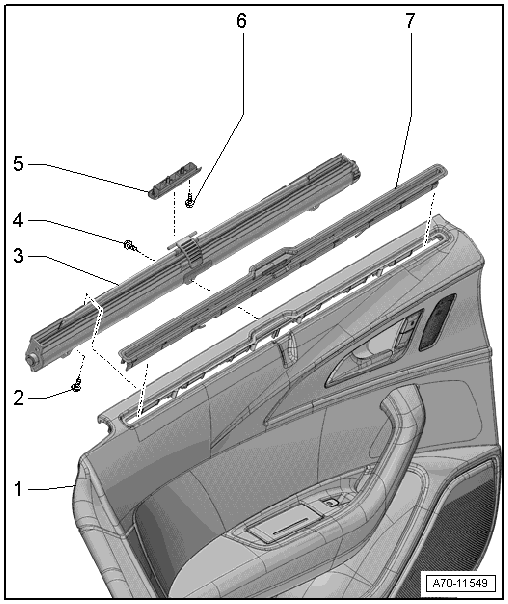
1 - Rear Door Trim Panel
- Removing and installing. Refer to → Chapter "Rear Door Trim Panel, Removing and Installing".
2 - Bolt
- 1.2 Nm
- For the sunshade
- Quantity: 4
3 - Sun Shade
- Removing and installing. Refer to → Chapter "Door Window Sun Shade, Removing and Installing".
4 - Bolt
- 1.2 Nm
- For the sunshade
- Quantity: 3 or 4 depending on the equipment level
5 - Sun Shade Mount
- Removing and installing. Refer to → Chapter "Sun Shade Mount, Removing and Installing".
6 - Bolt
- 2.2 Nm
- For the mount
- Quantity: 2
7 - Guide Strip
- Removing and installing. Refer to → Chapter "Door Window Sun Shade, Removing and Installing".
- Can only be inserted in one position in the door trim panel
