Audi A6 Typ 4G: Rear Door Trim Panel, Removing and Installing
Special tools and workshop equipment required
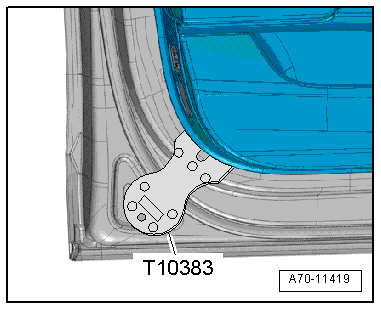
- Wedge Set -T10383-
Removing
- Switch the ignition off and remove the ignition key.
- Remove the interior door mechanism trim. Refer to → Chapter "Trim Molding, Removing and Installing".
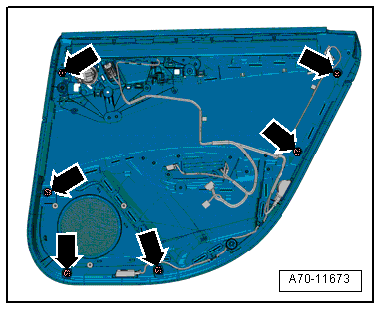
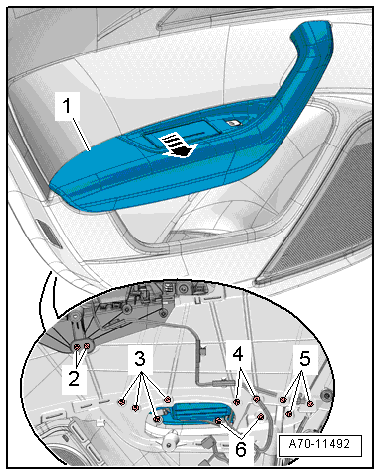
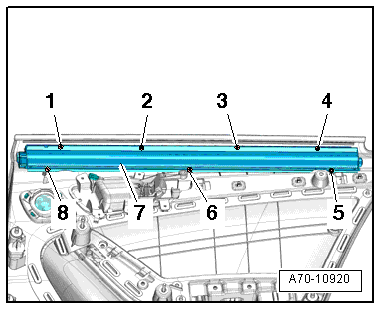
- Remove the bolts -1 to 3-.

 Note
Note
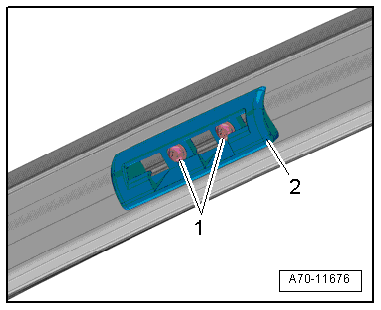
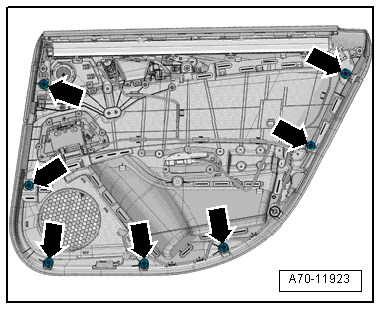
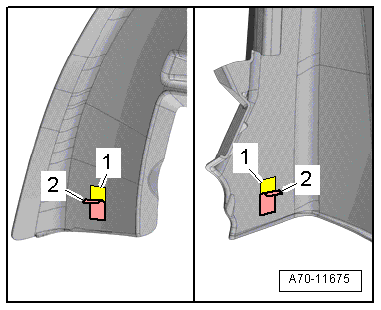
There is a two-piece clip at the bottom of the door trim panel. This clip must be released before the six "normal" one-piece clips are unclipped.
- At the impression down beside the entry light, press hard against the door trim with thumb -arrow 1-. The two-piece clip is released as a result -arrow 2-.
- Using the Wedge Set -T10383- unclip at lower rear in the radius beginning from the door by inserting the wedge between door trim and door in the area of the retaining clip.
- Position of the remaining clips -arrows-.
Market-Specific
- Position of the remaining clips -arrows-.
Continuation for All Vehicles
- Disengage the top of the door trim from the door in the window recess by pulling the door trim up.
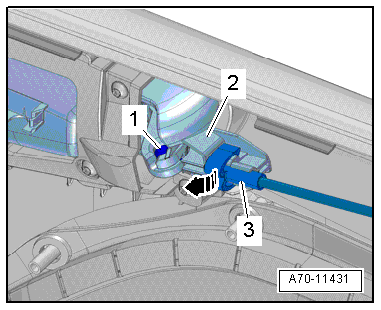
- Versions with a treble speaker: disconnect the treble speaker connector.
- Unclip the cable -3- carefully from the interior door mechanism -2-.
- Swivel the interior door mechanism cable -arrow-.
- Disengage the ends of the cable -1- from the inside door release mechanism.
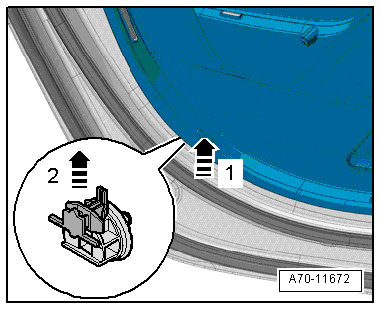
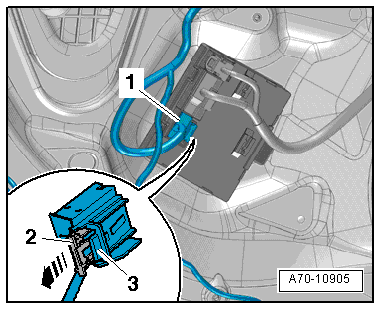
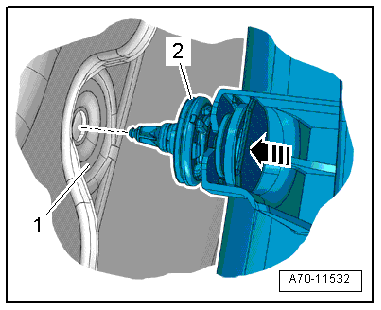
- Disconnect the electrical connector -1- on the door control module by removing securing clip -2--arrow- and pressing the release mechanism -3-.
- Remove the door trim.
Installing
- Replace two-part clip by detaching lower part -1- from the door from the rear side and removing upper part -2- from the door trim.
- Assemble two-part clip in direction of -arrow- and insert in the door trim.
- Engage the ends of the cable -1- in the inside door release mechanism lever.
- Attach the interior door mechanism cable -3- to the interior door mechanism -2-.
- Connect the connectors on the door control module.
- Position the door trim on the window recess and press it down firmly.
- Carefully position the door trim panel clips -2- all around the door and press the door trim onto the door -1- until it engages audibly on the mounting points -arrows-.
Installation is performed in reverse order of removal, noting the following:
Installation notes, for example tightening specifications, replacing components. Refer to → Chapter "Overview - Rear Door Trim Panel".
Rear Armrest, Removing and Installing
Removing
- Remove the rear door trim panel. Refer to → Chapter "Rear Door Trim Panel, Removing and Installing".
- Remove insulation mat.
- Disconnect the connectors.
- Remove the bolts -2 through 6- on the rear of the door trim panel.
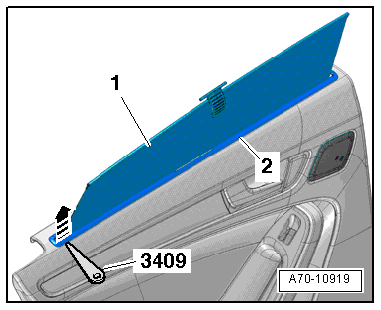
- Loosen and remove the pull handle/armrest -1- from the door trim panel -arrow-.
Installing
Install in reverse order of removal. Note the following:
Installation notes, for example tightening specifications, replacing components. Refer to → Chapter "Overview - Rear Door Trim Panel".
Window Frame Trim Panel, Removing and Installing
Special tools and workshop equipment required
- Trim Removal Wedge -3409-
Removing
- Lower the door window.
- Remove the rear door trim panel. Refer to → Chapter "Rear Door Trim Panel, Removing and Installing".
- Vehicles equipped with sun shade: remove the sun shade mount. Refer to → Chapter "Sun Shade Mount, Removing and Installing".
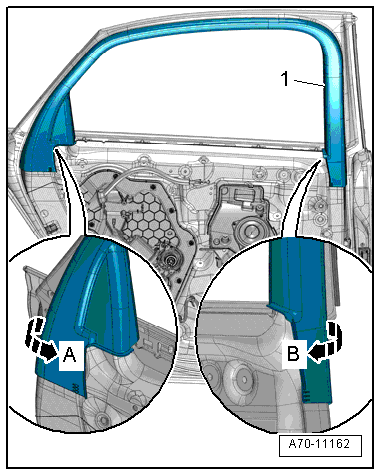
- Carefully pry off the window frame trim panel -1- starting at the lower rear and working along the length of the window guide to the upper front using the Trim Removal Wedge -3409--arrow A-.
- Then, carefully pry off the window frame trim at the lower front using the Trim Removal Wedge -3409- along the length of the window guide -arrow B-.
- Pull down the window frame trim from the window frame and remove.
Installing
- Insert window frame trim -2- in the window guide starting at the top of the B-pillar -1--arrow-.
- Install window frame trim along the entire length of the window guide.
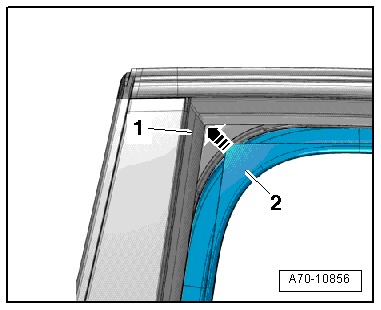
- Remove the protective film -2- from the adhesive pads -1-.
- Press the trim panel firmly onto the door frame so that it is fixed in place.
Installation is performed in reverse order of removal, noting the following:
Installation notes, for example tightening specifications, replacing components. Refer to → Chapter "Overview - Rear Door Trim Panel".
Door Window Sun Shade, Removing and Installing
Special tools and workshop equipment required
- Trim Removal Wedge -3409-
Removing
- Remove the rear door trim panel. Refer to → Chapter "Rear Door Trim Panel, Removing and Installing".
- Carefully release the guide strip -2- using the Trim Removal Wedge -3409- from the door panel in direction of -arrow-.
- Pull the sun shade -1- out of the door trim panel just a little bit, and feed the retaining strap through the guide strip.
- Remove bolts -1 through 6- and -8-.
- Remove the sun shade -7- from the door trim panel by gently pivoting them outward.
Installing
Install in reverse order of removal. Note the following:
- Tighten the bolts in the sequence -1 to 6- and -8-.
Installation notes, for example tightening specifications, replacing components. Refer to → Chapter "Overview - Door Window Sun Shade".
Sun Shade Mount, Removing and Installing
Removing
- Remove the screws -1- and remove mount -2- from the window frame.
Installing
Install in reverse order of removal. Note the following:
Installation notes, for example tightening specifications, replacing components. Refer to → Chapter "Overview - Rear Door Trim Panel".