Audi A6 Typ 4G: Overview - Sunroof
Overview - Sunroof
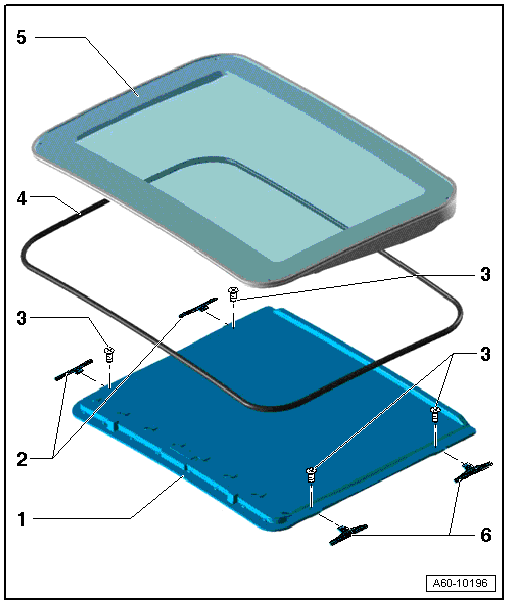
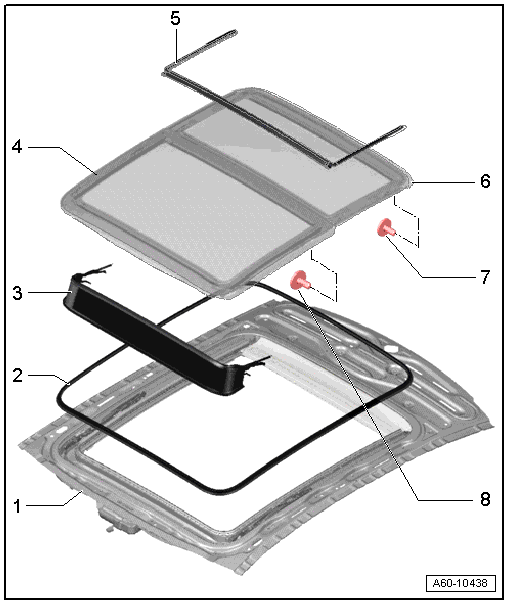
1 - Sliding Headliner
- Only for vehicles with glass panel
- Remove sunroof panel before removing.
- Removing. Refer to → Chapter "Sun Shade, Removing and Installing".
2 - Right Sunroof Spring
- Remove headliner cover frame before removing. Refer to → Body Interior; Rep. Gr.70; Roof Trim Panels; Headliner, Removing and Installing.
- To remove, remove the screw -7- at front and rear.
- Push front spring -2- forward and rear spring rearward, remove both from sliding headliner.
- Remove sliding headliner sideways from opposite guide rail and remove upward.
3 - Bolt
- 1.5 Nm
4 - Seal
- Replacing. Refer to → Chapter "Sunroof Seals, Removing and Installing, Sedan".
5 - Sunroof Panel
- Tilt sunroof panel to remove.
- Boot removed. Refer to → Chapter "Boot, Removing and Installing".
- Remove the left and right bolts and then remove the sunroof panel upward.
- Adjusting. Refer to → Chapter "Sunroof Panel, Adjusting".
6 - Left Sunroof Spring
Overview - Sunroof, Sunroof Frame
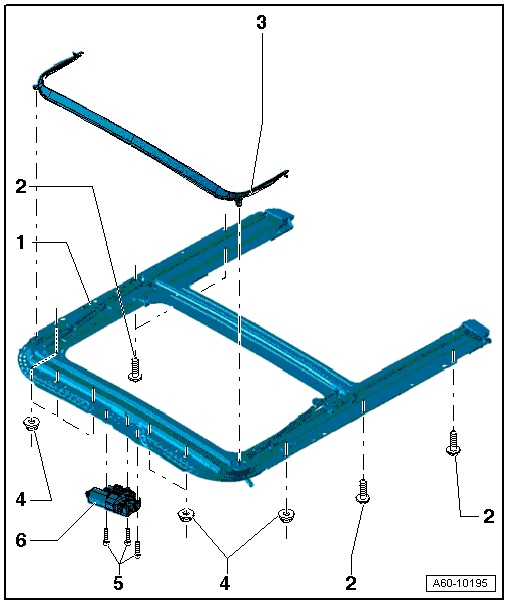
1 - Frame
- Removing:
- Fold the seat backrest all the way back.
- Lower the headliner. Refer to → Body Interior; Rep. Gr.70; Roof Trim Panels; Headliner, Removing and Installing.
- Sunroof panel removed
- Remove the water drain hoses.
- Remove the nuts -4- and screws -2- on the frame.
- Lift the frame through the rear door and out of the vehicle.
- Installing:
- Attach the frame with the nuts and screws loosely to the roof.
- Connect the water drain hoses.
- Secure the frame in the body using a 12 mm drill bit on the front right side and a 10 mm drill bit. Then tighten the nuts to the tightening specification beginning at the front center and working back on the left and right sides.
- Tighten the screws in the same sequence to the tightening specification.
2 - Bolt
- 8 Nm
3 - Wind Deflector
- Removing. Refer to → Chapter "Wind Deflector, Removing and Installing, Sedan".
4 - Nut
- 8 Nm
5 - Bolt
- 4 Nm
6 - Engine
- Removing:
 Note
Note
Remove the motor only when the sunroof panel is closed.
- Interior lamps removed.
- Disconnect the connector from the motor.
- Remove the screws -5- and remove the motor through the headliner cut-out.
- Perform and adaptation after removing and installing a motor. Refer to → Chapter "Motor Adaptation".
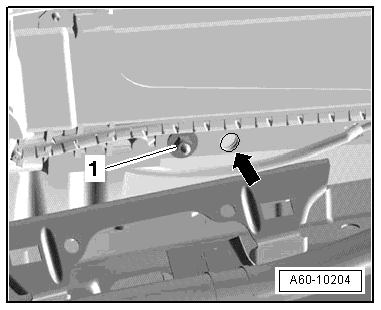
Attaching Points for the Frame
- When installing the sunroof, the frame must be attached at the front right side -arrow- from the first nut -1- with a 12 mm drill and....
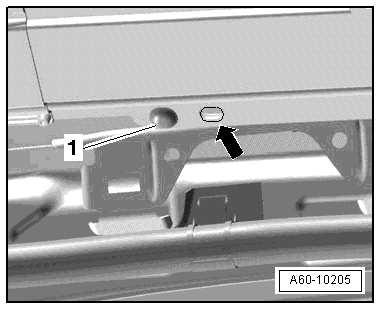
- The rear left side (oblong hole) -arrow- in front of the last screw -1- with a 10 mm drill.
- Starting at the center and working from the front to the rear, tighten the nuts and screws to the tightening specification. Refer to → Chapter "Overview - Sunroof, Sunroof Frame".
Overview - Panorama Sunroof
Overview - Panorama Sunroof, Sedan
Note
- Only the differences on the Avant Panorama sunroof are shown.
- Removing and installing the individual parts of the Panorama sunroof on the Sedan is identical on the Avant Panorama sunroof.
1 - Panorama Sunroof Frame
- Removing. Refer to → Chapter "Sunroof Frame, Removing and Installing, Avant".
2 - Seal
- Replacing
3 - Wind Deflector
- Removing. Refer to → Chapter "Wind Deflector, Removing and Installing, Avant".
4 - Sunroof Panel "1"
- Removing. Refer to → Chapter "Sunroof Panel 1 for Panorama Sunroof, Removing and Installing".
5 - Panel Seal
- Removing. Refer to -item 3-.
6 - Sunroof Panel "2"
- Removing. Refer to → Chapter "Sunroof Panel 2 for Panorama Sunroof, Removing and Installing".
7 - Bolt
- 3 Nm
8 - Bolt
- 7 Nm
Overview - Panorama Sunroof, Avant

1 - Panorama Sunroof Frame
- Removing. Refer to → Chapter "Sunroof Frame, Removing and Installing, Avant".
2 - Seal
- Replacing.
3 - Wind Deflector
- Removing. Refer to → Chapter "Wind Deflector, Removing and Installing, Avant".
4 - Sunroof Panel "1"
- Removing. Refer to → Chapter "Sunroof Panel 1 for Panorama Sunroof, Removing and Installing".
5 - Panel Seal
- Removing. Refer to -item 3-.
6 - Sunroof Panel "2"
- Removing. Refer to → Chapter "Sunroof Panel 2 for Panorama Sunroof, Removing and Installing".
7 - Bolt
- 3 Nm
8 - Bolt
- 7 Nm
Overview - Sunroof Shade
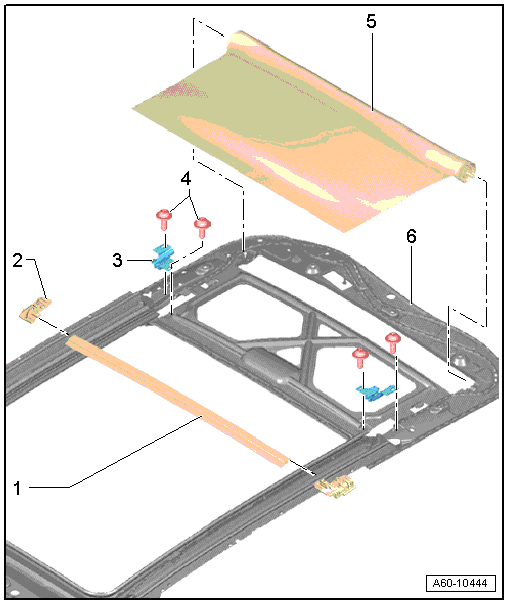
1 - Tension Bow
- Removing. Refer to → Chapter "Sunroof Shade Cable, Removing and Installing".
2 - Sun Shade Cable Coupling Plate
- Can only be replaced with the cable.
- Removing. Refer to → Chapter "Sunroof Shade Cable, Removing and Installing".
3 - Cable Stop
- Removing. Refer to → Chapter "Sunroof Shade Cable, Removing and Installing".
4 - Bolt
- 1 Nm
5 - Sun Shade
- Removing. Refer to
→ Chapter "Sunroof Shade, Removing and Installing".
- Remove the side rail from the material for the sun shade.
6 - Panorama Sunroof Frame
