Audi A6 Typ 4G (2011–2018) Workshop Manual / Body / Body Exterior / Exterior Equipment / Overview - Underbody Panels
Audi A6 Typ 4G: Overview - Underbody Panels
Overview - Front Underbody Panels
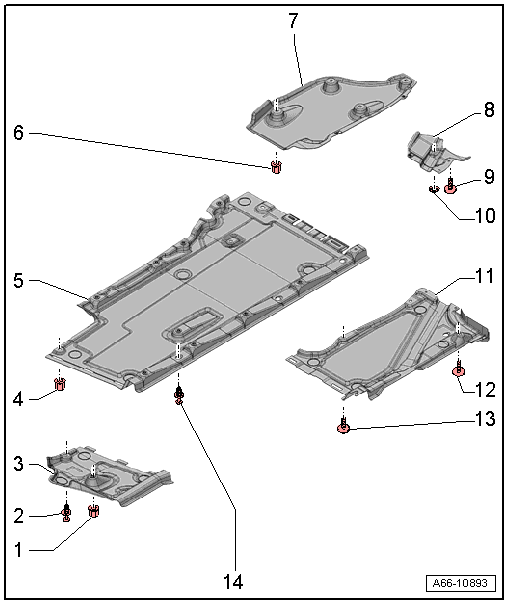
1 - Nut
- With retainer
- 2.1 Nm
2 - Expanding Clip
3 - Front Vehicle Underbody Cover
- Removing and installing. Refer to → Chapter "Front Vehicle Underbody Cover, Removing and Installing".
4 - Nut
- 2.1 Nm
- With retainer
- Quantity: 10
5 - Center Vehicle Underbody Cover
- Removing and installing. Refer to → Chapter "Center Vehicle Underbody Cover, Removing and Installing".
6 - Nut
- 2.1 Nm
- Quantity: 4
7 - Left Rear Cover
- Removing and installing. Refer to → Chapter "Left Rear Vehicle Underbody Cover, Removing and Installing".
8 - Stone Chip Protective Molding
- Removing and installing. Refer to → Chapter "Stone Chip Protective Molding, Removing and Installing".
9 - Bolt
- 2.1 Nm
10 - Retaining clip
11 - Rear Vehicle Underbody Cover
- Removing and installing. Refer to → Chapter "Rear Vehicle Underbody Cover, Removing and Installing".
12 - Bolt
- 3.5 Nm
13 - Bolt
- 2.1 Nm
- Quantity: 4
14 - Expanding Clip
Overview - Rear Underbody Panels
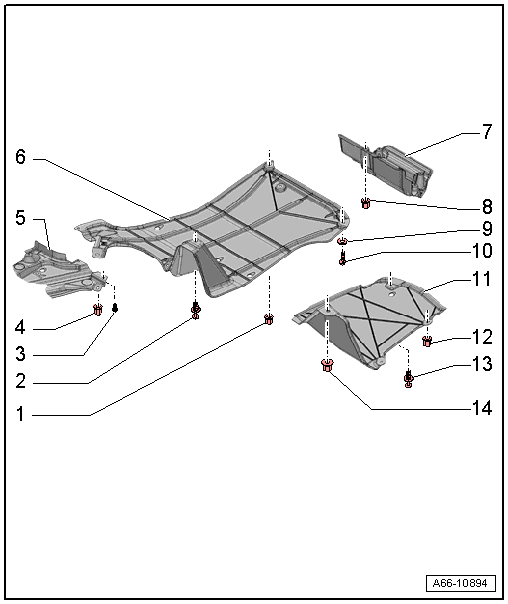
1 - Nut
- Quantity: 2
- 2.1 Nm
2 - Expanding Clip
3 - Bolt
- 2.1 Nm
4 - Nut
- 2.1 Nm
5 - Rear cover for the Right Underbody Cover
6 - Center Rear Cover
- Removing and installing. Refer to → Chapter "Center Cover, Removing and Installing".
7 - Front Cover for the Spare Wheel Well
- Removing and installing. Refer to → Chapter "Front Cover for Spare Tire Well, Removing and Installing".
8 - Nut
- 2.1 Nm
- Quantity: 5
9 - Washer
- Quantity: 2
10 - Bolt
- Quantity: 2
- 15 Nm
11 - Right Rear Cover
- Removing and installing. Refer to → Chapter "Right Rear Cover, Removing and Installing".
12 - Nut
- 2.1 Nm
13 - Expanding Clip
14 - Nut
- 20 Nm
