Audi A6 Typ 4G: Rain/Light Recognition Sensor, Removing and Installing
Rain/Light Recognition Sensor -G397-, Removing and Installing, without Humidity Sensor -G355-
Special tools and workshop equipment required
- Cleaning Solution -D 009 401 04-
Removing
- Remove the interior rearview mirror. Refer to → Body Interior; Rep. Gr.68; Interior Rearview Mirror; Interior Rearview Mirror, Removing and Installing.
- Disconnect the connector.
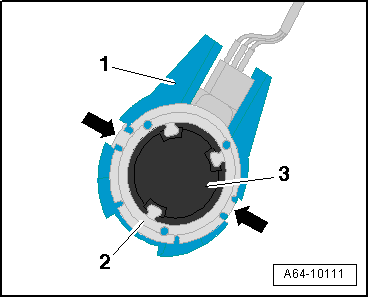
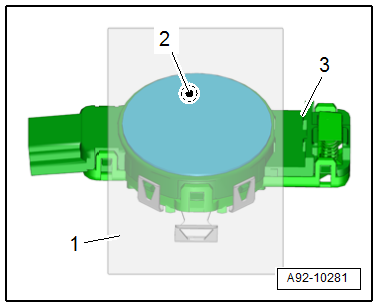
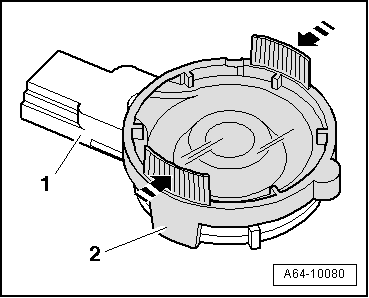
- Release the retaining tab -arrows- with a small screwdriver.
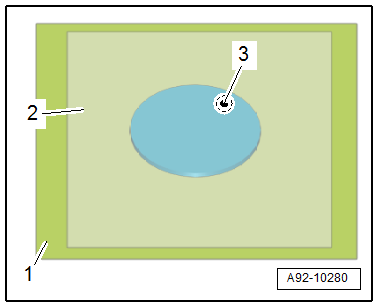
- Remove the retaining clip -2- from the mounting plate -1-.
- Wait one minute so that the silicon pad can release without leaving any residue.
- Loosen the Rain/Light Recognition Sensor -G397--item 3- by moving it back and forth and remove it from the mount.
- Remove the silicon pad from the windshield, leaving no residue.
Installing
Install in the reverse order of removal. Note the following:
 Note
Note
Replace the silicon pad.
- Clean the adhesive surface on the windshield with Cleaning Solution -D 009 401 04-.
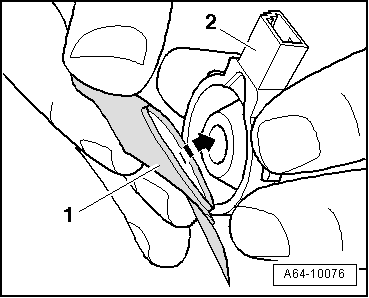
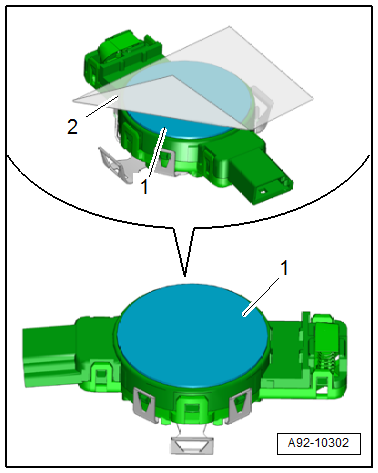
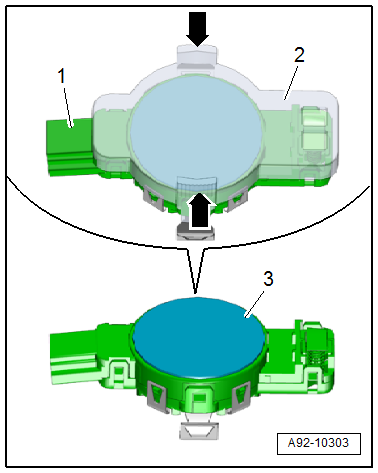
- Remove the silicone pad -2- cleanly from the sensor -1-.
- Clean the adhesive surface on the sensor with Cleaning Solution -D 009 401 04-.

- Remove the silicone paper -3- from the silicone pad -2-.
- The clear protective film -1- remains on the silicone pad as an assembly aid.
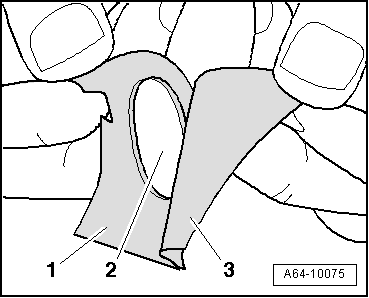
- Center the silicone pad on the sensor -2- using the clear protective film -1-.
- Press the silicone pad through the protective film -1- onto the sensor -2- without forming any bubbles.

- Remove the protective film -1- from the silicone pad -2-.
Note
To avoid contaminating the silicone pad, remove the protective film just before installing it.
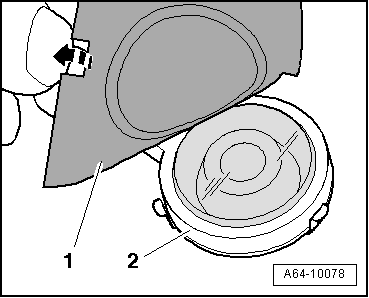
- Spray the entire surface of the silicone pad -1- with the Cleaning Solution -D 009 401 04- and insert the sensor into the mount.
 Caution
The Rain/Light Recognition Sensor -G397- must have no embedded objects or bubbles between it and the windshield to function correctly.
- Press the retaining clip onto the mounting plate until it audibly engages.
Rain/Light Recognition Sensor -G397-, Removing and Installing, with Humidity Sensor -G355-
Special tools and workshop equipment required
- Cleaning Solution -D 009 401 04-
Removing
- Turn off the ignition.
- Vehicles with ignition lock: Remove the key.
- Remove the interior rearview mirror. Refer to → Body Interior; Rep. Gr.68; Interior Rearview Mirror; Interior Rearview Mirror, Removing and Installing.
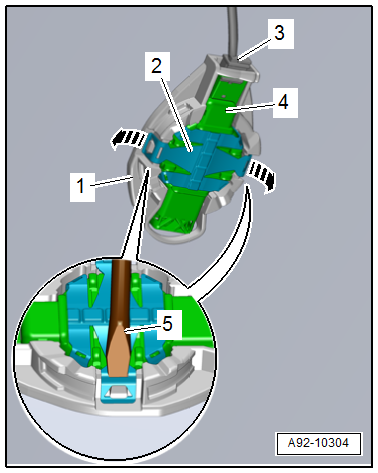
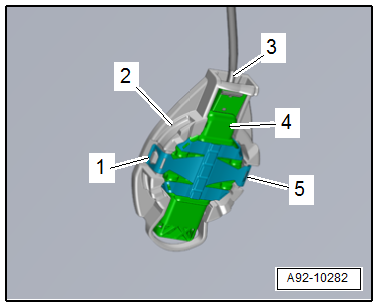
- Disconnect the connector -3-.
- Insert a narrow screwdriver -5- into the opening as shown and release the retaining tabs -2- in direction of -arrows-.
- Wait one minute so that the silicon pad can release without leaving any residue.
- Loosen the Rain/Light Recognition Sensor -G397--item 4- by moving it back and forth and remove it from the mount -1-.
Caution
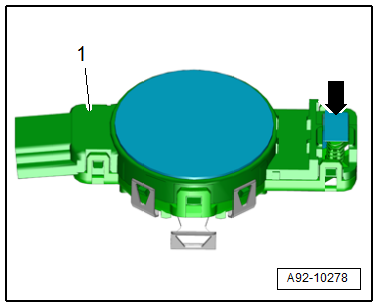
Risk of damage to the humidity sensor.
- The humidity sensor -arrow- on the rain/light recognition sensor -1- is extremely sensitive and must not be damaged.
- A damaged humidity sensor must be replaced.
Installing
Install in the reverse order of removal. Note the following:
Note
Replace the silicon pad and retainer.
- Release the retaining tabs on the retainer -1- in direction of -arrows- and remove it from the sensor -2-.
- Press on the new retainer until it audibly engages.
- Clean the adhesive surface on the windshield with Cleaning Solution -D 009 401 04-.
- Any silicone residue must be completely removed.

- Remove the silicone pad -2- cleanly from the sensor -3-.
- Clean the adhesive surface -1- on the sensor with Cleaning Solution -D 009 401 04-.
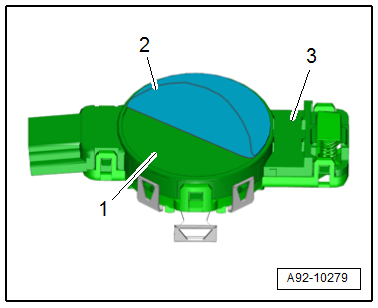
- Remove the silicone paper -1- from the silicone pad -3-.
- The clear protective film -2- remains on the silicone pad as an assembly aid.
- Center the silicone pad -2- on the sensor -3- using the clear protective film -1-.
- Press the silicone pad through the protective film onto the sensor without forming any bubbles.
- Remove the protective film -2- from the silicone pad -1-.
Note
To avoid contaminating the silicone pad, remove the protective film just before installing it.
- Spray the entire surface of the silicone pad with the Cleaning Solution -D 009 401 04-.
- Insert the sensor -4- into the mount -2-.
Caution
The Rain/Light Recognition Sensor -G397- must have no embedded objects or bubbles between it and the windshield to function correctly.
- Press the retaining clips -1 and 5- until they audibly engage.
- Connect the connector -3-.
Rain/Light Recognition Sensor -G397-, Replacing, without Humidity Sensor -G355-
Special tools and workshop equipment required
- Cleaning Solution -D 009 401 04-
Removing
- Remove the interior rearview mirror. Refer to → Body Interior; Rep. Gr.68; Interior Rearview Mirror; Interior Rearview Mirror, Removing and Installing.
- Disconnect the connector.
- Release the retaining tab -arrows- with a small screwdriver.
- Remove the retaining clip -2- from the mounting plate -1-.
- Wait one minute so that the silicon pad can release without leaving any residue.
- Loosen the Rain/Light Recognition Sensor -G397--item 3- by moving it back and forth and remove it from the mount.
- Remove the silicon pad from the windshield, leaving no residue.
- Clean the adhesive surface on the windshield with Cleaning Solution -D 009 401 04-.
- Any silicone residue must be completely removed.
Installing
Install in the reverse order of removal. Note the following:
Note
Replace the silicon pad.
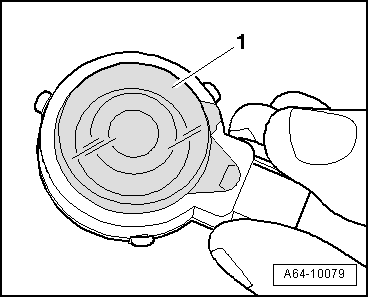
- Press the grip surfaces in direction of -arrows- on the protective cap -2- gently together and remove from the sensor -1-.
Note
To avoid contaminating the silicone pad, remove the protective cap just before installing it.
- Spray the entire surface of the silicone pad -1- with the Cleaning Solution -D 009 401 04- and insert the sensor into the mount.
Caution
The Rain/Light Recognition Sensor -G397- must have no embedded objects or bubbles between it and the windshield to function correctly.
- Press the retaining clip onto the mounting plate until it audibly engages.
Rain/Light Recognition Sensor -G397-, Replacing, with Humidity Sensor -G355-
Special tools and workshop equipment required
- Cleaning Solution -D 009 401 04-
Removing
- Turn off the ignition.
- Vehicles with ignition lock: Remove the key.
- Remove the interior rearview mirror. Refer to → Body Interior; Rep. Gr.68; Interior Rearview Mirror; Interior Rearview Mirror, Removing and Installing.
- Disconnect the connector -3-.
- Insert a narrow screwdriver -5- into the opening as shown and release the retaining tabs -2--arrows-.
- Wait one minute so that the silicon pad can release without leaving any residue.
- Loosen the Rain/Light Recognition Sensor -G397--item 4- by moving it back and forth and remove it from the mount -1-.
- Clean the adhesive surface on the windshield with Cleaning Solution -D 009 401 04-.
- Any silicone residue must be completely removed.
Installing
Install in the reverse order of removal. Note the following:
Caution
Risk of damage to the humidity sensor.
- The humidity sensor -arrow- on the rain/light recognition sensor -1- is extremely sensitive and must not be damaged.
- A damaged humidity sensor must be replaced.
- Press the grip surfaces -arrows- on the protective cap -2- gently together and remove from the sensor -1-.
Note
To avoid contaminating the silicone pad, remove the protective cap just before installing it.
- Spray the entire surface of the silicone pad -3- with the Cleaning Solution -D 009 401 04-.
- Insert the sensor -4- into the mount -2-.
Caution
The Rain/Light Recognition Sensor -G397- must have no embedded objects or bubbles between it and the windshield to function correctly.
- Press the retaining clips -1 and 5- until they audibly engage.
- Connect the connector -3-.
- After replacing the rain/light recognition sensor, it must be re-coded in "Guided Functions" using the Vehicle Diagnostic Tester.
