Audi A6 Typ 4G: Side Windows
Overview - Rear Side Window
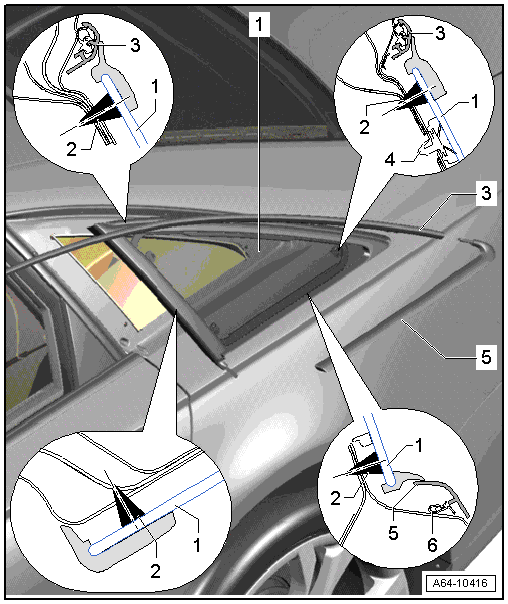
1 - Side Window
- Roof trim molding and side trim molding are removed.
- The "C-pillar" trim is removed.
- Remove the window.
- When installing a new window, first press it into the "D-pillar" with the securing pin and then insert the whole thing into the window opening and let the securing pin lock into the "C-pillar".
- If a window was removed and is being installed again, then secure the window to the inside the window opening with tape.
2 - Adhesive Bead
- Dimension -a- = 6 mm
- Dimension -b- = 6 mm
- Dimension -c- = 33 mm
3 - Roof Trim Molding
4 - Locking Pin
- No replacement part
- Is cut through when removing window.
5 - Side Trim Molding
Overview - Rear Side Window, Avant
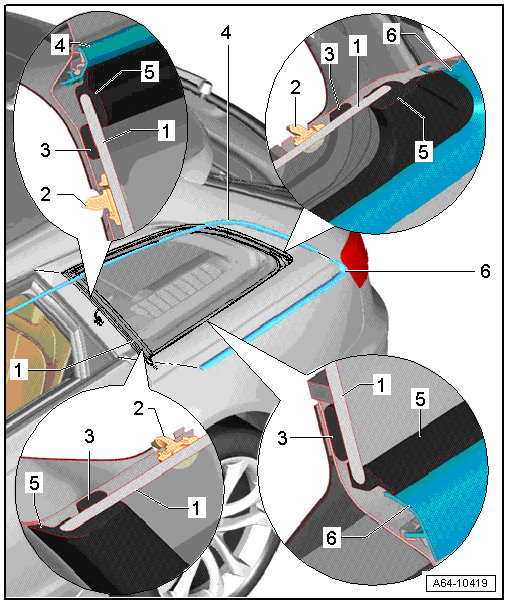
1 - Side Window
- Before removing, remove side panel trim molding -4- and remove roof trim in "D-pillar" area sideways from clips.
2 - Centering Pin
- Will be cut during removal.
3 - Adhesive Bead
4 - Roof Trim Molding
- Unclip near the side window.
5 - Side Window Molding
- No replacement part
- Must not be damaged in field of vision.
6 - Side Panel Trim Molding
- Unclip from the side panel and pull it off the roof trim molding.
Rear Side Window, Removing and Installing
Undamaged Side Window, Removing, Sedan
Procedure
 Caution
In the window separation area, protect the side panel and roof against paint damage with adhesive tape.
- Remove the inner door seal in the "C-pillar" and side window area.
- The "C-pillar" trim is removed.
- Remove the roof trim molding.
 Caution
Roof trim molding must not be bent.
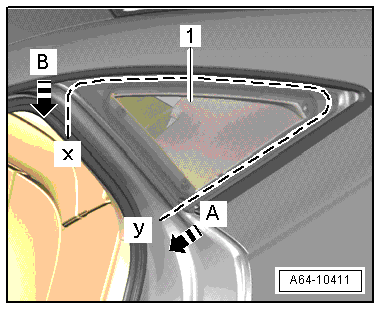
- Route the cutting wire around the side window as shown in the illustration.
- Secure ends X and Y in two pull grips from Bonded Window Tool Kit -VAG 1351-.
- Pull cutting wire forward in direction of -arrow A- using light sawing motions and cut through lower adhesive sealing material at side panel and at roof frame.
- In this way, first the securing pin on the rear of the window and then the adhesive bead are cut through.
- Then pull cutting cord through in direction of -arrow B- downward through adhesive sealing material.
- Remove window from window opening.
Undamaged Side Window, Removing, Avant
Procedure
 WARNING
- To prevent damage to paint when removing and installing trim molding, cover area below side window and on side panel using adhesive tape.
- Also, a slightly bent roof trim molding is damaged and must be replaced.
Vehicles with high gloss roof trim molding:
- Roof trim molding and side trim molding removed.
- Unclip the roof trim molding on the roof around the side window.
 Caution
Remove the upper "C-pillar" and "D-pillar" trim and secure the antenna connections with adhesive tape to the center of the window.
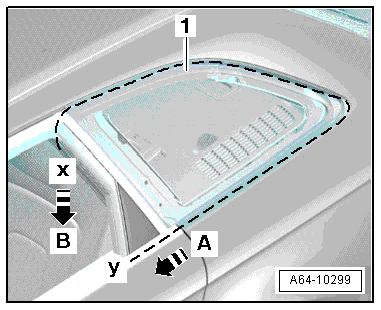
- Route the cutting wire around the side window as shown in the illustration.
- Secure ends X and Y in two pull grips from Bonded Window Tool Kit -VAG1351-.
- Pull cutting wire forward in direction of -arrow A- using sawing motions and cut through lower adhesive sealing material at side panel and at roof frame.
- In this way, first the securing pin on the rear of the window and then the adhesive bead are cut through.
- Then pull cutting cord through in direction of -arrow B- downward through adhesive sealing material.
- Remove window from window opening.
Broken Side Window, Removing
Procedure
- Protect body and interior from glass splinters.
- Bond flange all around with fabric reinforced adhesive tape.
- Remove glass pieces from adhesive material.
 WARNING
Always wear protective eyewear and leather gloves when removing a window glass.
- Cut through the adhesive sealing material (with glass residue) in the from window opening using Window Cutter - VAG1561A- and Cutting Blade, Bent at Right Angle - VAG1561/10-
Side Window, Installing, Sedan
Procedure
- Installing. Refer to → Chapter "Bonded Window Glass Installation Instructions".
- Prepare the undamaged window for installing. Refer to → Chapter "Undamaged Window Glass, Preparing for Installation".
- Prepare the new window for installation. Refer to → Chapter "New Window Glass, Preparing for Installation".
- Prepare the body flange for installation. Refer to → Chapter "Body Flange, Preparing for Installation".
 Note
Note
1K Window Adhesive -DH 009 100 03- (small cartridge) is recommended when bonding a single window 2K Window Adhesive Kit -D 004 600 A2- is recommended when bonding more than one window.
- First press the new window onto the "D-pillar" with the securing pin, then insert it into the window opening and push the securing pin onto the "C-pillar".
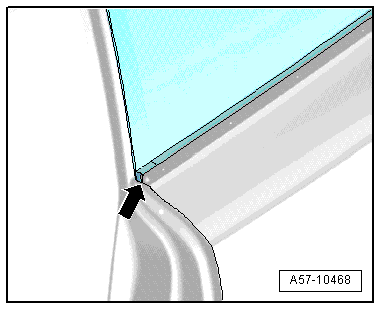
- On windows without a securing pin, align the window lengthwise to the edge on the side panel -arrow- and then insert it into the cut-out for the window.
- Secure window in window opening with adhesive tape.
- Install the door seal on the "C-pillar".
- Observe the minimum curing time. Refer to → Chapter "Minimum Curing Time for Bonded Windows".
Side Window, Installing, Avant
Procedure
- Installing. Refer to → Chapter "Bonded Window Glass Installation Instructions".
- Prepare the undamaged window for installing. Refer to → Chapter "Undamaged Window Glass, Preparing for Installation".
- Prepare the new window for installation. Refer to → Chapter "New Window Glass, Preparing for Installation".
- Prepare the body flange for installation. Refer to → Chapter "Body Flange, Preparing for Installation".
 Note
Note
1K Window Adhesive -DH 009 100 03- (small cartridge) is recommended when bonding a single window 2K Window Adhesive Kit -D 004 600 A2- is recommended when bonding more than one window.
- The roof trim molding and side trim molding must be installed before installing the side window.
- Install the side window and centering pins into the window flange and press it all the way into the body.
 Note
Note
Side window without centering pins must be secured to the body with adhesive tape.

