Audi A6 Typ 4G: Catch, Removing and Installing
Hood Hook, Removing and Installing
Removing
- Remove the nuts -1- and the
hood catch -2-.
Installing
Install in reverse order of removal.
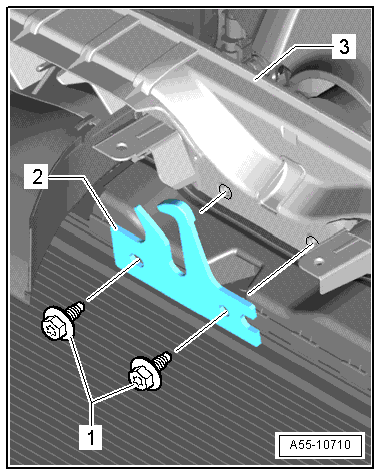
Lock Carrier Hook, Removing and Installing
Removing
- Remove the lock carrier cover.
- Remove the bolts -1- and then
remove the hood catch -2- from the
lock carrier -3-.
- Tighten the bolts to 5 Nm.
Installing
Install in reverse order of removal.
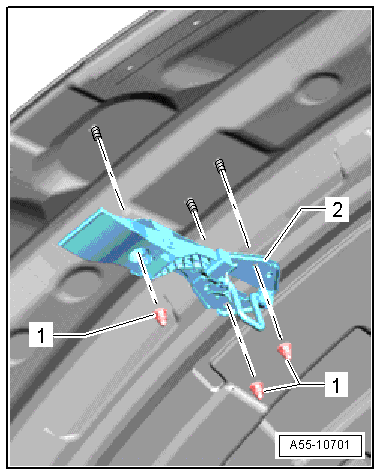
Catch, Removing and Installing
1 - Nut
- Tightening specification. Refer to
→ Chapter "Overview - Hood".
2 - Catch
- Removing
- Remove the bolts and the hood catch.
- Installing
- Align the hood catch with the markings on the hood
-arrows- and then tighten the bolts.
3 - Hood
READ NEXT:
1 - Hood
2 - Hood Hinge
Removing
Before removing a hood hinge, support the hood or secure it against
falling.
Remove the gas-filled strut. Refer to
→ Chapter "Gas-
Overview - Rear Lid, Sedan
1 - Rear Lid
Removing and installing. Refer to
→ Chapter "Rear Lid, Removing and Installing, Sedan".
2 - Stop Strip
3 - Adjusting
Rear Lid, Removing and Installing, Sedan
1 - Rear Lid
A second technician will be needed during removal and installation
to support and to hold the rear lid.
Removing:
Note
Ma
SEE MORE:
Overview - Rear Axle
Part I
I - → Chapter "Overview - Subframe, Vehicles with FWD"
II - → Chapter "Overview - Subframe, Vehicles with AWD"
III - → Chapter "Overview - Stabilizer Bar"
IV - → Chapter "Overview - Transverse Link"
V&n
Caution
Do not bend the fiber-optic cable too much. The
bending radius must be no less than 25 mm.
Fiber optic cables must not be routed over sharp
edges.
The fiber-optic cable must not be dirty or touched
with bare fingers.
Fiber optic cables may not be heated.
It is not permitted to tw
