Audi A6 Typ 4G: Sill Panel Strip Lamps
Overview - Entry Lamp
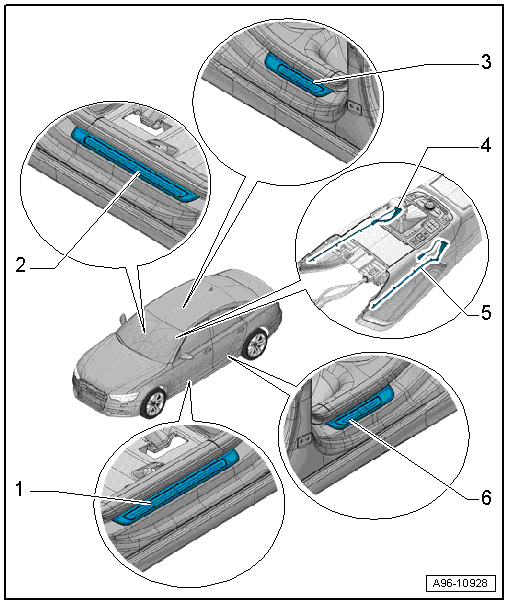
1 - Fiber Optic Cable for Left Front Sill Panel Ambient Lighting -W67-
- Removing and installing. Refer to → Chapter "Left/Right Fiber Optic Cable for Front Sill Panel Ambient Lighting -W67-/-W68-, Removing and Installing".
2 - Fiber Optic Cable for Right Front Sill Panel Ambient Lighting -W68-
- Removing and installing. Refer to → Chapter "Left/Right Fiber Optic Cable for Front Sill Panel Ambient Lighting -W67-/-W68-, Removing and Installing".
3 - Fiber Optic Cable for Right Rear Sill Panel Ambient Lighting -W70-
- Removing and installing. Refer to → Chapter "Left/Right Fiber Optic Cable for Rear Sill Panels -W69-/-W70-, Removing and Installing".
4 - Right Center Armrest Illumination Bulb -L157- Right
5 - Right Center Armrest Illumination Bulb -L157- Left
6 - Fiber Optic Cable for Left Rear Sill Panel Ambient Lighting -W69-
- Removing and installing. Refer to → Chapter "Left/Right Fiber Optic Cable for Rear Sill Panels -W69-/-W70-, Removing and Installing".
Entry Lamp, Removing and Installing
Left/Right Fiber Optic Cable for Front Sill Panel Ambient Lighting -W67-/-W68-, Removing and Installing
The ambient lighting fiber optic cable is integrated in the sill panel trim and cannot be replaced separately if faulty.
- Replace the front sill panel. Refer to → Body Interior; Rep. Gr.70; Passenger Compartment Trim; Sill Panel Strip, Removing and Installing.
Left/Right Fiber Optic Cable for Rear Sill Panels -W69-/-W70-, Removing and Installing
The ambient lighting fiber optic cable is integrated in the sill panel trim and cannot be replaced separately if faulty.
- Replace the rear sill panel. Refer to → Body Interior; Rep. Gr.70; Passenger Compartment Trim; Sill Panel Strip, Removing and Installing.
