Audi A6 Typ 4G: Antenna Amplifier, Removing and Installing
Antenna Amplifier 2 -R111-/Antenna Amplifier 3 - R112-, Removing and Installing, Sedan
The Antenna Amplifier 2 -R111-/Antenna Amplifier 3 -R112- are located on the D-pillar at the top.
Removing and installing is identical.
Removing
- Turn off the ignition and all electrical equipment and remove the ignition key.
- Remove the D-pillar trim panel. Refer to → Body Interior; Rep. Gr.70; Vehicle Interior Trim Panels; D-Pillar Trim Panel, Removing and Installing.
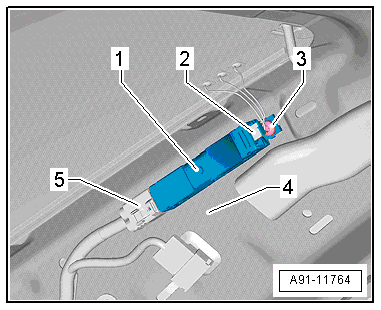
- Release and disconnect the connectors -2- and -5- from the Antenna Amplifier 2 -R111--1-.
- Remove the bolt -3- and remove the Antenna Amplifier 2 -R111--1- from the D-pillar -4-.
Installing
- Installation is identical in reverse order of removal.
Antenna Amplifier -R124- / Antenna Amplifier 4 - R113-, Removing and Installing, Sedan
The Antenna Amplifier -R24-/Antenna Amplifier 4 -R113- are located at the bottom of the D-pillar.
Removing and installing is identical.
Removing
- Turn off the ignition and all electrical equipment and remove the ignition key.
- Remove the D-pillar trim panel. Refer to → Body Interior; Rep. Gr.70; Vehicle Interior Trim Panels; D-Pillar Trim Panel, Removing and Installing.
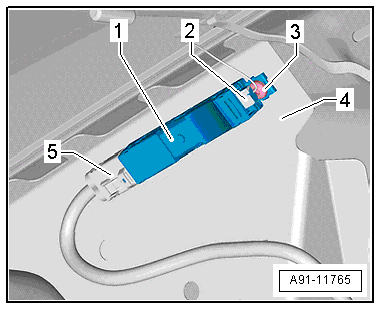
- Release and disconnect the connectors -2- and -5- on the Antenna Amplifier -R24--1-.
- Remove bolt -3- and remove the Antenna Amplifier -R124--1- from the D-pillar -4-.
Installing
- Installation is identical in reverse order of removal.
Antenna Amplifier -R24-, Removing and Installing, Avant
The Antenna Amplifier -R24-is located on the bottom left of the rear lid.
Removing
- Turn off the ignition and all electrical equipment and remove the ignition key.
- Remove the lower rear lid trim panel. Refer to → Body Interior; Rep. Gr.70; Luggage Compartment Trim Panel; Rear Lid Lower Trim Panel, Removing and Installing.
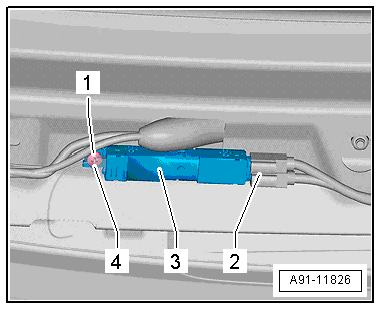
- Release and disconnect the connectors -1- and -3- on the Antenna Amplifier -R24--2-.
- Remove the bolts -4- and remove the Antenna Amplifier -R24--2- from the rear lid.
Installing
- Installation is identical in reverse order of removal.
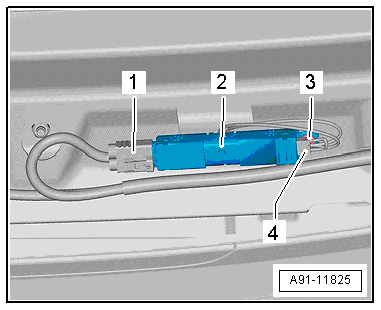
Antenna Amplifier 2 -R111-, Removing and Installing, Avant
The Antenna Amplifier 2 -R111- is located on the upper left of the rear lid.
Removing
- Turn off the ignition and all electrical equipment and remove the ignition key.
- Remove the lower rear lid trim panel. Refer to → Body Interior; Rep. Gr.70; Luggage Compartment Trim Panel; Rear Lid Lower Trim Panel, Removing and Installing.
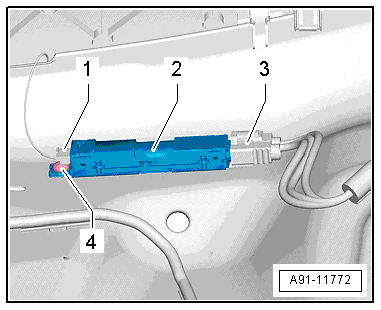
- Release and disconnect the connectors -2- and -4- from the Antenna Amplifier 2 -R111--3-.
- Remove the bolt -1- and remove the Antenna Amplifier 2 -R111--3- from the rear lid.
Installing
- Installation is identical in reverse order of removal.
Antenna Amplifier 4 -R113-, Removing and Installing, Avant
Antenna Amplifier 4 -R113- is located at the top right of the rear lid.
Removing
- Turn off the ignition and all electrical equipment and remove the ignition key.
- Remove the upper rear lid trim panel. Refer to → Body Interior; Rep. Gr.70; Luggage Compartment Trim Panel; Rear Lid Upper Trim Panel, Removing and Installing.
- Release and disconnect the connectors -1- and -4- from the Antenna Amplifier 4 -R113--2-.
- Remove the bolt -3- and remove the Antenna Amplifier 4 -R113--2- from the rear lid.
Installing
- Installation is identical in reverse order of removal.
Antenna Amplifier 3 -R112-, Removing and Installing, Avant
The Antenna Amplifier 3 -R112- are located on the left C-pillar.
Removing
- Turn off the ignition and all electrical equipment and remove the ignition key.
- Remove the C-pillar trim. Refer to → Body Interior; Rep. Gr.70; Vehicle Interior Trim Panel; C-Pillar Trim, Removing and Installing.
- Release and disconnect the connectors -2- and -4- from the Antenna Amplifier 3 -R112--1-.
- Remove bolt -3- and remove the Antenna Amplifier 3 -R112--1- from the C-pillar.
Installing
- Installation is identical in reverse order of removal.

