Audi A6 Typ 4G: Attachments, Removing and Installing
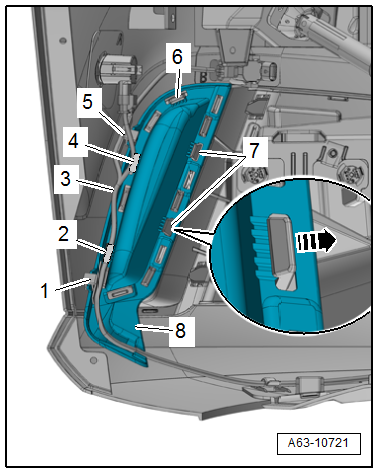
Lock Carrier Cover, Removing and Installing
Special tools and workshop equipment required
- Pry Lever -80-200-
Removing
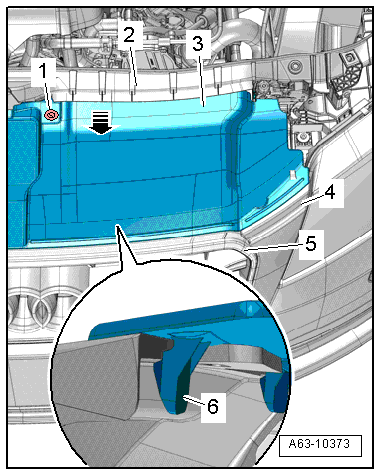
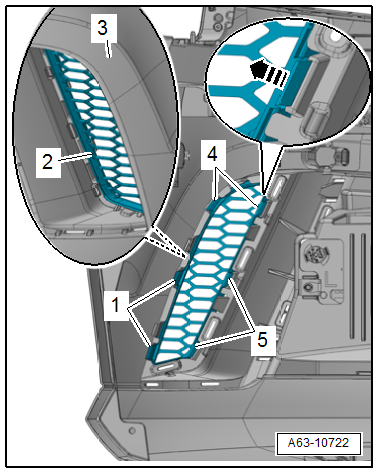
- Remove the expanding rivets -1- with a Pry Lever -80-200-.
- Remove the lock carrier cover -3- from the groove in the lock carrier -2--arrow-.
- Move the lock carrier cover forward and remove it.
- While doing this, the tabs -6- on the radiator grille -5- will detach from the bumper cover -4-.
Installing
Install in reverse order of removal. Note the following:
- Slide the lock carrier cover into the groove in the lock carrier cover and then push it onto the radiator grille and bumper cover.
Center Reinforcement Brace, Removing and Installing, Vehicles through MY 2014
Removing
- Remove the front bumper cover. Refer to → Chapter "Bumper Cover, Removing and Installing".
- Remove the mount for the Night Vision System Camera -R212- and free up the windshield washer fluid hose, if equipped. Refer to → Chapter "Night Vision System Camera -R212- Mount, Removing and Installing, Vehicles through MY 2014".
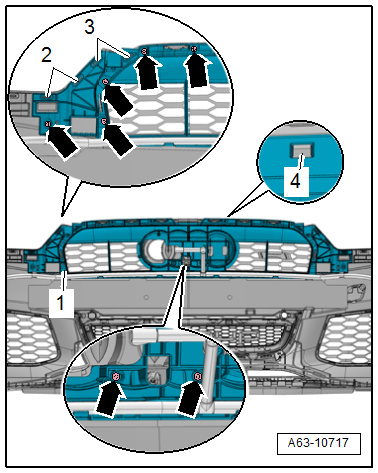
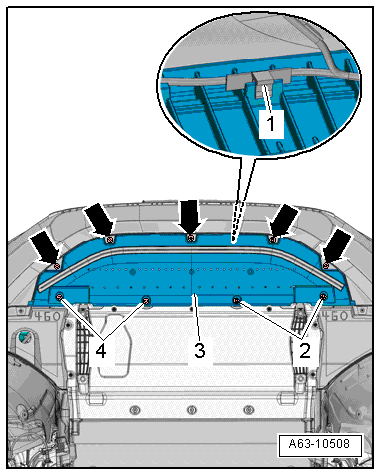
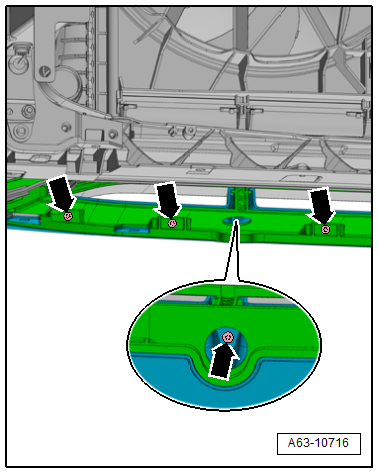
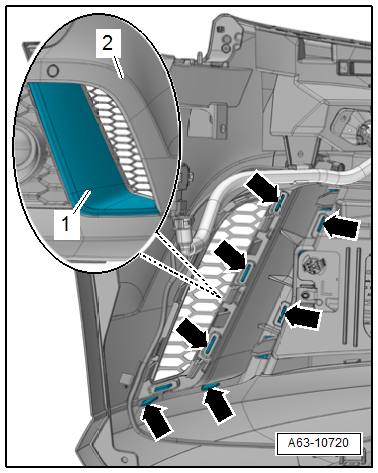
- Carefully remove the clips -2 and 3- from the guide tab with a screwdriver.
- Remove the bolts -arrows-.
- Release the catch -4- and remove the reinforcement brace -1- to the rear.
Installing
Install in reverse order of removal. Note the following:
- Install the mount for the Night Vision System Camera -R212-. Refer to → Chapter "Night Vision System Camera -R212- Mount, Removing and Installing, Vehicles through MY 2014".
Side Reinforcement Brace, Removing and Installing, Vehicles through MY 2014
Removing
- Remove the center reinforcement brace. Refer to → Chapter "Center Reinforcement Brace, Removing and Installing, Vehicles through MY 2014".
- Remove the bracket for the headlamp washer system spray nozzle. Refer to → Electrical Equipment; Rep. Gr.92; Headlamp Washer System; Spray Nozzles, Removing and Installing.
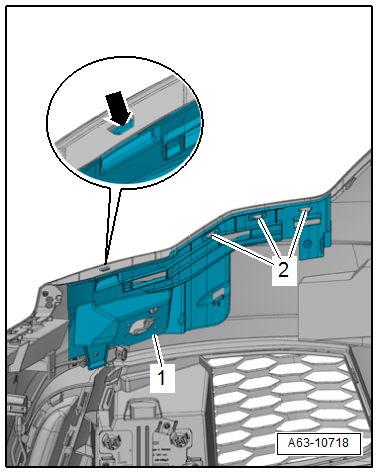
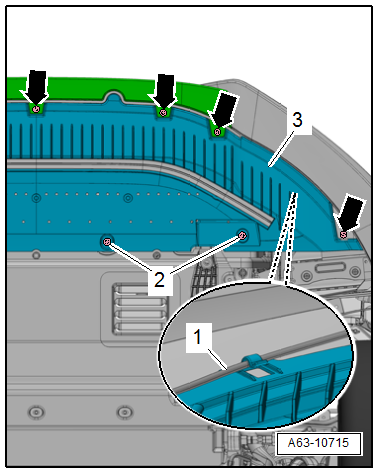
- Carefully remove the clips -2- from the guide tab with a screwdriver.
- Release the catch -arrow- and remove the reinforcement brace -1- to the rear.
Installing
Install in reverse order of removal.
Night Vision System Camera -R212- Mount, Removing and Installing, Vehicles through MY 2014
Removing
- Remove the lock carrier cover. Refer to → Chapter "Lock Carrier Cover, Removing and Installing".
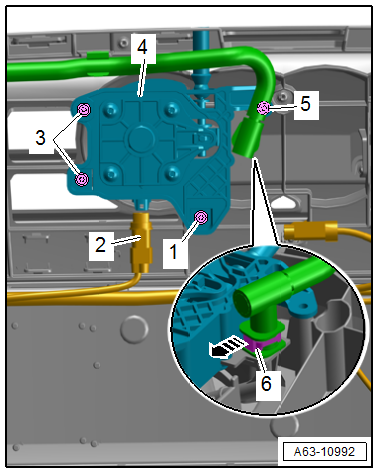
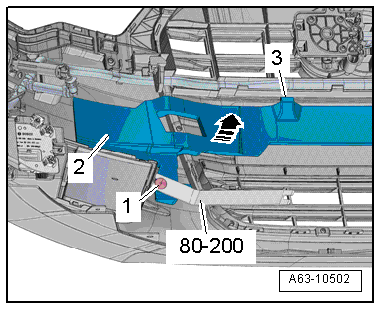
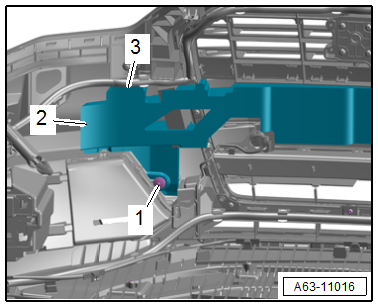
- Disconnect the connector -1-.
- Remove the screws -2, 3, 5 and 6- and then remove the mount -4- with the Night Vision System Camera -R212-.
- Open the clamp -7--arrow- and remove the windshield washer fluid hose.
- If the mount is being replaced, then remove the Night Vision System Camera -R212-. Refer to → Communication; Rep. Gr.91; Infrared System; Night Vision System Camera, Removing and Installing.
Installing
Install in reverse order of removal.

Night Vision System Camera -R212- Mount, Removing and Installing, Vehicles from MY 2015
Removing
- Remove the lock carrier cover. Refer to → Chapter "Lock Carrier Cover, Removing and Installing".
- Disconnect the connector -2-.
- Remove the screws -1, 3 and 5- and then remove the mount -4- with the Night Vision System Camera -R212-.
- Open the clamp -6--arrow- and remove the washer fluid hose.
- If the mount is being replaced, then remove the Night Vision System Camera -R212-. Refer to → Communication; Rep. Gr.91; Infrared System; Night Vision System Camera, Removing and Installing.
Installing
Install in reverse order of removal.
Front Bumper Cover End Plate, Removing and Installing, Audi A6/S6
Removing
- Remove the bolts -2 and 4- and -arrows-.
- Remove the front bumper cover end plate -3- toward the rear and free up the wiring harness -1-.
- If installed, free up the water line for cleaning the headlamps.
- Remove the bumper cover end plate.
Installing
Install in reverse order of removal.
Front Bumper Cover End Plate, Removing and Installing, Audi RS 6
Removing
- Remove the bolts -2- and -arrows-.
- Remove the front bumper cover end plate -3- toward the rear and free up the wiring harness -1-.
- Remove the bumper cover end plate.
Installing
Install in reverse order of removal.
Spoiler Lip, Removing and Installing
Removing
- Remove the front bumper cover end plate. Refer to → Chapter "Attachments, Removing and Installing".
 Caution
Danger of causing damage to the lip on the spoiler.
Coat the tabs on the spoiler lip with soapy water.
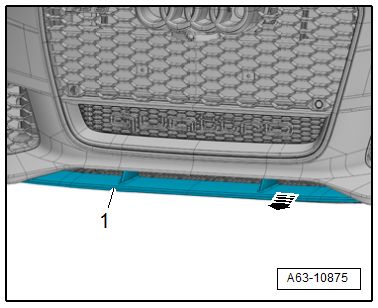
- Starting on the outer side, release the tabs -3- on the lip of the spoiler -1--arrows-.
- Remove the spoiler lip carefully from the mount -2-.
Installing
Install in reverse order of removal.
Spoiler Lower Section, Removing and Installing
Removing
- Remove the front bumper cover end plate. Refer to → Chapter "Front Bumper Cover End Plate, Removing and Installing, Audi RS 6".
- Remove the lower radiator air duct.
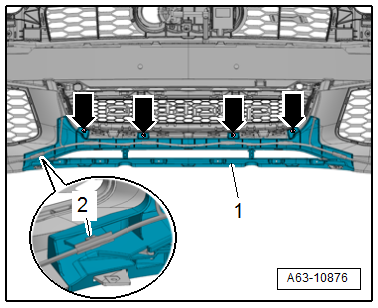
- Remove the bolts -arrows-.
- Remove spoiler lower part -1- on the outside starting at the bumper -arrow-.
Installing
Install in reverse order of removal.
Spoiler Lower Section Mount, Removing and Installing
Removing
- Remove the spoiler lower section. Refer to → Chapter "Spoiler Lower Section, Removing and Installing".
- Remove the bolts -arrows-.
- Pull the mount -1- slightly rearward and free up the wiring harness -2-.
- Remove the bracket.
Installing
Install in reverse order of removal.
Front Bumper Cover Mount, Removing and Installing
Removing
- Remove the front bumper cover. Refer to → Chapter "Bumper Cover, Removing and Installing".
- Loosen the bolt -2- three turns.
- Free up the wiring harness -1-.
- Remove the bolts -3 and 5- and the mount -4- for the front bumper cover.
 Note
Note
Depending on the version, instead of bolts nuts may be installed.
Installing
Install in reverse order of removal. Note the following:
- Check the gap dimensions. Refer to → Chapter "Front Bumper Cover Gap Dimensions".

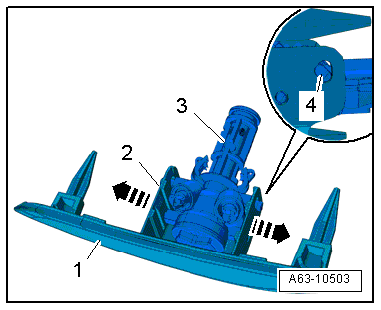
Molded Foam Part, Removing and Installing, Audi A6/S6 through MY 2014
Special tools and workshop equipment required
- Pry Lever -80-200-
Removing
- Remove the front bumper cover. Refer to → Chapter "Bumper Cover, Removing and Installing".
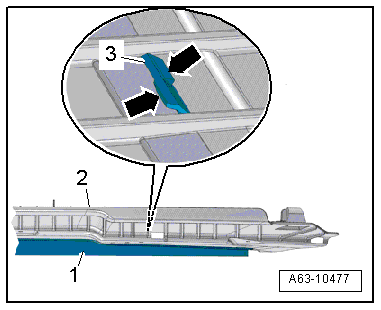
- Pry off the clip -1- using the Pry Lever - 80-200-
- Move the molded foam piece -2- in direction of -arrow- and disengage the tabs -3-.
- Remove the molded foam part.
Installing
Install in reverse order of removal.
Molded Foam Part, Removing and Installing, Audi A6 from MY 2015
Special tools and workshop equipment required
- Pry Lever -80-200-
Removing
- Remove the front bumper cover. Refer to → Chapter "Bumper Cover, Removing and Installing".
- Pry off the clip -1- using the Pry Lever - 80-200-
- Guide the molded foam part -2- out of the bracket -3- and remove.
Installing
Install in reverse order of removal.
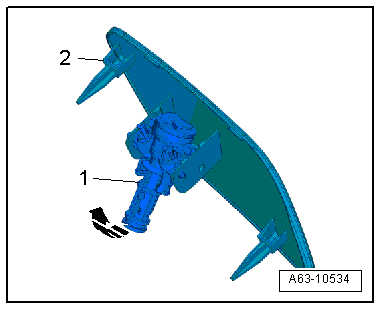
Molded Foam Part, Removing and Installing, Audi RS 6
Removing
- Remove the front bumper cover. Refer to → Chapter "Bumper Cover, Removing and Installing".
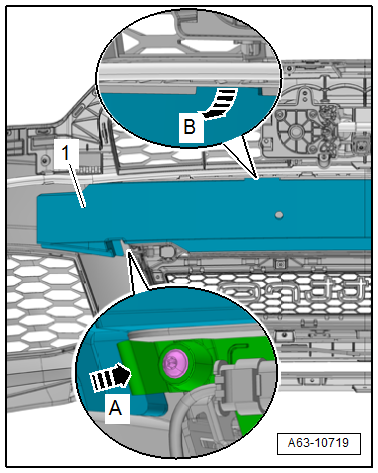
- Release the retainer -arrow A- and disengage the molded foam part -1- by moving the top of the molded foam part in the direction of -arrow B-.
- Remove the molded foam part.
Installing
Install in reverse order of removal.
Molded Foam Part Mount, Removing and Installing, Audi RS 6
Removing
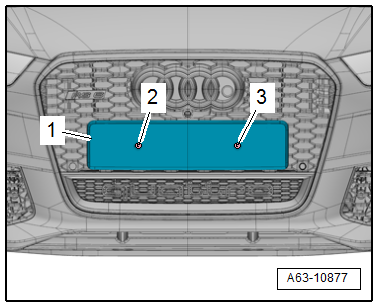
- Remove the license plate.
- Remove screws -2- and -3- on the license plate holder -1-.
- Remove the molded foam part. Refer to → Chapter "Molded Foam Part, Removing and Installing, Audi RS 6".
- Remove the center reinforcement brace. Refer to → Chapter "Center Reinforcement Brace, Removing and Installing, Vehicles through MY 2014".
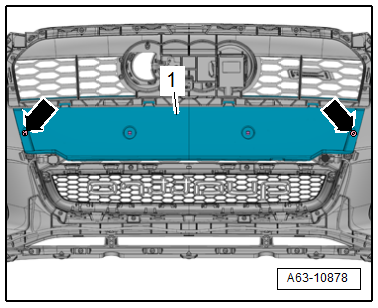
- Remove the bolts -arrows-.
- Remove the mount -1-.
Installing
Install in reverse order of removal.
Headlamp Washer System Spray Nozzle Cover, Removing and Installing
Removing
- Remove the headlamp washer system spray nozzle. Refer to → Electrical Equipment; Rep. Gr.92; Headlamp Washer System; Spray Nozzles, Removing and Installing.
- Expand the retainers -2- on the spray nozzle cover -1- with a screwdriver -arrows- and remove the spray nozzle -3-.
Note
Tabs will break off when expanding the retainers -4-.
Installing
Install in reverse order of removal. Note the following:
- Insert the spray nozzle -1- into the cover -2- as illustrated and then push on it in direction of -arrow- until it clicks into place.
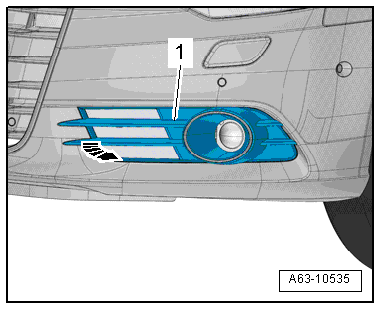
Air Intake Grille, Removing and Installing
Removing
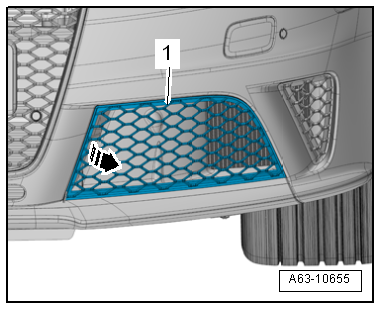
- Remove the air intake grille -1- from the bumper cover -arrow-.
Installing
Install in reverse order of removal.
Outer Air Intake Grille, Removing and Installing, Audi RS 6
Removing
- Remove the front bumper cover. Refer to → Chapter "Bumper Cover, Removing and Installing".
- Press off the spiral clips -1 and 5- and free up the wiring harness -3-.
- Press off the cover -8- from the bumper cover, to do this push the catches -2, 4, 6, and 7- slightly to the side -arrow-.
- Carefully remove the clips -arrows- from the guide tab with a screwdriver.
- Remove the trim -1- from the bumper cover -2-.
- Release the catches -1, 4, and 5--arrow- and the air intake grille -3- from the bumper cover -2-.
Installing
Install in reverse order of removal.
Inner Air Intake Grille, Removing and Installing, Audi RS 6
Removing
- Pull air intake grille -1- off of the bumper cover -arrow- and remove it.
Note
If the air intake grille cannot be removed in the described manner, the front bumper cover must be removed. Refer to → Chapter "Bumper Cover, Removing and Installing".
Installing
Install in reverse order of removal. Note the following:
- The retaining tabs must engage completely in the bumper.
Outside Air Temperature Sensor -G17- Bracket, Removing and Installing
Removing
- Remove the front bumper cover. Refer to → Chapter "Bumper Cover, Removing and Installing".
- Remove the Outside Air Temperature Sensor -G17-. Refer to → Electrical Equipment; Rep. Gr.90; Instrument Cluster; Outside Air Temperature Sensor, Removing and Installing.
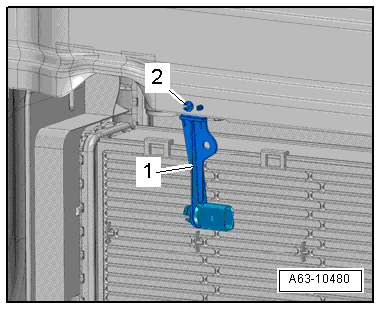
- Remove the expanding pin -2- and the bracket -1-.
Installing
Install in reverse order of removal.