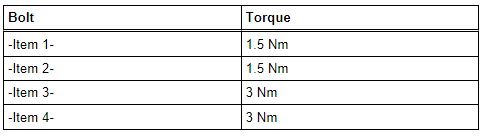
Audi A6 Typ 4G: Overview - Rear Bumper Cover
Overview - Bumper Cover, Audi A6/allroad/S6, through MY 2014
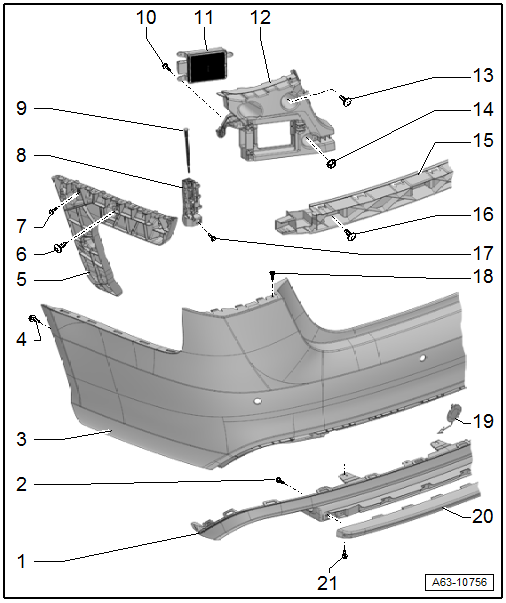
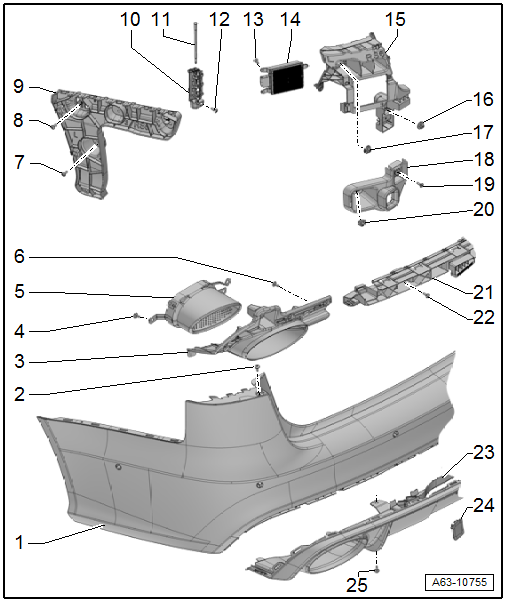
1 - Bumper Cover Lower Section
- There are different versions. Refer to the Parts Catalog.
- Removing and installing. Refer to → Chapter "Attachments, Removing and Installing".
2 - Bolt
- 2.2 Nm
- Quantity: 8
3 - Rear Bumper Cover
- Removing and installing. Refer to → Chapter "Bumper Cover, Removing and Installing, Vehicles through MY 2014".
4 - Bolt
- Depending on version
- 2.1 Nm
5 - Side Mount
- For the bumper cover
- Removing and installing. Refer to → Chapter "Bumper Cover Side Mount, Removing and Installing".
6 - Bolt
- Quantity: 2
- Tightening sequence. Refer to → Fig. "Bumper Cover Side Mount - Tightening Specification and Sequence"
7 - Bolt
- Quantity: 2
- Tightening sequence. Refer to → Fig. "Bumper Cover Side Mount - Tightening Specification and Sequence"
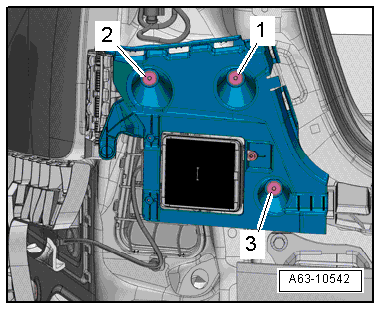
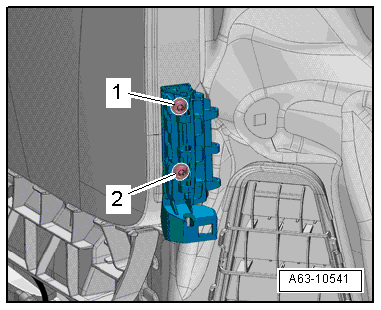
8 - Upper Mount
- For the bumper cover
- Removing and installing. Refer to → Chapter "Upper Bumper Cover Mount, Removing and Installing".
9 - Locking pin
- For attaching the rear bumper cover to the upper mount
10 - Bolt
- Quantity: 2
- Tightening specification. Refer to → Electrical Equipment; Rep. Gr.96; Lane Change Assistance; Overview - Lane Change Assistance.
11 - Lane Change Assistance Control Module
- Removing and installing. Refer to → Electrical Equipment; Rep. Gr.96; Lane Change Assistance; Lane Change Assistance Control Module J769/Lane Change Assistance Control Module 2 J770, Removing and Installing.
12 - Outer Mount
- For the bumper cover
- There are different versions. Refer to the Parts Catalog.
- Removing and installing. Refer to → Chapter "Bumper Cover Mount, Removing and Installing, Audi A6/S6".
13 - Bolt
- Sedan, quantity: 3
- Avant, quantity: 2
- Tightening sequence. Refer to → Fig. "Bumper Cover Outer Mount - Tightening Specification and Sequence"
14 - Bolt/Nut
- Sedan: bolt
- Avant: nut
- Tightening sequence. Refer to → Fig. "Bumper Cover Outer Mount - Tightening Specification and Sequence"
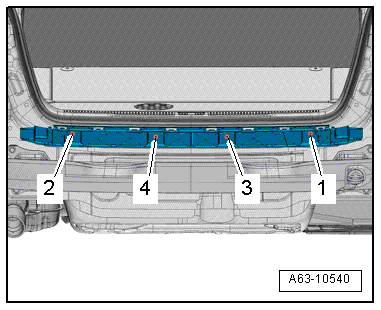
15 - Mount in the Center
- For the bumper cover
- There are different versions. Refer to the Parts Catalog.
- Removing and installing. Refer to → Chapter "Center Bumper Cover Mount, Removing and Installing".
16 - Bolt
- Quantity: 4
- Tightening sequence. Refer to → Fig. "Bumper Cover Center Mount - Tightening Specification and Sequence"
17 - Bolt
- Quantity: 2
- Tightening sequence → Fig. "Bumper Cover Upper Mount - Tightening Specification and Sequence"
18 - Bolt
- 2.5 Nm
19 - Cover
- For the towing eye
20 - Trim Strip
- For the bumper cover lower section
- Equipment levels
- Removing and installing. Refer to → Chapter "Trim Molding for Bumper Lower Section, Removing and Installing".
21 - Bolt
- 1.7 Nm
- Vehicles without a trailer hitch, quantity: 3
- Vehicles with a trailer hitch, quantity: 2
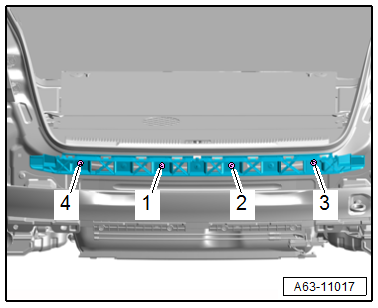
Bumper Cover Outer Mount - Tightening Specification and Sequence
- Tighten the bolts/nuts in the specified sequence.

Bumper Cover Upper Mount - Tightening Specification and Sequence
- Tighten the screws to 1.5 Nm in the sequence -1 to 2-.
Bumper Cover Center Mount - Tightening Specification and Sequence
- Tighten the bolts to 3 Nm in the sequence -1 to 4-.
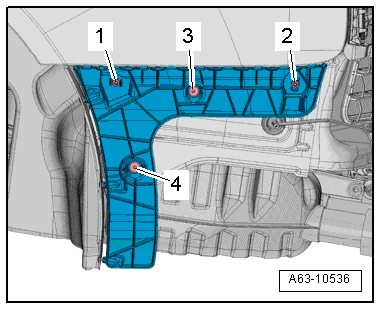
Bumper Cover Side Mount - Tightening Specification and Sequence
 Note
Note
There are different versions of the bolts.
- Tighten the bolts in the specified sequence.
Overview - Bumper Cover, Audi A6 from MY 2015
1 - Bumper Cover Lower Section
- There are different versions. Refer to the Parts Catalog.
- Removing and installing. Refer to → Chapter "Attachments, Removing and Installing".
2 - Rear Bumper Cover
- Removing and installing. Refer to → Chapter "Bumper Cover, Removing and Installing, Vehicles from MY 2015".
3 - Bolt
- 2.1 Nm
4 - Mount
- For the tail pipe trim
- Removing and installing. Refer to → Chapter "Tail Pipe Trim Mount, Removing and Installing from MY 2015".
5 - Bolt
- 2 Nm
- Quantity: 4
6 - Tail pipe trim
- Removing and installing. Refer to → Chapter "Tail Pipe Trim, Removing and Installing from MY 2015".
7 - Bolt
- 2 Nm
- Quantity: 2
8 - Bolt
- Quantity: 2
- Tightening sequence. Refer to → Fig. "Bumper Cover Side Mount - Tightening Specification and Sequence"
9 - Bolt
- Quantity: 2
- Tightening sequence. Refer to → Fig. "Bumper Cover Side Mount - Tightening Specification and Sequence"
10 - Side Mount
- For the bumper cover
- Removing and installing. Refer to → Chapter "Bumper Cover Side Mount, Removing and Installing".
11 - Locking Pin
- For attaching the rear bumper cover to the upper mount
12 - Upper Mount
- For the bumper cover
- Removing and installing. Refer to → Chapter "Upper Bumper Cover Mount, Removing and Installing".
13 - Bolt
- Quantity: 2
- Tightening sequence. Refer to → Fig. "Bumper Cover Upper Mount - Tightening Specification and Sequence"
14 - Lane Change Assistance Control Module
- Removing and installing. Refer to → Electrical Equipment; Rep. Gr.96; Lane Change Assistance; Lane Change Assistance Control Module J769/Lane Change Assistance Control Module 2 J770, Removing and Installing.
15 - Outer Mount
- For the bumper cover
- There are different versions. Refer to the Parts Catalog.
- Removing and installing. Refer to → Chapter "Bumper Cover Mount, Removing and Installing, Audi A6/S6".
16 - Bolt
- Sedan, quantity: 3
- Avant, quantity: 2
- Tightening sequence. Refer to → Fig. "Bumper Cover Outer Mount - Tightening Specification and Sequence"
17 - Bolt/Nut
- Sedan: bolt
- Avant: nut
- Tightening sequence. Refer to → Fig. "Bumper Cover Outer Mount - Tightening Specification and Sequence"
18 - Mount in the Center
- For the bumper cover
- There are different versions. Refer to the Parts Catalog.
- Removing and installing. Refer to → Chapter "Center Bumper Cover Mount, Removing and Installing".
19 - Bolt
- Quantity: 4
- Tightening sequence. Refer to → Fig. "Bumper Cover Center Mount - Tightening Specification and Sequence"
20 - Bolt
- 2.5 Nm
21 - Cover
- For the towing eye
22 - Rear Mount
- For the bumper cover
- Removing and installing. Refer to → Chapter "Rear Bumper Cover Mount, Removing and Installing".
23 - Nut
- 1.5 Nm
- Quantity: 2
24 - Adjusting Element
25 - Bolt
- 4.5 Nm
M6 Bolt
- Quantity: 2
26 - Bolt
- 1.7 Nm
- Quantity: 2
Bumper Cover Center Mount - Tightening Specification and Sequence
- Tighten the bolts to 3 Nm in the sequence -1 to 4-.
Overview - Bumper Cover, Audi RS 6
1 - Rear Bumper Cover
- Removing and installing. Refer to → Chapter "Bumper Cover, Removing and Installing, Vehicles through MY 2014".
2 - Bolt
- 2.5 Nm
3 - Mount
- For the tail pipe trim
- Removing and installing. Refer to → Chapter "Tail Pipe Trim Mount, Removing and Installing, Audi RS 6".
4 - Bolt
- 2 Nm
- Quantity: 4
5 - Tail Pipe Trim
- Removing and installing. Refer to → Chapter "Tail Pipe Trim, Removing and Installing, Audi RS 6".
6 - Bolt
- 2 Nm
- Quantity: 3
7 - Bolt
- Quantity: 2
- Tightening sequence. Refer to → Fig. "Bumper Cover Side Mount - Tightening Specification and Sequence"
8 - Bolt
- Quantity: 2
- Tightening sequence. Refer to → Fig. "Bumper Cover Side Mount - Tightening Specification and Sequence"
9 - Side Mount
- For the bumper cover
- Removing and installing. Refer to → Chapter "Bumper Cover Side Mount, Removing and Installing".
10 - Upper Mount
- For the bumper cover
- Removing and installing. Refer to → Chapter "Upper Bumper Cover Mount, Removing and Installing".
11 - Locking Pin
- For attaching the rear bumper cover to the upper mount
12 - Bolt
- Quantity: 2
- Tightening sequence. Refer to → Fig. "Bumper Cover Upper Mount - Tightening Specification and Sequence"
13 - Bolt
- Quantity: 2
- Tightening specification. Refer to → Electrical Equipment; Rep. Gr.96; Lane Change Assistance; Overview - Lane Change Assistance.
14 - Lane Change Assistance Control Module
- Removing and installing. Refer to → Electrical Equipment; Rep. Gr.96; Lane Change Assistance; Lane Change Assistance Control Module J769/Lane Change Assistance Control Module 2 J770, Removing and Installing.
15 - Outer Mount
- For the bumper cover
- Removing and installing. Refer to → Chapter "Bumper Cover Mount, Removing and Installing, Audi RS 6".
16 - Nut
- Tightening sequence → Fig. "Bumper Cover Outer Mount - Tightening Specification and Sequence"
17 - Bolt
- Quantity: 2
- Tightening sequence → Fig. "Bumper Cover Outer Mount - Tightening Specification and Sequence"
18 - Lower Outer Mount
- For the bumper cover
- Removing and installing. Refer to → Chapter "Bumper Cover Mount, Removing and Installing, Audi RS 6".
19 - Bolt
- Tightening sequence. Refer to → Fig. "Bumper Cover Outer Mount - Tightening Specification and Sequence"
20 - Nut
- Tightening sequence. Refer to → Fig. "Bumper Cover Outer Mount - Tightening Specification and Sequence"
21 - Mount in the Center
- For the bumper cover
- Removing and installing. Refer to → Chapter "Center Bumper Cover Mount, Removing and Installing".
22 - Bolt
- Quantity: 4
- Tightening sequence. Refer to → Fig. "Bumper Cover Center Mount - Tightening Specification and Sequence"
23 - Bumper Cover Lower Section
- There are different versions. Refer to the Parts Catalog.
- Removing and installing. Refer to → Chapter "Bumper Cover Lower Section, Removing and Installing, Audi RS 6".
24 - Cover
- For the towing eye
25 - Bolt
- 1.7 Nm
- Quantity: 3
Bumper Cover Outer Mount - Tightening Specification and Sequence
- Tighten the bolts/nuts in the specified sequence.


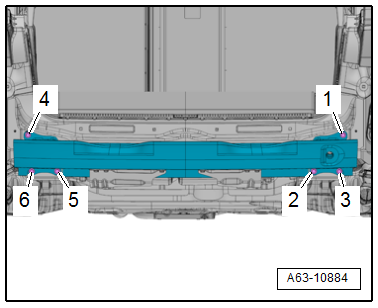
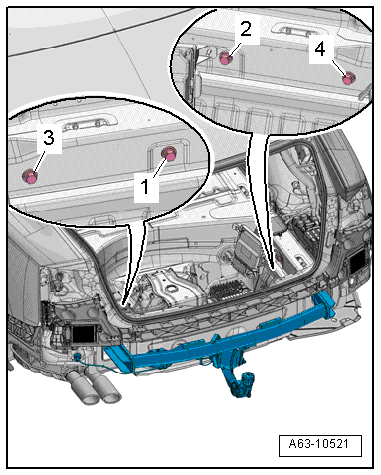
Overview - Impact Member
Overview - Impact Member, Audi A6/allroad/S6
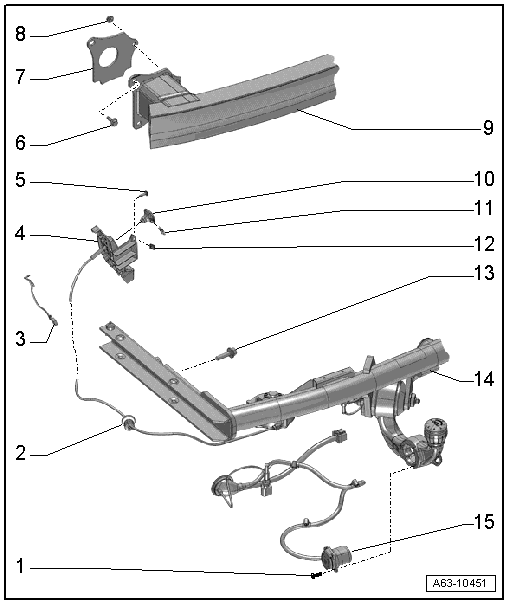
1 - Bolt
- 3.5 Nm
- Quantity: 3
2 - Grommet
- For the cable
3 - LED Indicator Lamp
- Make sure the trailer hitch it locked correctly
- Removing and installing. Refer to → Electrical Equipment; Rep. Gr.96; Trailer Hitch; LED Indicator Lamp, Removing and Installing
4 - Mount
- For the cable
- Removing and installing. Refer to → Chapter "Cable Mount, Removing and Installing".
5 - Bolt
- 2 Nm
- Quantity: 3
6 - Bolt
- Quantity: 3
- Tightening sequence. Refer to → Fig. "Impact Member without Trailer Hitch - Tightening Specification and Sequence"
7 - Foam Seal
- Replace if damaged.
8 - Nut
- 23 Nm + 90º
- Replace after removing
9 - Impact Member
- For vehicles without a trailer hitch
- Removing and installing. Refer to → Chapter "Impact Member, Removing and Installing, Vehicles without Trailer Hitch, Audi A6/allroad/S6".
10 - Pull Knob
- For unlocking the trailer hitch
- Removing and installing. Refer to → Chapter "Cable Mount, Removing and Installing".
11 - Lock Clamp
- For the pull knob
12 - Spring Nut
- Quantity: 3
13 - Bolt
- Replace after removing
- Quantity: 2
- Tightening sequence. Refer to → Fig. "Impact Member with Trailer Hitch - Tightening Specification and Sequence"
14 - Impact Member
- For vehicles with a trailer hitch
- Removing and installing. Refer to → Chapter "Impact Absorber, Removing and Installing, Vehicles with Trailer Hitch".
15 - Socket
- Removing and installing. Refer to → Electrical Equipment General Information; Rep. Gr.96; Trailer Hitch
- Connector assignment. Refer to → Electrical Equipment General Information; Rep. Gr.96; Trailer Hitch
Impact Member without Trailer Hitch - Tightening Specification and Sequence
- Tighten the bolts in a -1 to 6- sequence to 30 Nm.
Impact Member with Trailer Hitch - Tightening Specification and Sequence
- Tighten the bolts to 50 Nm +90º in the following sequence: -1 through 4-.
Overview - Impact Member, Audi RS 6
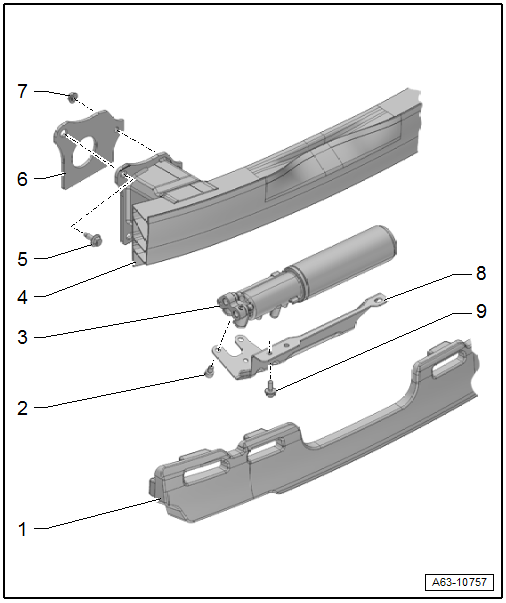
1 - Molded Foam Piece
- Removing and installing. Refer to → Chapter "Molded Foam Piece, Removing and Installing".
2 - Bolt
- Quantity: 3
- Tightening sequence. Refer to → Suspension, Wheels, Steering; Rep. Gr.43; Dynamic Ride Control (DRC); Overview - Central Valve.
3 - Central Valve
- For electronic damping
- Removing and installing. Refer to → Suspension, Wheels, Steering; Rep. Gr.43; Dynamic Ride Control (DRC); Central Valve, Removing and Installing.
4 - Impact Member
- Removing and installing. Refer to → Chapter "Impact Member, Removing and Installing, Audi RS 6".
5 - Bolt
- Quantity: 3
- Tightening sequence. Refer to → Fig. "Impact Member without Trailer Hitch - Tightening Specification and Sequence"
6 - Foam Seal
- Replace if damaged.
7 - Nut
- 23 Nm + 90º
- Replace after removing
8 - Retaining Bracket
- For central valve
9 - Bolt
- Quantity: 3
- Tightening sequence. Refer to → Suspension, Wheels, Steering; Rep. Gr.43; Dynamic Ride Control (DRC); Overview - Central Valve.
