Audi A6 Typ 4G: Backrest Cover and Cushion, Removing and Installing
Backrest Cover and Padding, Removing and Installing, Standard/Sport Seat
Special tools and workshop equipment required
- Pry Lever -80-200-
Removing
 WARNING
- Follow all Safety Precautions when working with pyrotechnic components. Refer to → Chapter "Pyrotechnic Components Safety Precautions".
- Before handling pyrotechnic components (for example, disconnecting the connector), the person handling it must "discharge static electricity". This can be done by touching the door striker, for example.
- Remove the front seat. Refer to → Chapter "Front Seat, Removing and Installing".
- Fasten the front seat on the Engine/Transmission Holder - Seat Repair Fixture -VAS6136-. Refer to → Chapter "Front Seat, Mounting on Fixture for Seat Repair".
- Remove the backrest cover. Refer to → Chapter "Backrest Cover, Removing and Installing, Standard Seat/Sport Seat/Super Sport Seat".
- Remove the headrest. Refer to → Chapter "Headrest, Removing and Installing".
- Remove the backrest. Refer to → Chapter "Front Backrest, Removing and Installing, Standard Seat/Sport Seat/Super Sport Seat".
- Vehicles with rear seat entertainment: remove the mount for the rear seat entertainment. Refer to → Chapter "Rear Seat Entertainment Mount/Bracket, Removing and Installing".
- Unclip the backrest cover clips -5- from the backrest frame using the Pry Lever -80-200-.
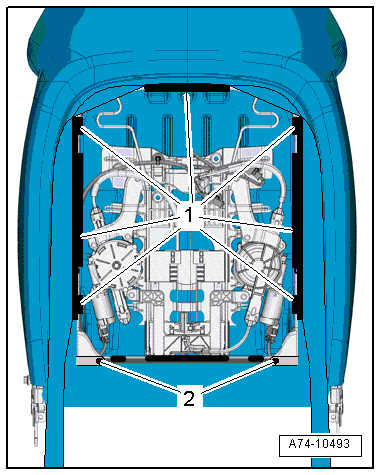
- Detach the rear moldings -1 through 4- from the backrest frame.
- Vehicles with seat ventilation: disconnect the connectors from the fan.
- Remove the rear contour wire -1- from the backrest frame -2-.
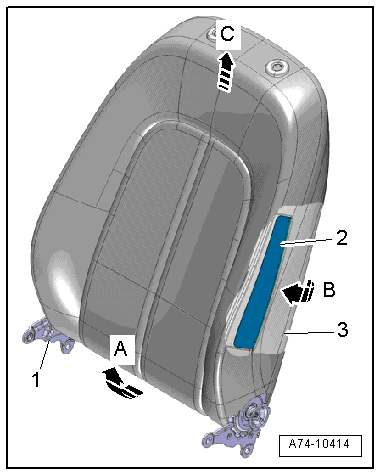
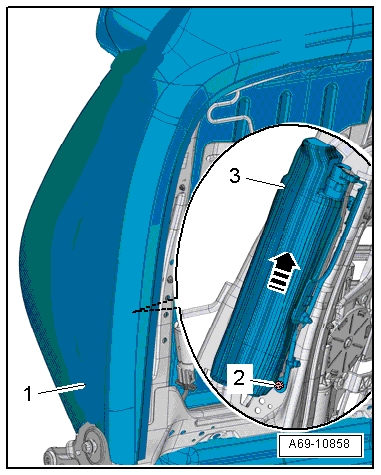
- Remove the backrest cover with the lower backrest cushion forward from the backrest frame -1- in direction of -arrow A-.
- Carefully remove the backrest cushion -3- near the side airbag from the cushion protection -2- in direction of -arrow B-.
- Remove the backrest cover and backrest cushion upward -arrow C- and off the backrest frame while removing the backrest heating wiring harness and seat ventilation.
Installing
WARNING
- Follow all Safety Precautions when working with pyrotechnic components. Refer to → Chapter "Pyrotechnic Components Safety Precautions".
- Before handling pyrotechnic components (for example, connecting the connector), the person handling it must "discharge static electricity". This can be done by touching the door striker, for example.
- Observe all measures when installing the front seat. Refer to → Chapter "Front Seat, Removing and Installing".
Install in reverse order of removal. Note the following:
Installation notes, for example tightening specifications, replacing components. Refer to → Chapter "Overview - Backrest Cover and Cushion, Standard Seat/Sport Seat".
Backrest Cover and Cushion, Removing and Installing, Super Sport Seat
Special tools and workshop equipment required
- Pry Lever -80-200-
Removing
WARNING
- Follow all Safety Precautions when working with pyrotechnic components. Refer to → Chapter "Pyrotechnic Components Safety Precautions".
- Before handling pyrotechnic components (for example, disconnecting the connector), the person handling it must "discharge static electricity". This can be done by touching the door striker, for example.
- Remove the front seat. Refer to → Chapter "Front Seat, Removing and Installing".
- Fasten the front seat on the Engine/Transmission Holder - Seat Repair Fixture -VAS6136-. Refer to → Chapter "Front Seat, Mounting on Fixture for Seat Repair".
- Remove the backrest cover. Refer to → Chapter "Backrest Cover, Removing and Installing, Standard Seat/Sport Seat/Super Sport Seat".
- Remove the backrest. Refer to → Chapter "Front Backrest, Removing and Installing, Standard Seat/Sport Seat/Super Sport Seat".
- Vehicles with rear seat entertainment: remove the mount for the rear seat entertainment. Refer to → Chapter "Rear Seat Entertainment Mount/Bracket, Removing and Installing".
- Unclip the backrest cover clips -2- from the backrest frame using the Pry Lever -80-200-.
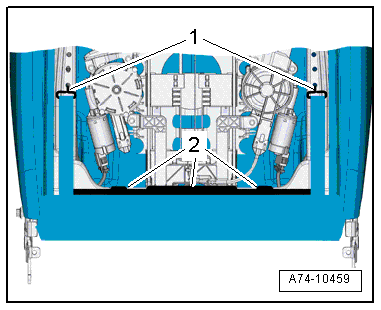
- Detach the rear moldings -1- from the backrest frame.
- Detach the rubber strap -1- from the backrest frame.
- Detach the rear molding -2- from the backrest frame.
- Carefully pull backrest cover as far forward as possible with backrest cushion -1- in the area of the side airbag.
- Remove the bolt -2-.
- Disengage the side airbag -3- from the backrest frame with the hook -arrow-.
- Disengage the side airbag from the cushion protection and engage it again in the backrest frame.
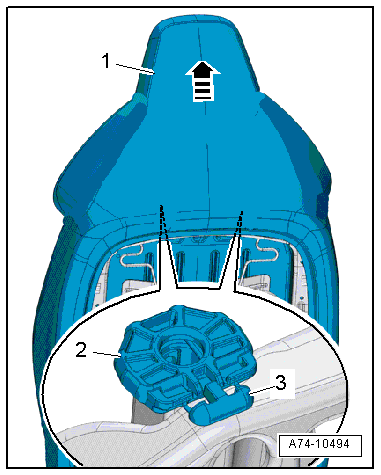
- Reach under the backrest cushion from the back of the backrest and find the release button -3-.
- Press the release button for the headrest guide -2- and hold it.
- With a second technician, pull the backrest cover and the backrest cushion -1- together with the headrest upward and off the backrest frame -arrow-.
- Remove the backrest cover and backrest cushion upward and off the backrest frame while removing the backrest heating wiring harness.
Installing
WARNING
- Follow all Safety Precautions when working with pyrotechnic components. Refer to → Chapter "Pyrotechnic Components Safety Precautions".
- Before handling pyrotechnic components (for example, connecting the connector), the person handling it must "discharge static electricity". This can be done by touching the door striker, for example.
- Observe all measures when installing the front seat. Refer to → Chapter "Front Seat, Removing and Installing".
Install in reverse order of removal. Note the following:
Installation notes, for example tightening specifications, replacing components. Refer to → Chapter "Overview - Backrest Cover and Cushion, Super Sport Seat".
Backrest Cover and Cushion, Removing and Installing, Multi-contour Seat through 08/2012
Removing
- Remove the headrest. Refer to → Chapter "Headrest, Removing and Installing".
WARNING
- Follow all Safety Precautions when working with pyrotechnic components. Refer to → Chapter "Pyrotechnic Components Safety Precautions".
- Before handling pyrotechnic components (for example, disconnecting the connector), the person handling it must "discharge static electricity". This can be done by touching the door striker, for example.
- Remove the front seat. Refer to → Chapter "Front Seat, Removing and Installing".
- Fasten the front seat on the Engine/Transmission Holder - Seat Repair Fixture -VAS6136-. Refer to → Chapter "Front Seat, Mounting on Fixture for Seat Repair".
- Vehicles with rear seat entertainment: remove the mount for the rear seat entertainment. Refer to → Chapter "Rear Seat Entertainment Mount/Bracket, Removing and Installing, Market-Specific".
- Remove the backrest cover. Refer to → Chapter "Backrest Cover, Removing and Installing, Multi-contour Seat".
- Remove backrest blower fan. Refer to → Chapter "Front Backrest Fan, Removing and Installing".
- Remove the backrest. Refer to → Chapter "Front Backrest, Removing and Installing, Multi-contour Seat".
- Detach the backrest cover molding -1, 2 and 3- from the backrest frame.
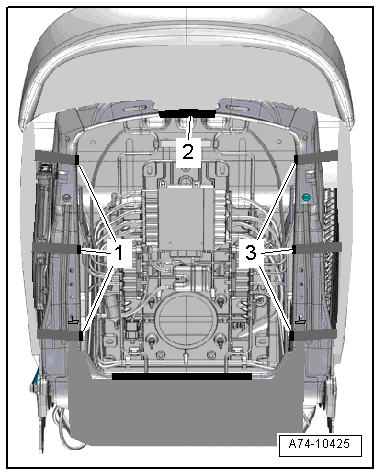
- Detach hooks -2- and molding -3- of the backrest cover -1- at the backrest frame.
- Disconnect and free up the connectors.

- Remove the bolts -5-.
- Disengage the side airbag -2- from the backrest frame -arrow- using the hook -4-.
- Disengage the side airbag from the cushion protection -3- and engage it again in the backrest frame.
- Disconnect the connector -3-.
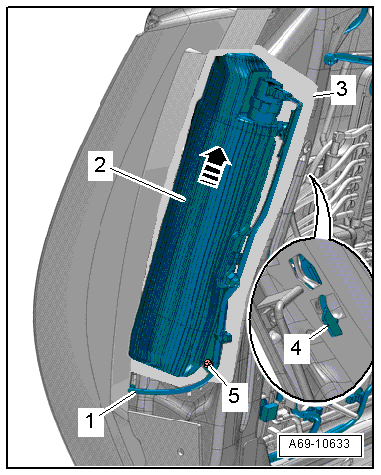
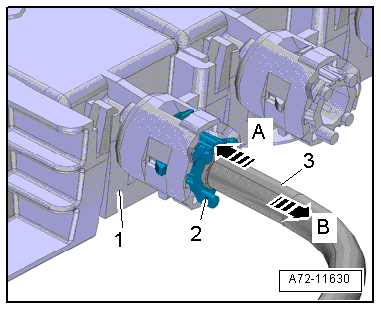
- Push massage mat valve block -4- up slightly to detach it at the module carrier -arrow A-.
- Carefully release locking mechanism -arrow B-, disconnect pneumatic lines -1 and 2-.
- Repeat the procedure on the opposite side of the backrest.
- Detach the molding -1, 3, 4 and 6- from the padding wire -2-, -5-.
- Free up the bracket -7- from the lumbar support module carrier.
- Free up valve block with connected pneumatic lines on the backrest frame and remove backrest cover and backrest cushion.
Installing
WARNING
- Follow all Safety Precautions when working with pyrotechnic components. Refer to → Chapter "Pyrotechnic Components Safety Precautions".
- Before handling pyrotechnic components (for example, connecting the connector), the person handling it must "discharge static electricity". This can be done by touching the door striker, for example.
- Observe all measures when installing the front seat. Refer to → Chapter "Front Seat, Removing and Installing".
Install in reverse order of removal. Note the following:
Installation notes, for example tightening specifications, replacing components. Refer to → Chapter "Overview - Backrest Cover and Cushion, Multi-contour Seat".
Backrest Cover and Cushion, Removing and Installing, Multi-contour Seat from 09/2012
Removing
- Remove the headrest. Refer to → Chapter "Headrest, Removing and Installing".
WARNING
- Follow all Safety Precautions when working with pyrotechnic components. Refer to → Chapter "Pyrotechnic Components Safety Precautions".
- Before handling pyrotechnic components (for example, disconnecting the connector), the person handling it must "discharge static electricity". This can be done by touching the door striker, for example.
- Remove the front seat. Refer to → Chapter "Front Seat, Removing and Installing".
- Fasten the front seat on the Engine/Transmission Holder - Seat Repair Fixture -VAS6136-. Refer to → Chapter "Front Seat, Mounting on Fixture for Seat Repair".
- Vehicles with rear seat entertainment: remove the mount for the rear seat entertainment. Refer to → Chapter "Rear Seat Entertainment Mount/Bracket, Removing and Installing".
- Remove the backrest cover. Refer to → Chapter "Front Backrest, Removing and Installing".
- Remove backrest blower fan. Refer to → Chapter "Front Backrest Fan, Removing and Installing".
- Remove the backrest. Refer to → Chapter "Front Backrest, Removing and Installing, Multi-contour Seat".
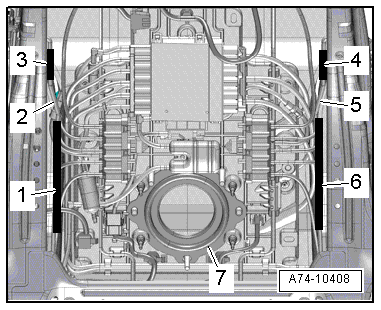
- Detach the backrest cover molding -1, 2 and 3- from the backrest frame.

- Detach hooks -2- and molding -3- of the backrest cover -1- at the backrest frame.
- Disconnect and free up the connectors.
- Remove the bolts -5-.
- Disengage the side airbag -2- from the backrest frame -arrow- using the hook -4-.
- Remove the side airbag from the bottom of the pocket sewn into the backrest cover.
- Reinstall the side airbag in the frame.
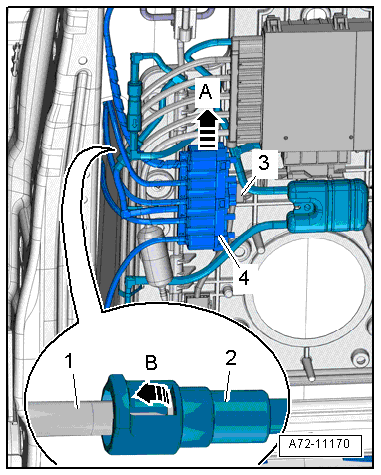
- Before disconnecting, mark the pneumatic line assignments to the connections at the valve block using a waterproof permanent marker.
- Disconnect the pneumatic lines -1 through 5- from all of the massage mat air cushions.
 Note
Note
Ignore item -6-.
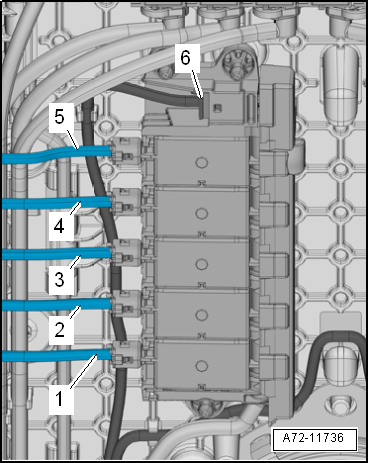
- To do this, press the release ring -2- in the direction of the valve block -1--arrow A- and at the same time pull out the pneumatic line -3- in direction of -arrow B-.
- Free up the pneumatic lines from all of the massage mat air cushions.
- Repeat the procedure on the opposite valve block.
- Remove the protective strip -1- from the cushion wire.
- Free up the boot -2- from the lumbar support module carrier.
- Remove the backrest cover and the backrest cushion.
Installing
WARNING
- Follow all Safety Precautions when working with pyrotechnic components. Refer to → Chapter "Pyrotechnic Components Safety Precautions".
- Before handling pyrotechnic components (for example, connecting the connector), the person handling it must "discharge static electricity". This can be done by touching the door striker, for example.
- Observe all measures when installing the front seat. Refer to → Chapter "Front Seat, Removing and Installing".
Install in reverse order of removal. Note the following:
Installation notes, for example tightening specifications, replacing components. Refer to → Chapter "Overview - Backrest Cover and Cushion, Multi-contour Seat".