Audi A6 Typ 4G: Wiper, Moving Into Service Position
 Note
Note
If the windshield wiper motor is to be run during the work procedure, the hood must be closed, otherwise the voltage supply of the wiper motor will be interrupted.
- Make sure the wiper blades are not frozen.
- Turn on the ignition.
- Activate the menu entry windshield wiper "on" using the multimedia system control head. Refer to the Owner's Manual.
- The windshield wipers run into "Service position".
- Turn off the ignition.
 Caution
Risk of damaging the hood by running the wipers back in basic position.
- Do not drive a vehicle with windshield wiper arms folded up.
- The windshield wipers automatically go back into their rest position when the wiper switch is activated or when driving faster than 6 km/h.
Wiper Blade, Removing and Installing
Removing
- Bring the windshield wiper into service position. Refer to → Chapter "Wiper, Moving Into Service Position".
- Lift the wiper arm off the windshield.
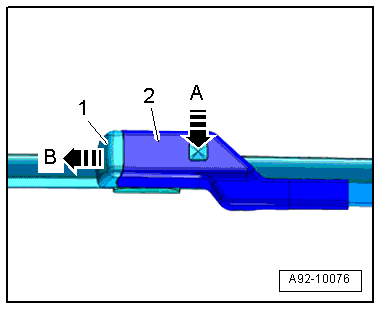
- Press the clip in direction of -arrow A- and remove the wiper blade -1- from the wiper arm -2- in direction of -arrow B-.
- Remove the wiper blade.
Installing
Caution
There is a risk of damaging the body.
The driver and passenger side wiper blades are different lengths.
Install in reverse order of removal. Note the following:
- Guide the wiper blade -1- parallel into the wiper arm -2- in direction of -arrow-. Slide the wiper blade on until the retaining clips engage in the wiper arm.
- To leave the "Service position", either operate the windshield wiper switch or drive faster than six km/h.

Windshield Wiper Arms, Removing and Installing
Special tools and workshop equipment required
- Puller - Wiper Arm Kit -T10369-
Removing
Caution
Danger of causing damage to the windshield wiper axle.
The windshield wiper axles can get damaged when removing the windshield wiper arms without using the Puller - Wiper Arm Kit - Puller 1 -T10369/1-.
Note
If the windshield wiper motor is to be run during the work procedure, the hood must be closed. Otherwise, the voltage supply of the wiper motor will be interrupted.
- Bring the windshield wiper into service position. Refer to → Chapter "Wiper, Moving Into Service Position".
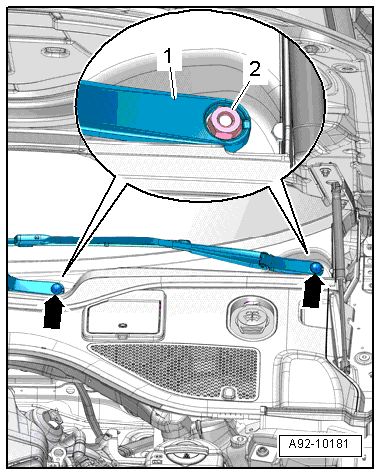
- Pry the caps -arrows- off of the windshield wiper arms -1- with a screwdriver.
- Loosen the nuts -2- a few turns.
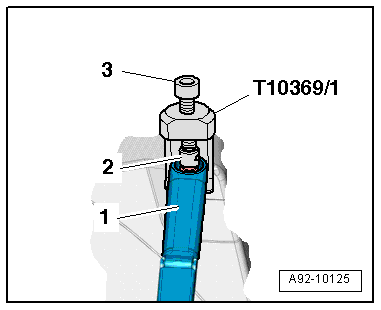
- Position the Puller - Wiper Arm Kit - Puller 1 -T10369/1- on the wiper arm -1- as illustrated.
- Position the thrust piece -2- on the wiper axle.
- Rotate the bolt -3- clockwise until the wiper arm is removed from the axle.
- Remove the nuts and remove the wiper arm.
Installing
Caution
There is a risk of damaging the body.
The driver and passenger side wiper arms are different lengths.
Install in reverse order of removal. Note the following:
- Adjust the windshield wiper arms. Refer to → Chapter "Windshield Wiper Arms, Adjusting".
Windshield Wiper Arms, Adjusting
Procedure
Note
If the windshield wiper motor is to be run during the work procedure, the hood must be closed. Otherwise, the voltage supply of the wiper motor will be interrupted.
- Remove the windshield wiper arms. Refer to → Chapter "Windshield Wiper Arms, Removing and Installing".
- Turn on the ignition.
- Activate "one-tap wiping" and let the wiper motor run into its end position.
Note
- Every second time the windshield wiper motor is switched off, it returns the wiper arms to a lower rest position, thus tipping the wiper blade lips the other way.
- To do so, the windshield wiper motor moves the wiper arms farther down than to rest position and then a bit up again. This lower rest position must not be used to adjust the wiper crank.
- Only use end position where wiper arms run directly into the end position with no understroke. Activate "one-touch wiping" again if necessary.
- Turn off the ignition.
- Position the wiper arm with wiper blade installed at the wiper axle.
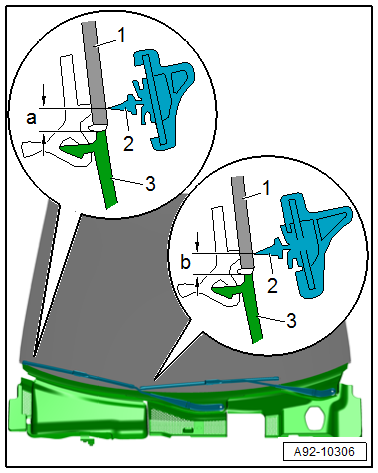
- Align the wiper blade tip -2- on the lower edge of the windshield -1- to the cowl panel trim -3-:
- Dimension -a- = 25 + 10 mm.
- Dimension -b- = 15 + 10 mm.
- Tighten the nuts -2- on the windshield wiper arms -1-.
- Tightening specification. Refer to → Chapter "Overview - Windshield Wiper System".
- Turn on the ignition.
- Activate "one-tap wiping" and let the windshield wiper arms run into their end position.
- Turn off the ignition.
- Check the position of the wiper arms one more time and adjust if necessary.
- Press the caps -arrows- onto the wiper arms.
Windshield Wiper Motor -V-, Removing and Installing
Removing
- Remove the windshield wiper arms. Refer to → Chapter "Windshield Wiper Arms, Removing and Installing".
- Remove the plenum chamber cover and cowl panel trim. Refer to → Body Exterior; Rep. Gr.50; Bulkhead; Plenum Chamber Cover, Removing and Installing.
- Remove the washer fluid reservoir filler neck. Refer to → Chapter "Washer Fluid Reservoir Filler Tube, Removing and Installing".
- Release the retainer in direction of -arrow-, remove the engine control module -1- and move it to the side with the wires still connected.
Note
Disregard -item 2-.
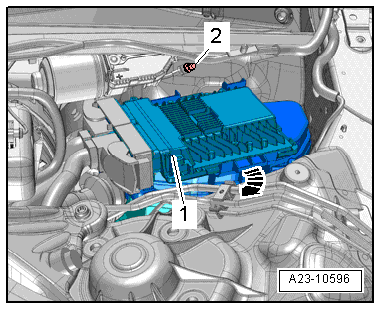
- Disconnect the connector -2- and free up the wiring harness -3-.
- Open the retainers in direction of -arrows- and remove the mount -1- downward.
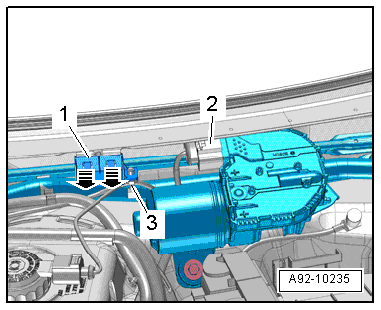
- Remove the bolts -2, 4 and 5-.
- Move the windshield wiper frame -3- with the linkage and windshield wiper motor slightly forward in direction of -arrow-.
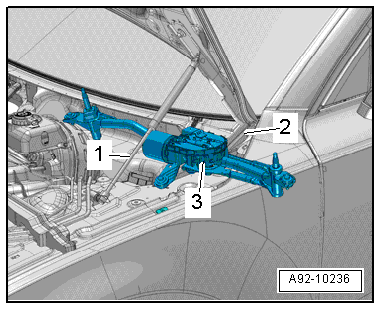
- Free up the wiring harness -1- on the windshield wiper frame.
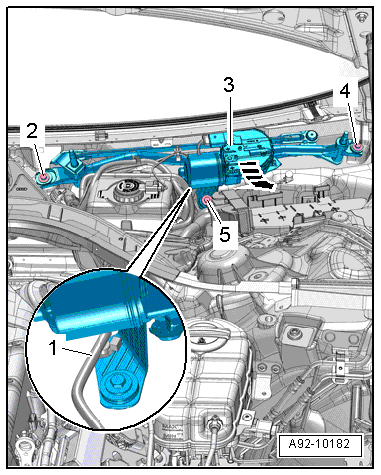
- Remove the windshield wiper frame -3- with the linkage and windshield wiper motor from the plenum chamber between the gas-filled strut -1- and the hood hinge -2-.
Installing
Install in reverse order of removal. Note the following:
- Install the windshield wiper motor and the windshield wiper frame.
- Tighten the bolts. Refer to → Fig. "Tightening Specifications and Sequence for the Windshield Wiper Motor".
- Press the cowl panel trim mount onto the body until it clicks into place.
- Adjust the windshield wiper arms. Refer to → Chapter "Windshield Wiper Arms, Adjusting".
Windshield Wiper Motor, Replacing
Procedure
- If the control module was replaced, select the "Replace" function for the respective control module in "Guided Fault Finding" or "Guided Functions" using the Vehicle Diagnostic Tester.
