Audi A6 Typ 4G: C-Pillar Trim Panel, Removing and Installing
C-Pillar-Trim Panel, Removing and Installing, Sedan
Special tools and workshop equipment required
- Pry Lever -80-200-
- Omega Clip Tool -T40280-
Removing
 WARNING
Follow all Safety Precautions when working with pyrotechnic components. Refer to → Chapter "Pyrotechnic Components Safety Precautions".
- Remove the rear outer belt guide. Refer to → Chapter "Rear Seat Belt Guide, Removing and Installing, Sedan".
- Remove the headliner and lay it on the seats, do not remove the windshield. Refer to → Chapter "Headliner, Removing and Installing, Sedan".
 Caution
- Remove the headliner and lay it on the seats when performing the following work. Do this very carefully because the headliner can be creased easily.
- Replace the headliner if it is bent.
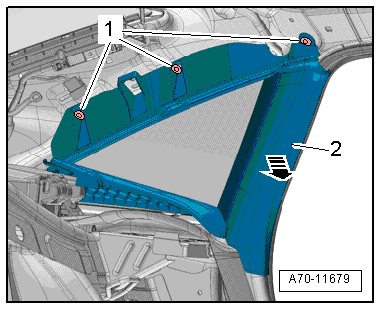
- Remove the expanding clips -1- with the Pry Lever -80-200-.
- Unclip the C-pillar trim panel -2- from the C-pillar using the Pry Lever -80-200--arrows- and remove it.
Installing
 WARNING
- Follow all Safety Precautions when working with pyrotechnic components. Refer to → Chapter "Pyrotechnic Components Safety Precautions".
- Do not pinch the head curtain airbag when installing the C-pillar trim.
Install in reverse order of removal. Note the following:
Installation notes, for example tightening specifications, replacing components. Refer to → Chapter "Overview - C-Pillar Trim Panel, Sedan".

C-Pillar Trim Panel, Removing and Installing, Avant
Special tools and workshop equipment required
- Pry Lever -80-200-
- Omega Clip Tool -T40280-
Removing
 WARNING
Follow all Safety Precautions when working with pyrotechnic components. Refer to → Chapter "Pyrotechnic Components Safety Precautions".
- Remove the luggage compartment side trim. Refer to → Chapter "Luggage Compartment Side Trim Panel, Removing and Installing, Avant".
- Remove the rear outer belt guide. Refer to → Chapter "Rear Seat Belt Guide, Removing and Installing, Avant".
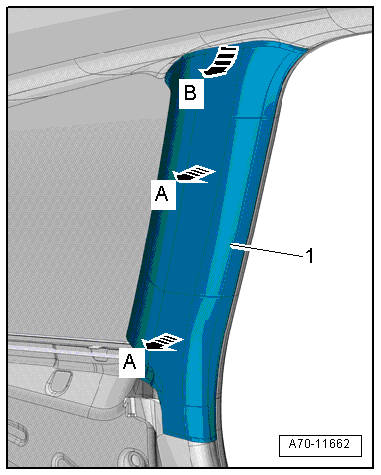
- Unclip the C-pillar trim -1- from the C-pillar using the Pry Lever -80-200- in direction of -A arrows-.
- Remove the upper C-pillar trim from the bracket on the body in direction of -arrow B- by moving the trim toward the inside and pulling it downward at the same time.
Installing
 WARNING
- Follow all Safety Precautions when working with pyrotechnic components. Refer to → Chapter "Pyrotechnic Components Safety Precautions".
- Do not pinch the head curtain airbag when installing the C-pillar trim.

Install in reverse order of removal. Note the following:
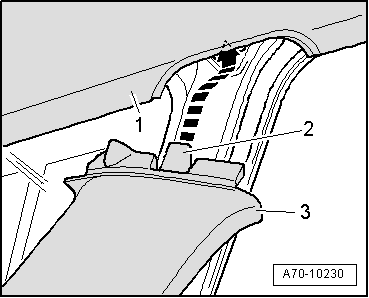
- When installing the C-pillar trim -3-, make sure the retaining strip -2- fits into the cut-out in the body -arrow- and in the headliner -1-.
Installation notes, for example tightening specifications, replacing components. Refer to → Chapter "Overview - C-Pillar Trim Panel, Avant".


