Audi A6 Typ 4G: Clutch
Overview - Flywheel and Dual Clutch
 Note
Note
All assembly work and tightening specifications are outlined in the "S tronic Transmission" repair manual.
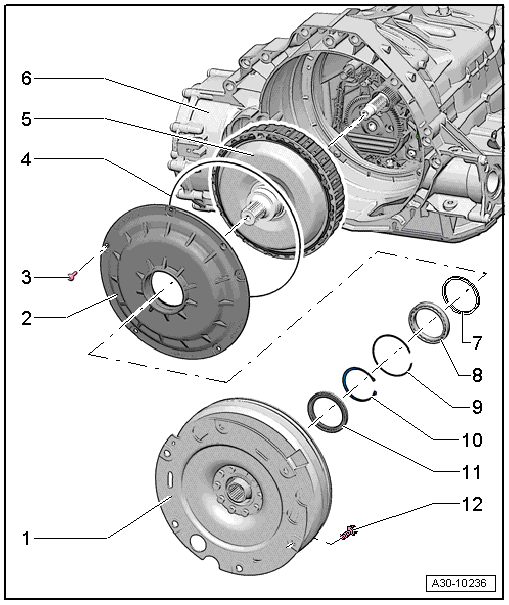
1 - Flywheel
- Removing and installing, refer to → S tronic Transmission Internal Components; Rep. Gr.30; Clutch; Flywheel, Removing and Installing
2 - Clutch Cover
- There are different versions depending on the date of manufacture, with or without a thrust washer (-item 7-), allocation, refer to the Parts Catalog.
- Removing and installing, refer to → S tronic Transmission Internal Components; Rep. Gr.30; Clutch; DSG Clutch, Removing or → S tronic Transmission Internal Components; Rep. Gr.30; Clutch; Dual Clutch, Installing.
3 - Bolt
- Tightening specification and sequence, refer to → S tronic Transmission Internal Components; Rep. Gr.30; Clutch; Overview - Flywheel and Dual Clutch.
4 - O-Ring
- Replacing
5 - Dual Clutch
- Refer to the Parts Catalog because there are different versions depending on the date of manufacture.
- Removing and installing, refer to → S tronic Transmission Internal Components; Rep. Gr.30; Clutch; DSG Clutch, Removing or → S tronic Transmission Internal Components; Rep. Gr.30; Clutch; Dual Clutch, Installing.
- Always perform the necessary "Guided Functions" on the Vehicle Diagnostic Tester after replacing the dual clutch, refer to → Chapter "Transmission Guided Functions".
6 - Transmission Housing
7 - Thrust Washer
- Depending on the date of manufacture, clutch cover allocation, refer to the Parts Catalog.
8 - Ball Bearing
- For the input shaft
- Replacing, refer to → S tronic Transmission Internal Components; Rep. Gr.35; Input Shaft.
9 - Locking Ring
- For ball bearing
- Replacing
10 - Locking Ring
- For the dual clutch
- Replacing
11 - Shaft Seal
- For the input shaft
- Replacing, refer to → S tronic Transmission Internal Components; Rep. Gr.35; Input Shaft; Input Shaft Seal, Replacing.
12 - Bolt
- Quantity of 4 for 6 and 8 -Cylinder Engines
- Tightening specification, refer to → S tronic Transmission Internal Components; Rep. Gr.30; Clutch; Overview - Flywheel and Dual Clutch.
Flywheel, Removing and Installing
- The transmission is removed.
Note
All assembly work and tightening specifications are outlined in the "S tronic Transmission" repair manual.
Description of the procedure, refer to → S tronic Transmission Internal Components; Rep. Gr.30; Clutch; Flywheel, Removing and Installing.
S tronic Clutch, Removing
- The transmission is removed.
Note
All assembly work and tightening specifications are outlined in the "S tronic Transmission" repair manual.
Description of the procedure, refer to → S tronic Transmission Internal Components; Rep. Gr.30; Clutch; DSG Clutch, Removing.
