Audi A6 Owners & Service Manuals
Audi A6 Typ 4G (2011–2018) Workshop Manual / Body / Body Exterior / Exterior Equipment / Rear Wheel Housing Liner, Removing and Installing

Audi A6 Typ 4G: Rear Wheel Housing Liner, Removing and Installing

Rear Wheel Housing Liner, Removing and Installing

Removing

  • Rear wheel removed. Refer to → Suspension, Wheels, Steering; Rep. Gr.44; Wheels and Tires.

- Remove the bolts -3-.

- Remove the clip -1- from the wheel housing liner -2-.
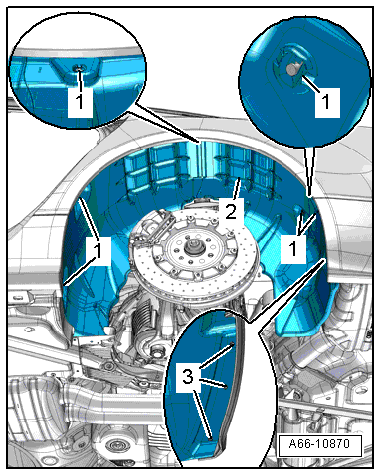
A66-10870

- To remove the clips -3-, unlock the release lever -2- with needle nose pliers in direction of -arrow A- and push it off the pin -1- in -direction of arrow B-.

- The Locking Pliers -VAS 6199- may also be alternatively used to release the clips.

- Remove the wheel housing liner.

Installing

Install in reverse order of removal. Note the following:

- Make sure the clip is secure after installing it.
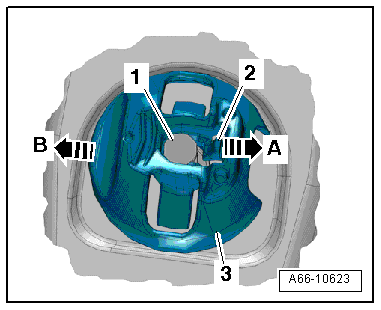
A66-10623

Rear Wheel Housing Liner, Removing and Installing, Audi RS 6

Removing

  • Rear wheel removed. Refer to → Suspension, Wheels, Steering; Rep. Gr.44; Wheels and Tires.

- Remove the expanding rivet -3-.

- Remove the bolts -4-.

- Remove the clip -1- from the wheel housing liner -2-.
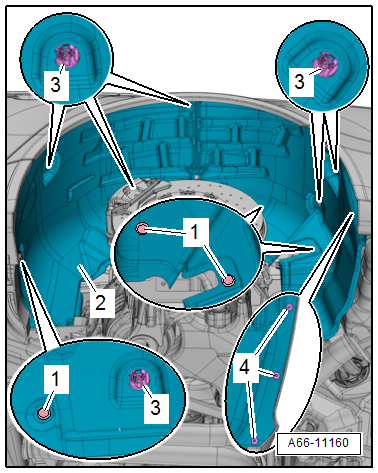
A66-11160

- To remove the clips -3-, unlock the release lever -2- with needle nose pliers in direction of -arrow A- and push it off the pin -1- in -direction of arrow B-.

- The Locking Pliers -VAS 6199- may also be alternatively used to release the clips.

- Remove the wheel housing liner.

Installing

Install in reverse order of removal. Note the following:

- Make sure the clip is secure after installing it.

A66-10623

    READ NEXT:

     Name Badges and Emblems

    General Information Special tools and workshop equipment required Roller -3356-   Caution Badges and emblems that are remove must be replaced. The vehicle must reach room temperature bef

     Trailer Hitch

    Overview - Trailer Hitch 1 - Grommet For the cable 2 - Screw Tightening specification. Refer to → Chapter "Overview - Impact Member, Audi A6/allroad/S6" Quantity: 4

     Body Interior

    SEE MORE:

     Ground Cable with Battery Monitoring Control Module -J367-, Removing and Installing

    Ground Cable with Battery Monitoring Control Module -J367-, Removing and Installing, Vehicles without High Voltage System Removing - Turn off the ignition. - Lift the luggage compartment floor covering by the handle and fold it forward. - Remove the vehicle tools. - If equipped

     Underbody Panels, Removing and Installing

    Front Vehicle Underbody Cover, Removing and Installing Removing - Remove the nut -3- and expanding clip -1-. - Remove the front cover -2- forward. - Remove the front cover. Installing Install in reverse order of removal. Center Vehicle Underbody Cover, Removing and Installing Remov

    © 2011-2024 Copyright www.aa6.tochrfr.com