Audi A6 Typ 4G: Floor Heat Shield, Removing and Installing
Left Longitudinal Member Heat Shield, Removing and Installing, Vehicles with Gasoline Engine
Removing
- Remove the noise insulation: for the front. Refer to → Chapter "Front Noise Insulation, Removing and Installing"; for the rear. Refer to → Chapter "Rear Noise Insulation, Removing and Installing".
- Pry out the spring clips -1 and 2- from the transmission side and the spring clip -5- from the engine mount side.
- Drain the coolant. Refer to → Rep. Gr.19; Coolant System/Coolant; Coolant, Draining and Filling.
- Open the clamp -2-, move it to the side and remove the coolant line.
 Note
Note
Ignore -item 1-.
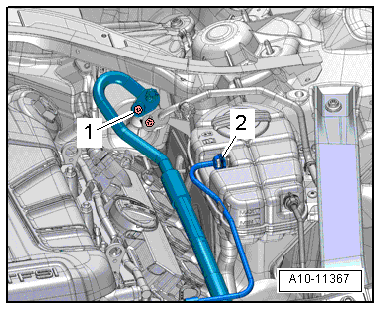
- Open the clamp -arrow-, free up the coolant hose and remove the left coolant hose from the front coolant pipe.
- Remove the lock washer -3-.
- Swivel the heat shield -4- for the front longitudinal member upward and remove it.
Installing
Install in reverse order of removal. Note the following:
- Install the coolant hose and coolant line. Refer to → Rep. Gr.19; Coolant System/Coolant; Coolant, Draining and Filling.
Right Longitudinal Member Heat Shield, Removing and Installing, Vehicles with Gasoline Engine
Removing
- Remove the noise insulation: for the front. Refer to → Chapter "Front Noise Insulation, Removing and Installing"; for the rear. Refer to → Chapter "Rear Noise Insulation, Removing and Installing".
- Remove the spring clips -4 and 5- from the transmission side and the spring -1- from the engine mount side.
- Remove the air guide pipe from the air filter housing. Refer to → Rep. Gr.24; Air Filter; Overview - Air Filter Housing.
- Remove the lock washer -3-.
- Swivel the heat shield -2- for the front longitudinal member upward and remove it.
Installing
Install in reverse order of removal.
Left Longitudinal Member Heat Shield, Removing and Installing, Vehicles with TDI Engine
Removing
- The engine is cold.
- Remove the noise insulation: for the front. Refer to → Chapter "Front Noise Insulation, Removing and Installing"; for the rear. Refer to → Chapter "Rear Noise Insulation, Removing and Installing".
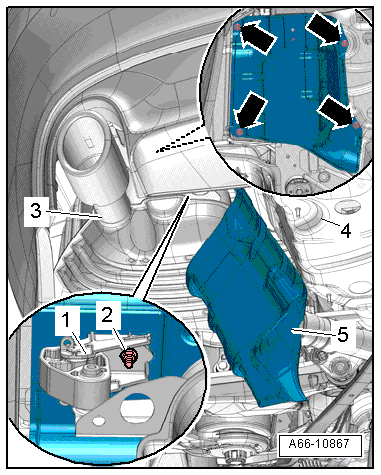
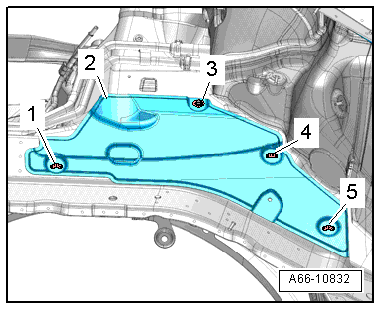
- Pry out the spring clips -1 and 2- from the transmission side and the spring clip -5- from the engine mount side.
- Remove the left lock carrier brace. Refer to → Chapter "Lock Carrier Brace, Removing and Installing".
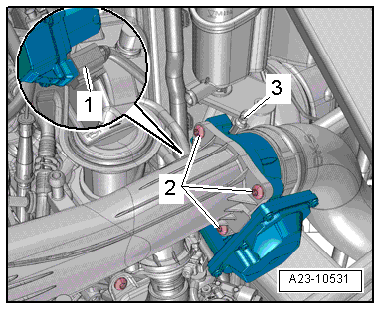
- Open the clamp -3- and remove the air guide hose.
Note
Ignore -items 1 and 2-.
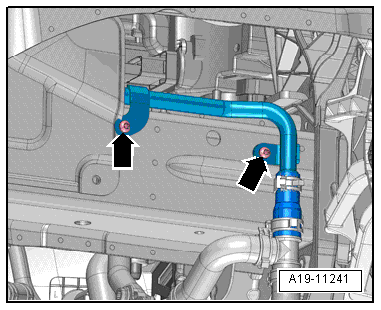
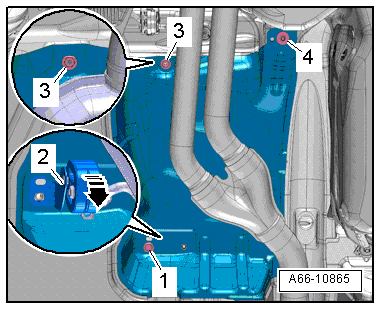
- Remove the nuts -arrow- and free up the coolant pipe on the wiring harness.
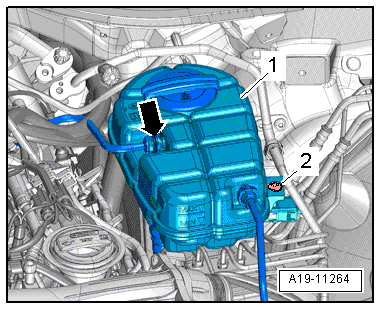
- Remove the bolt -2-.
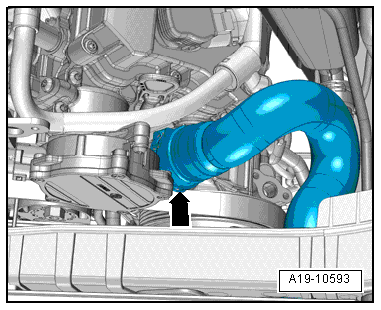
- Open the clamp -arrow-, move it to the side and remove the coolant line.
- Move the coolant reservoir -1- as far as possible to the side.
- Remove the lock washer -3-.
- Swivel the heat shield -4- for the front longitudinal member upward and remove it.
Installing
Install in reverse order of removal. Note the following:
- Install the coolant expansion tank and line. Refer to → Engine Mechanical, Fuel Injection and Ignition; Rep. Gr.19; Coolant Pipes; Overview - Coolant Pipes.
- Install the air guide hose. Refer to → Engine Mechanical, Fuel Injection and Ignition; Rep. Gr.21; Charge Air System; Overview - Charge Air Hose Connections.
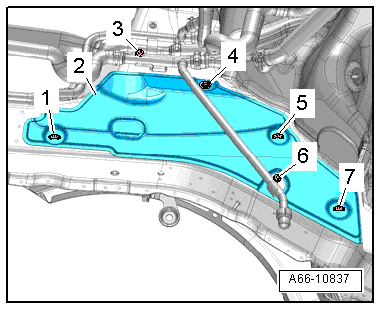
Right Longitudinal Member Heat Shield, Removing and Installing, Vehicles with TDI Engine
Removing
- Remove the noise insulation: for the front. Refer to → Chapter "Front Noise Insulation, Removing and Installing"; for the rear. Refer to → Chapter "Rear Noise Insulation, Removing and Installing".
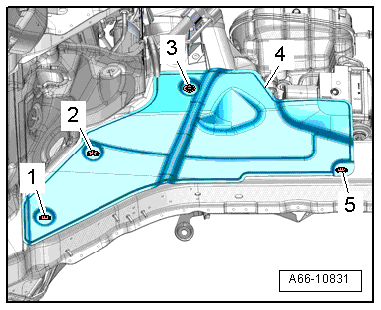
- Remove the spring clips -5 and 7- from the transmission side and the spring -1- from the engine mount side.
- Remove the bolt -6-.
- Remove the air guide pipe from the air filter housing. Refer to → Rep. Gr.23; Air Filter; Overview - Air Filter Housing.
- Remove the bolt -3- and the lock washer -4-.
- Swivel the heat shield -2- for the front longitudinal member upward and remove it.
Installing
Install in reverse order of removal. Note the following:
- Install the coolant line. Refer to → Engine Mechanical, Fuel Injection and Ignition; Rep. Gr.19; Coolant Pipes; Overview - Coolant Pipes.
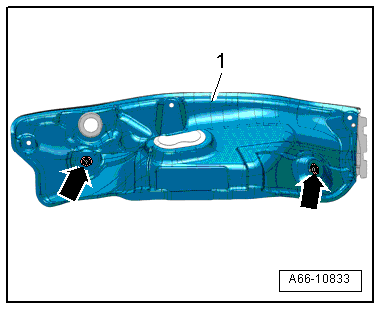
Heat Shield, Removing and Installing, Plenum Chamber Bulkhead, Vehicles with Gasoline Engine
Removing
- Remove the plenum chamber bulkhead. Refer to → Chapter "Plenum Chamber Bulkhead, Removing and Installing".
- Remove the lock washers -arrows-.
- Remove the heat shield -1- from the plenum chamber bulkhead.
Installing
Install in reverse order of removal.
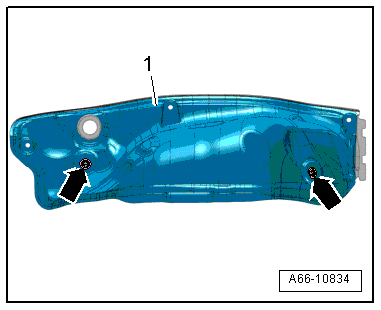
Heat Shield, Removing and Installing, Plenum Chamber Bulkhead, Vehicles with TDI Engine
Removing
- Remove the plenum chamber bulkhead. Refer to → Chapter "Plenum Chamber Bulkhead, Removing and Installing".
- Remove the lock washers -arrows-.
- Remove the heat shield -1- from the plenum chamber bulkhead.
Installing
Install in reverse order of removal.
Heat Shield for Left Upper Tunnel, Removing and Installing
Removing
- Remove the plenum chamber bulkhead. Refer to → Chapter "Plenum Chamber Bulkhead, Removing and Installing".
- Vehicles with gasoline engine: Remove the left catalytic converter. Refer to → Rep. Gr.26; Emissions Control; Catalytic Converter, Removing and Installing.
- Vehicles with TDI engine: Remove the particulate filter. Refer to → Rep. Gr.26; Emissions Control; Particulate Filter, Removing and Installing.
- Remove the lock washers -arrows-.
- Remove the heat shield -2- upward.
Installing
Install in reverse order of removal. Note the following:
- Make sure the heat shield is pushed in behind the right heat shield -1- and the center heat shield -3- for the tunnel.
Heat Shield for Right Upper Tunnel, Removing and Installing
Removing
- Remove the plenum chamber bulkhead. Refer to → Chapter "Plenum Chamber Bulkhead, Removing and Installing".
- Vehicles with gasoline engine: Remove the right catalytic converter. Refer to → Rep. Gr.26; Emissions Control; Catalytic Converter, Removing and Installing.
- Vehicles with TDI engine: Remove the particulate filter. Refer to → Rep. Gr.26; Emissions Control; Particulate Filter, Removing and Installing.
- Remove the lock washers -arrows-.
- Remove the heat shield -1- upward.
Installing
Install in reverse order of removal. Note the following:
- Make sure the heat shield is pushed in behind the center heat shield for the tunnel.
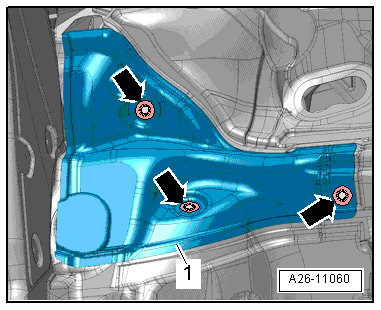
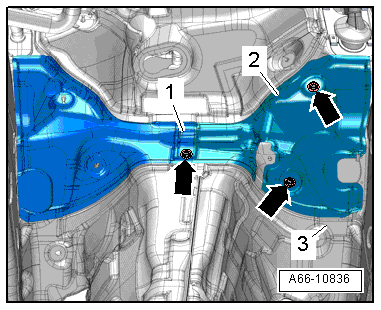
Heat Shield for Center Tunnel, Removing and Installing, Vehicles with Gasoline Engine
Removing
- Remove the selector mechanism function unit. Refer to → S tronic Transmission; Rep. Gr.34; Selector Mechanism; Selector Mechanism, Removing and Installing or → Automatic Transmission; Rep. Gr.37; Selector Mechanism; Selector Mechanism, Removing and Installing.
- Remove the rear heat shield for the tunnel. Refer to → Chapter "Heat Shield for Rear Tunnel, Removing and Installing".
- Remove the nuts -1 and 2-.
- Pry out the spring clips -arrows-.
- Remove the heat shield -3- to the rear.
Installing
Install in reverse order of removal.
Heat Shield for Front Center Tunnel, Removing and Installing, Vehicles with TDI Engine
Removing
- Remove the center heat shield for the tunnel. Refer to → Chapter "Heat Shield for Rear Center Tunnel, Removing and Installing, Vehicles with TDI Engine".
- Remove the selector mechanism function unit. Refer to → S tronic Transmission; Rep. Gr.34; Selector Mechanism; Selector Mechanism, Removing and Installing or → Automatic Transmission; Rep. Gr.37; Selector Mechanism; Selector Mechanism, Removing and Installing.
- Remove the nuts -1 and 2-.
- Pry out the spring clips -arrows-.
- Remove the heat shield -3- to the rear.
Installing
Install in reverse order of removal.
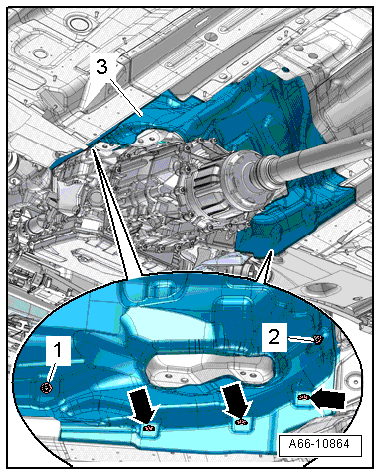
Heat Shield for Rear Center Tunnel, Removing and Installing, Vehicles with TDI Engine
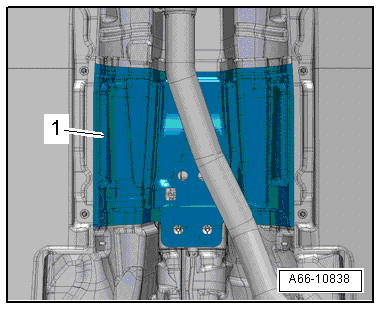
Removing
- Remove the expanding clip -8- from the left front cover -3-.
- Remove the nuts -1 and 2-.
Note
Ignore -items 4 to 7-.
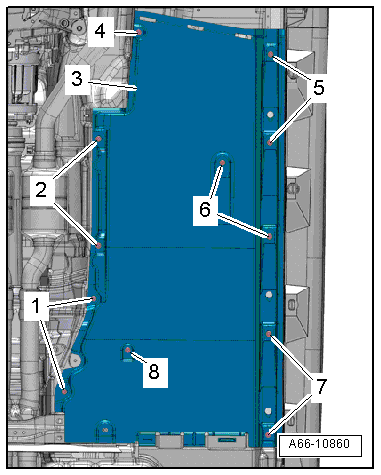
- Turn the heat shield -1- downward and remove it.
Installing
Install in reverse order of removal. Note the following:
- Install the center cover for the underbody. Refer to → Chapter "Center Vehicle Underbody Cover, Removing and Installing".
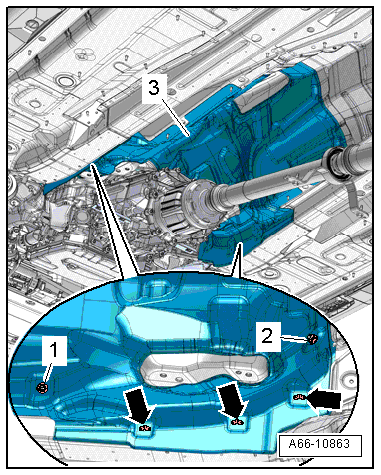
Propshaft Heat Shield, Removing and Installing
Special tools and workshop equipment required
- Transmission Support -VW 785/1 B-
Removing
- Remove the expanding clip -8- from the left front cover -3-.
- Remove the nuts -1 and 2-.
Note
Ignore -items 4 to 7-.
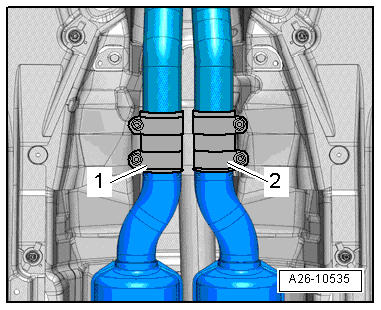
Vehicles with a gasoline engine:
 Caution
The decoupling elements in the front muffler could be damaged.
Do not bend decoupling element in front muffler more than 10º.
- Open the clamping sleeves -1 and 2-, slide them to the back and place the front muffler on the Transmission Support -VW 785/1 B-.
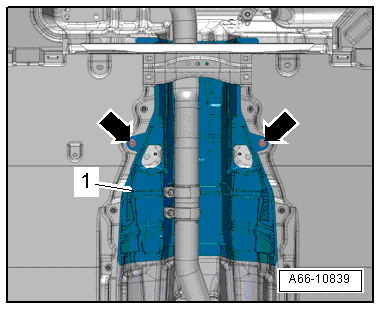
Continuation for all vehicles:
- Remove the nuts -arrows-.
- Slide the heat shield -1- forward (in direction of travel) and remove it.
- If the vehicle has a gasoline engine and the exhaust pipes are hanging down, the remove the heat shield to the rear.
Installing
Install in reverse order of removal. Note the following:
- Install the exhaust system. Refer to → Engine Mechanical, Fuel Injection and Ignition; Rep. Gr.26; Exhaust Pipes/Mufflers; Overview - Muffler.
- Install the center cover for the underbody. Refer to → Chapter "Center Vehicle Underbody Cover, Removing and Installing".
Heat Shield for Rear Tunnel, Removing and Installing
Removing
- Remove the rear section from the exhaust system. Refer to → Engine Mechanical, Fuel Injection and Ignition; Rep. Gr.26; Exhaust Pipes/Mufflers; Overview - Muffler.
- Remove the propshaft heat shield. Refer to → Chapter "Propshaft Heat Shield, Removing and Installing".
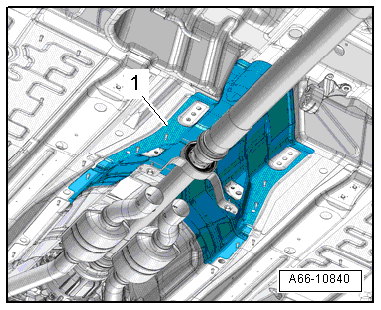
- Remove the propshaft from the rear final drive and tie it up. Refer to → Rear Final Drive; Rep. Gr.39.
- Remove the bolts -arrows- from the propshaft center bearing.
- Lower the propshaft carefully.

- Remove the crossbrace. Refer to → Chapter "Tunnel Bridge, Removing and Installing".
- Remove the heat shield -1- to the rear.
Installing
Install in reverse order of removal.
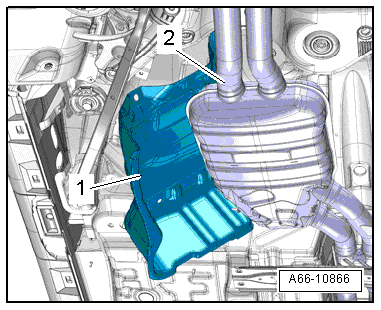
Center Exhaust System Heat Shield, Removing and Installing
Removing
- Removing the left rear cover for the underbody. Refer to → Chapter "Rear Vehicle Underbody Cover, Removing and Installing".
- Remove the nut -3- and bolts -1 and 4-.
- If the vehicle has a gasoline engine, turn the suspended mount -2- for the center muffler in -direction of arrow-.
- Remove the heat shield -1- past the exhaust system -2- to the left.
Installing
Install in reverse order of removal. Note the following:
- The washer -2- must be touching the heat shield -1- when installing the bolt -3-.
- Install the left rear cover for the underbody. Refer to → Chapter "Rear Vehicle Underbody Cover, Removing and Installing".

Rear Muffler Heat Shield, Removing and Installing
Removing
- Remove the nut -2- and turn the suspended mount -1- for the rear muffler -3- to the back.
- Remove the nuts -arrows-.
- Turn the heat shield -5- for the spare wheel well -4- and remove it.
Installing
Install in reverse order of removal. Note the following:
- Install the rear muffler. Refer to → Engine Mechanical, Fuel Injection and Ignition; Rep. Gr.26; Exhaust Pipes/Mufflers; Overview - Muffler.