Audi A6 Typ 4G: Front Brake Caliper, Replacing
Brake Caliper, Replacing, Steel Brakes, 1LA/1LJ/1LF/1LL/1LU and Ceramic Brakes, LN/1LW
Special tools and workshop equipment required
- Torque Wrench 1332 40-200Nm -VAG1332-
- Brake Pedal Actuator -VAG1869/2-.
- Container from the Brake Charger/Bleeder Unit -VAS5234-
- Plugs from the Assembly Part Set -5Q0698311-
 Note
Note
The brake caliper is removed and disconnected from the hydraulic system in the following description. The brake hose is removed.
1 - M10 Plugs
2 - M12 Plugs
Removing
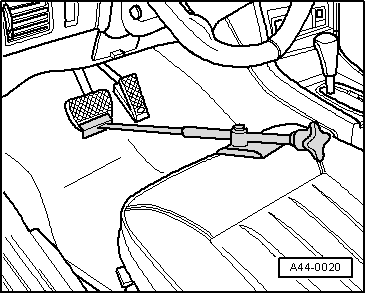
- Insert the Brake Pedal Actuator -VAG1869/2- between the brake pedal and driver seat. Preload the brake pedal at least 60 mm.
 Note
Note
By doing this, the valves in the brake master cylinder are closed and the brake fluid reservoir does not run empty.
- Remove the affected front wheel. Refer to → Suspension, Wheels, Steering; Rep. Gr.44; Wheels, Tires.
 Note
Note
Place a cloth underneath to catch any brake fluid leaking out.
 WARNING
Risk of skin irritation.
To prevent skin contact with brake fluid, wear chemical resistant safety gloves.
There is a risk of an accident from steam bubbles developing when the water content in the brake fluid is too high.
- Brake fluid is hygroscopic, meaning that it absorbs moisture from the surrounding air.
- Seal the open brake hoses and brake line with plugs from the Assembly Part Set -5Q0698311-.
Brake fluid contact with fluids containing mineral oils causes malfunctions.
Brake fluid must never come into contact with fluids containing mineral oils (oil, gas, cleaning solutions). Safety gloves must be free of oil and grease.
Risk of damaging the painted surfaces.
Due to its corrosive nature, brake fluid must also never contact paint. Wash off any spilled brake fluid immediately with plenty of water.
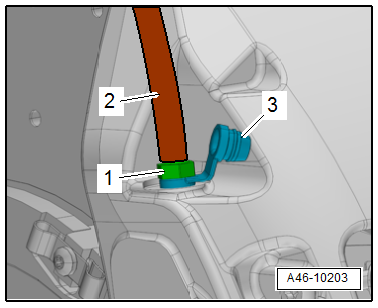
- Remove the protective cap -3- from the bleed screw -1-.
- Attach the container bleed hose -2- to the bleed screw.
- Open the bleed screw to reduce the pressure in the hydraulic system.
- Close the bleed screw and remove the container.
 Note
Note
Do not remove the Brake Pedal Actuator -VAG1869/2-.
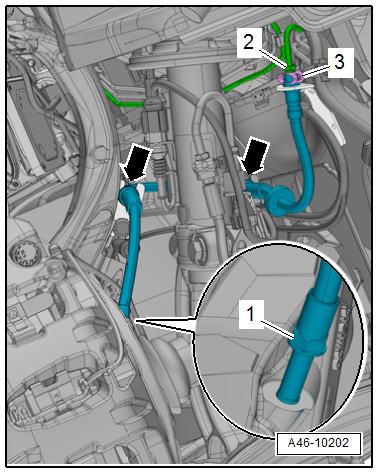
- Remove the union bolt -2-.
- Free up the brake hose at the brackets -arrows-.
- Detach the brake hose -1- from the brake caliper and remove it.
 Note
Note
Ignore -item 3-.
- Remove the brake pads. Refer to → Chapter "Brake Pads, Removing and Installing".
Installing
- Install the brake pads. Refer to → Chapter "Brake Pads, Removing and Installing".
- Install the brake hose -1- in the brake caliper and tighten.
- Check the retaining spring -3- for damage and replace if necessary.
- Insert the brake hose into the brackets -arrows- and connect it to the brake line by tightening the union bolt -2-.
 Note
Note
- Make sure the brake hose is routed correctly.
- Make sure the brake hose is not blocked, bent, twisted or rubbing against the vehicle.
- Remove the Brake Pedal Actuator -VAG1869/2-.
- Only bleed the brakes on the wheel from which the brake caliper and the brake hose was loosened. Refer to → Chapter "Hydraulic System, Standard Bleeding".
 Note
Note
If the brake pedal still feels "soft", completely bleed the brakes. Refer to → Chapter "Hydraulic System, Standard Bleeding".
- Install the front wheel. Refer to → Suspension, Wheels, Steering; Rep. Gr.44; Wheels, Tires.
 WARNING
Risk of accident!
- With the vehicle stationary, firmly press the brake pedal several times so that the brake pads in the operating condition properly sit in their respective position.
- Make sure the brakes are working correctly before driving the vehicle for the first time.

Brake Caliper, Replacing, 1LP
Special tools and workshop equipment required
- Torque Wrench 1332 40-200Nm -VAG1332-
- Torque Wrench 1332 Insert - Reversible Ratchet -VAG1332/1-
- Brake Pedal Actuator -VAG1869/2-.
- Container from the Brake Charger/Bleeder Unit -VAS5234-
Removing
- Remove affected front wheel.
- Insert the Brake Pedal Actuator -VAG1869/2- between the brake pedal and driver seat. Preload the brake pedal at least 60 mm.
 Note
Note
By doing this, the valves in the brake master cylinder are closed and the brake fluid reservoir does not run empty.
- Connect the container hose to a front brake caliper bleed screw.
- Open a brake caliper bleed screw on the front brake caliper to reduce the pressure from the brake system.
 WARNING
- Brake fluid is poisonous, and must never be siphoned by mouth under any circumstances.
- Wash off any brake fluid that comes into contact with the skin with a lot of water.
- If brake fluid comes in contact with the eyes, wash out the eye(s) and see a doctor.
- Close the bleed screw.

 Note
Note
Do not remove the Brake Pedal Actuator -VAG1869/2-.
- Remove the brake pads.
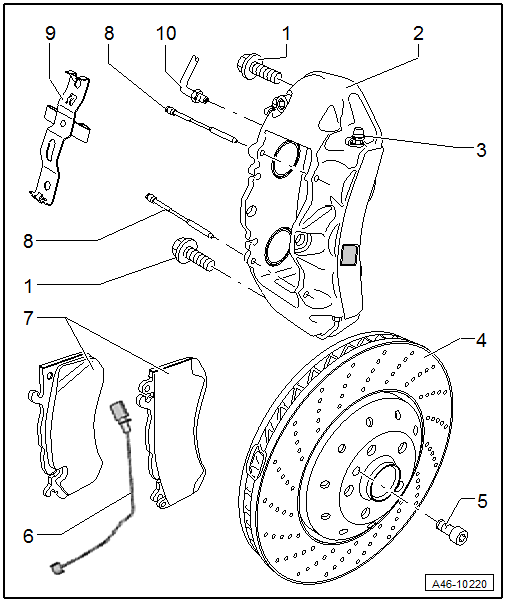
- Remove the brake hose -10-
- Remove the bolts -1-.
- Remove brake caliper -2-.
Installing
- Tightening Specifications
 Note
Note
Use new bolts. Refer to Parts Catalog.
- Install the brake caliper.
- Tighten the brake caliper with the new bolts.
- Tightening Specifications
- Install the brake hose into the brake caliper and tighten.
 WARNING
- Brake fluid is poisonous, and must never be siphoned by mouth under any circumstances.
- Wash off any brake fluid that comes into contact with the skin with a lot of water.
- If brake fluid comes in contact with the eyes, wash out the eye(s) and see a doctor.
The brake hose needs to sit in the bracket.
- Attach the brake pad wear wire.
- Install the brake pads.
- Remove the Brake Pedal Actuator -VAG1869/2-.
- Only bleed the brakes on the wheel from which the brake caliper and the brake hose was loosened. Refer to → Chapter "Hydraulic System, Standard Bleeding".
 Note
Note
If the brake pedal still feels "soft", completely bleed the brakes. Refer to → Chapter "Hydraulic System, Standard Bleeding".
 WARNING
Risk of accident!
- With the vehicle stationary, firmly press the brake pedal several times so that the brake pads in the operating condition properly sit in their respective position.
- Make sure the brakes are working correctly before driving the vehicle for the first time.
Brake Caliper, Replacing, Steel Brakes, 1LM/1LX
Special tools and workshop equipment required
- Torque Wrench 1332 40-200Nm -VAG1332-
- Brake Pedal Actuator -VAG1869/2-.
- Container from the Brake Charger/Bleeder Unit -VAS5234-
 Note
Note
In the following description the brake caliper is removed and replaced. The brake hose is removed.
Removing
- Insert the Brake Pedal Actuator -VAG1869/2- between the brake pedal and driver seat. Preload the brake pedal at least 60 mm.
 Note
Note
By doing this, the valves in the brake master cylinder are closed and the brake fluid reservoir does not run empty.
- Remove the affected front wheel. Refer to → Suspension, Wheels, Steering; Rep. Gr.44; Wheels, Tires.
 Note
Note
Place a cloth underneath to catch any brake fluid leaking out.
 WARNING
Risk of skin irritation.
To prevent skin contact with brake fluid, wear chemical resistant safety gloves.
There is a risk of an accident from steam bubbles developing when the water content in the brake fluid is too high.
- Brake fluid is hygroscopic, meaning that it absorbs moisture from the surrounding air.
- Seal the open brake hoses and brake line with plugs from the Assembly Part Set -5Q0698311-.
Brake fluid contact with fluids containing mineral oils causes malfunctions.
Brake fluid must never come into contact with fluids containing mineral oils (oil, gas, cleaning solutions). Safety gloves must be free of oil and grease.
Risk of damaging the painted surfaces.
Due to its corrosive nature, brake fluid must also never contact paint. Wash off any spilled brake fluid immediately with plenty of water.

- Remove the protective cap -3- from the bleed screw -1-.
- Attach the container bleeder hose -2- to the bleed screw.
- Open the bleed screw to reduce the pressure in the hydraulic system.
- Close the bleed screw and remove the container.
 Note
Note
Do not remove the Brake Pedal Actuator -VAG1869/2-.

- Remove the union bolt -2-.
- Free up the brake hose at the brackets -arrows-.
- Detach the brake hose -1- from the brake caliper and remove it.
 Note
Note
Ignore -item 3-.

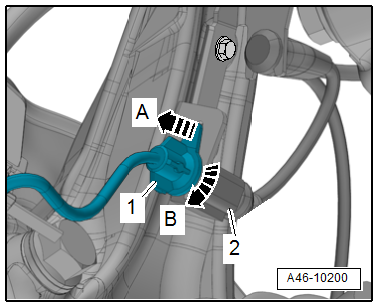
- Disconnect the connector -2- from the brake pad wear indicator.
- Release the connector -1- to the brake pad wear sensor from the bracket -arrow A- and turn it 90º at the same time -arrow B-.
 Note
Note
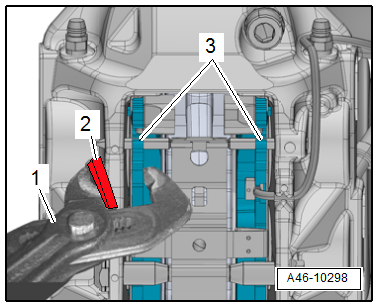
Pushing on the brake pads -3- lightly with pliers -1- makes it easier to remove the brake caliper from the brake rotor. To prevent damage to the paint coat on the brake caliper, place a piece of rubber -2- between the pliers and brake caliper.
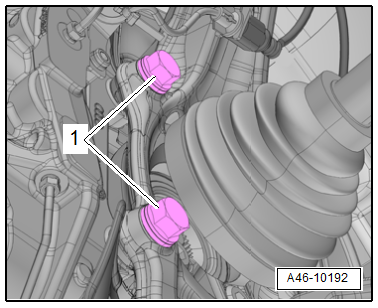
- Unscrew the bolts -1- and carefully remove the brake caliper with the brake pads from the brake rotor.
- If necessary, remove the brake pads. Refer to → Chapter "Brake Pads, Removing and Installing, Steel Brakes, 1LM/1LX".
Installing
Install in reverse order of removal and note the following:
- Bring the brake caliper into its installed position and tighten the new bolts -1-.
- Install the brake pads. Refer to → Chapter "Brake Pads, Removing and Installing, Steel Brakes, 1LM/1LX".

- Install the brake hose -1- in the brake caliper and tighten.
- Check the retaining spring -3- for damage and replace if necessary.
- Insert the brake hose into the brackets -arrows- and connect it to the brake line by tightening the union bolt -2-.
 Note
Note
- Make sure the brake hose is routed correctly.
- Make sure the brake hose is not blocked, bent, twisted or rubbing against the vehicle.
- Remove the Brake Pedal Actuator -VAG1869/2-.
- Only bleed the brakes on the wheel from which the brake caliper and the brake hose was loosened. Refer to → Chapter "Hydraulic System, Standard Bleeding".
 Note
Note
If the brake pedal still feels "soft", completely bleed the brakes. Refer to → Chapter "Hydraulic System, Standard Bleeding".
- Install the front wheel. Refer to → Suspension, Wheels, Steering; Rep. Gr.44; Wheels, Tires.
 WARNING
Risk of accident!
- With the vehicle stationary, firmly press the brake pedal several times so that the brake pads in the operating condition properly sit in their respective position.
- Make sure the brakes are working correctly before driving the vehicle for the first time.


