Audi A6 Typ 4G: Front Brake Pads, Removing and Installing
Brake Pads, Removing and Installing, Steel Brakes, 1LA/1LJ
Special tools and workshop equipment required
- Torque Wrench 1331 5-50Nm -VAG1331-
- Piston Resetting Tool -T10145-
- Lithium grease. Refer to the Parts Catalog.
Removing
 Note
Note
Label the brake pads when removing if they are going to be used again. Install in the same position, otherwise the braking effect will be uneven.
- Remove the affected front wheel. Refer to → Suspension, Wheels, Steering; Rep. Gr.44; Wheels, Tires.
 WARNING
Risk of injury!
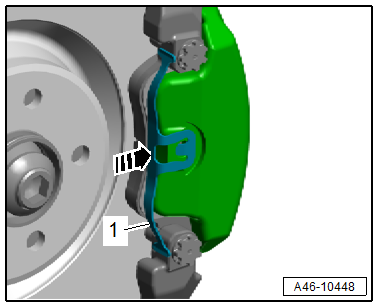
The balance spring -1- is tensioned. Disengage the balance spring to remove the balance spring at the same time do not damage the brake caliper paint.
- Push the balance spring -1- in the direction of the -arrow- and disengage from the brake caliper.
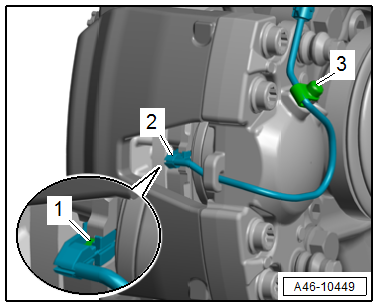
- Remove the contact -1- for the brake pad wear sensor from the brake pad, while being careful of the clips -2-.
- Free up the wire for the brake pad wear sensor, to do so open the dust cap -3- and disengage the wire from the brake caliper arrows.
 Note
Note
If the clips -2- go missing, the brake pad wear sensor must be replaced.
 Note
Note
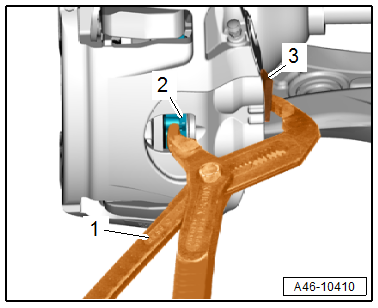
- For easier removal of the brake caliper from the brake rotor, push the brake pad -2- back lightly with pliers -1-, as shown in the illustration.
- To prevent damage to the paint coat on the brake caliper, place a piece of rubber -3- between the pliers and the brake caliper.
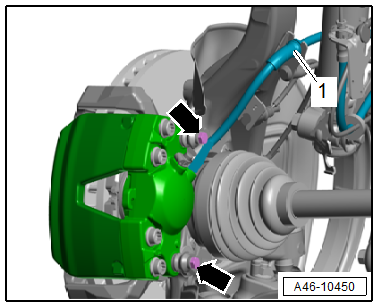
- Free up the brake hose -1- from the bracket.
- Remove the bolts -arrows-.
- Carefully remove the brake caliper with the brake pads from the brake rotor.
 Caution
There is a risk of damaging the brake hose.
- Do not let the brake caliper hang on the brake hose. Do not support the weight with the brake hose.
- Replace the brake hose if damaged.
There is a risk of damaging the brake caliper piston.
Do not press the brake pedal when the brake caliper is removed.
- Hang the brake caliper on the body using a suitable wire.
- Remove the brake pads from the brake caliper.
Installing
Install in reverse order of removal and note the following:
- When the brake pads are replaced, check the brake rotors for wear and damage:
- Brake rotor wear limit. Refer to → Chapter "Technical Data, Brakes".
 Note
Note
- Always replace brake pads on both sides of the axle.
- Use the complete repair kit when installing new brake pads.
 WARNING
Health Risk.
Do not blow out brake system with compressed air.
 Note
Note
- Use only mineral spirits to clean the brake caliper.
- Check the brake caliper piston protective caps for damage and install the complete repair kit, if necessary. Refer to → Chapter "Brake Caliper Piston, Removing and Installing, 1LA/1LJ".
 Caution
There is a risk of contamination and paint damage from escaping brake fluid.
- If the brake pads are worn out and brake fluid is filled unnecessary, the brake fluid may overflow, causing the pistons in the brake cylinders to be pressed back.
- Check the brake fluid level before pressing back the pistons. If there is brake fluid up to the "MAX" mark, some brake fluid will need to be extracted.
- Use the Brake Charger/Bleeder Unit -VAS5234- to extract brake fluid from the brake fluid reservoir.
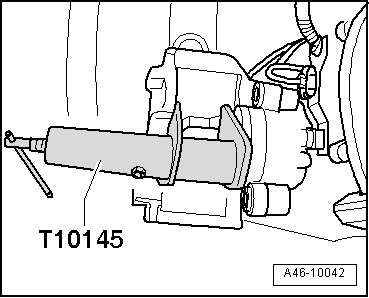
- Use the Piston Resetting Tool -T10145- to press the brake caliper piston completely back into the brake caliper.
- Clean the brake caliper.
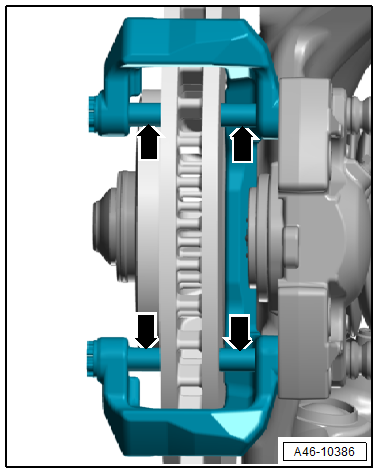
- Clean the retaining pin -arrows- on the brake pad contact surfaces and thinly coat them with lithium grease.
 Note
Note
If there is grease residue on the brake rotor clean it with brake cleaner.
- If reusing, install the marked brake pads in the same location.
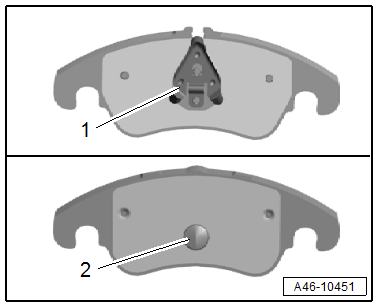
- Clip in the inner brake pad with the spring -1- in the brake caliper piston.
- Clip in the outer brake pad with the retaining pin -2- in the brake caliper.
- Slide the brake caliper with the brake pads installed carefully over the brake rotor.
- Tighten the bolts -arrows-.
- Engage the brake hose -1- at the bracket.
 Note
Note
- Check the contact for the brake pad wear sensor for damage, replacing if necessary.
- Make sure that the brake pad wear sensor contact sits correctly in the brake pad.
- Make sure the brake hose is not blocked, bent, twisted or rubbing against the vehicle.
- Make sure the protective caps for the guide pins are not damaged.
- Make sure the protective caps are installed properly.
- Install the brake pad wear sensor. Refer to → Chapter "Brake Pad Wear Indicator Wire, Removing and Installing, Steel Brakes, 1LA/1LJ".

- Bring the balance spring -1- into the installation position, push in the direction of the -arrow- and engage in the brake caliper as shown.
- Install the front wheel. Refer to → Suspension, Wheels, Steering; Rep. Gr.44; Wheels, Tires.
 WARNING
Risk of accident!
- With the vehicle stationary, firmly press the brake pedal several times so that the brake pads in the operating condition properly sit in their respective position.
- Make sure the brakes are working correctly before driving the vehicle for the first time.
- Check brake fluid level, and fill if necessary.

Brake Pads, Removing and Installing, Steel Brakes, 1LF/1LL
Special tools and workshop equipment required
- Torque Wrench 1332 40-200Nm -VAG1332-
- Piston Resetting Tool -T10145-
- Socket - Xzn 9 -T50036-
- Lithium grease. Refer to the Parts Catalog.
Removing
 Note
Note
Label the brake pads when removing if they are going to be used again. Install in the same position, otherwise the braking effect will be uneven.
- Remove the affected front wheel. Refer to → Suspension, Wheels, Steering;
 WARNING
Risk of injury!
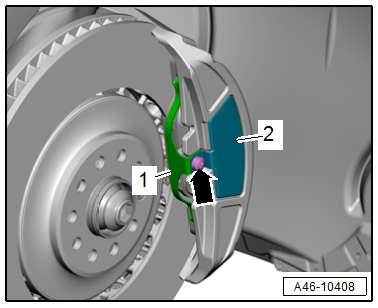
The balance spring -1- is tensioned. Disengage the balance spring to remove the balance spring at the same time do not damage the brake caliper paint.
- Remove the bolt -arrow-.
- Remove the trim -2- and the balance spring -1-.
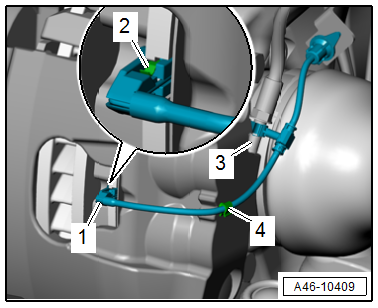
- Remove the contact -1- for the brake pad wear sensor from the brake pad, while being careful of the clips -2-.
- Free up the wire from the brake hose -3- and the bracket -4-.
 Note
Note
If the clips -2- go missing, the brake pad wear sensor must be replaced.
 Note
Note
- For easier removal of the brake caliper from the brake rotor, push the brake pad -2- back lightly with pliers -1-, as shown in the illustration.
- To prevent damage to the paint coat on the brake caliper, place a piece of rubber -3- between the pliers and the brake caliper.

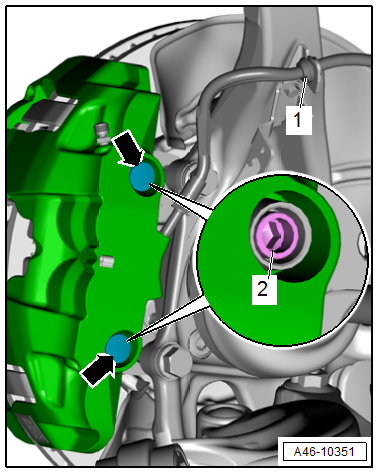
- Free up the brake hose -1- from the bracket.
- Remove the protective caps -arrows-.
- Remove the guide pins -2- using the Socket - Xzn 9 -T50036- and pull them out slightly from the brake caliper.
- Carefully remove the brake caliper with the brake pads from the brake rotor.
 Caution
There is a risk of damaging the brake hose.
- Do not let the brake caliper hang on the brake hose. Do not support the weight with the brake hose.
- Replace the brake hose if damaged.
There is a risk of damaging the brake caliper piston.
Do not press the brake pedal when the brake caliper is removed.
- Hang the brake caliper on the body using a suitable wire.
- Push off and remove each of the brake pads in the center of the brake caliper.
Installing
Install in reverse order of removal and note the following:
- When the brake pads are replaced, check the brake rotors for wear and damage:
- Brake rotor wear limit. Refer to → Chapter "Technical Data, Brakes".
 Note
Note
- Always replace brake pads on both sides of the axle.
- Use the complete repair kit when installing new brake pads.
 WARNING
Health Risk.
Do not blow out brake system with compressed air.
 Note
Note
- Use only mineral spirits to clean the brake caliper.
- Check the brake caliper piston protective caps for damage and install the complete repair kit, if necessary. Refer to → Chapter "Brake Caliper Piston, Removing and Installing, 1LF/1LL".
 Caution
There is a risk of contamination and paint damage from escaping brake fluid.
- If the brake pads are worn out and brake fluid is filled unnecessary, the brake fluid may overflow, causing the pistons in the brake cylinders to be pressed back.
- Check the brake fluid level before pressing back the pistons. If there is brake fluid up to the "MAX" mark, some brake fluid will need to be extracted.
- Use the Brake Charger/Bleeder Unit -VAS5234- to extract brake fluid from the brake fluid reservoir.
- Use the Piston Resetting Tool -T10145- to press the brake caliper piston completely back into the brake caliper.
- Clean the brake caliper.
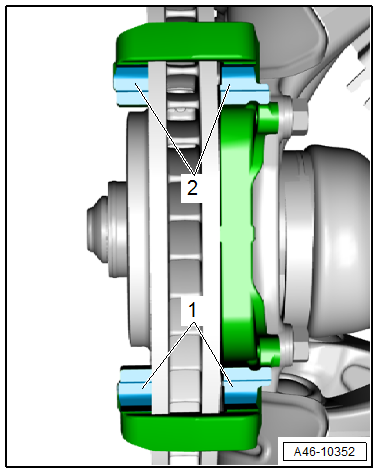
- Clean the brake carrier on the brake pad contact surfaces -1 and 2- and thinly coat them with Lithium grease.
 Note
Note
If there is grease residue on the brake rotor clean it with brake cleaner.
- If reusing, install the marked brake pads in the same location.
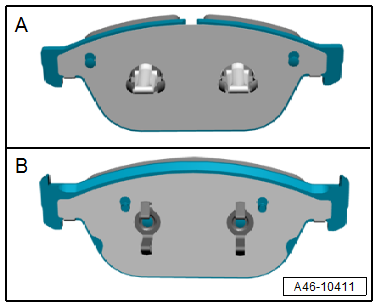
- Clip the inner brake pad -A- into the brake caliper piston.
- Clip the outer brake pad -B- into the brake caliper.
- Slide the brake caliper with the brake pads installed carefully over the brake rotor.
- Tighten the guide pins -2- and press on the protective caps -arrows-.
- Engage the brake hose -1- at the bracket.
 Note
Note
- Check the contact for the brake pad wear sensor for damage, replacing if necessary.
- Make sure that the brake pad wear sensor contact sits correctly in the brake pad.
- Make sure the brake hose is not blocked, bent, twisted or rubbing against the vehicle.
- Make sure the protective caps for the guide pins are not damaged.
- Make sure the protective caps are installed properly.
- Install the contact -1- for the brake pad wear sensor. Refer to → Chapter "Brake Pad Wear Indicator Wire, Removing and Installing, Steel Brakes, 1LF/1LL".

- Bring the balance spring -1- and trim -2- into its installed position and tighten the bolt -arrow-.
- Install the front wheel. Refer to → Suspension, Wheels, Steering; Rep. Gr.44; Wheels, Tires.
 WARNING
Risk of accident!
- With the vehicle stationary, firmly press the brake pedal several times so that the brake pads in the operating condition properly sit in their respective position.
- Make sure the brakes are working correctly before driving the vehicle for the first time.
- Check brake fluid level, and fill if necessary.

Brake Pads, Removing and Installing, 1LP
Special tools and workshop equipment required
- Piston Resetting Tool -T10145-
 Note
Note
If old brake pads are being replaced with new ones, then it is necessary to check the brake rotor for wear. Pay attention to the brake rotor wear limit while doing this.
Removing
 Note
Note
Label the brake pads when removing if they are going to be used again. Install in the same position, otherwise the braking effect will be uneven.
- Remove affected wheel.
It is not necessary to remove the brake caliper in order to remove the brake pads
- Disconnect the connector for the brake pad wear wire.
- Unclip the brake pad wear wire.
 Caution
There is a risk of contamination and paint damage from escaping brake fluid.
- If the brake pads are worn out and brake fluid is filled, the brake fluid may overflow if the pistons in the brake cylinder are pressed back.
- Check the brake fluid level before pressing back the pistons. If there is brake fluid up to the "MAX" mark, some brake fluid will need to be extracted.
- Use the Brake Charger/Bleeder Unit -VAS5234- to extract brake fluid from the brake fluid reservoir.
- Press the brake pistons back using the Piston Resetting Tool -T10145- with the brake pads still installed.
Position the Piston Resetting Tool -T10145- on the installed brake pad backing plates and carefully push the brake pads back into the brake caliper.
- Push a pad holding pin from the outside toward the inside out of the brake caliper.
Press the brake pad spring -8- inward for support.
 Note
Note
Be careful not to scratch or damaged the coating on the brake caliper.
 Caution
The brake pad spring is tensioned. Keep one hand in front of it.
- Push a second brake pad spring from the outside toward the inside out of the brake caliper.
 Note
Note
Be careful not to scratch or damaged the coating on the brake caliper.
- Remove the brake pads from the brake caliper.
Installing
If old brake pads are being replaced with new ones, then it is necessary to check the brake rotor for wear. Pay attention to the brake rotor wear limit while doing this.
- Check the brake rotor.
- Tightening Specifications
 Note
Note
- Always replace brake pads on both sides of the axle.
- Install complete repair kit. Refer to Parts Catalog.
- Install on one axle on brake pads from the same manufacturer and with the same quality.
- Use only mineral spirits or commercially available brake cleaner to clean the brake caliper.
- Clean brake caliper.
- Remove any protective film from the brake pad backing plate.
- Insert brake pads in brake caliper.
 Note
Note
The brake pad and brake pad wear wire face the inside.
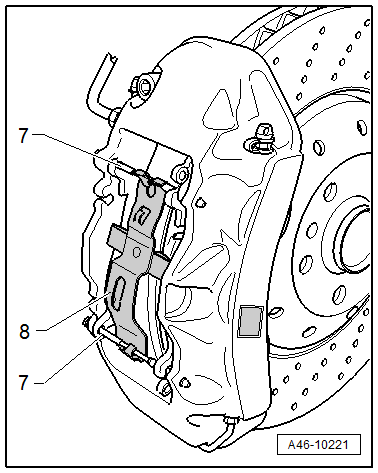
- Insert the brake pad spring -8-.
 Note
Note
Make sure the brake pad spring is installed correctly.
- Push the brake pad spring -7- from the inside toward the outside through the hole in the brake caliper. Press the brake pad pin all the way, if necessary.
 Caution
The brake pad pin needs to be seated securely in both holes so that it doesn't loosen on its own.
 Note
Note
- The brake pad spring -8- is located under the brake pad pin -7-. The spring on the end of the brake pad pin secure the brake pad pin inside the brake caliper.
- Be careful not to scratch or damaged the coating on the brake caliper.

- Push the second brake pad pin from the inside toward the outside through the hole in the brake caliper. Push the brake pad spring downward at the same time. Press the brake pad pin all the way, if necessary.
Press the brake pad spring -8- inward for support.
 Note
Note
- The brake pad spring -8- is located under the brake pad pin -7-. The spring on the end of the brake pad pin secure the brake pad pin inside the brake caliper.
- Be careful not to scratch or damaged the coating on the brake caliper.
- Connect the brake pad wear wire.
- Attach the brake pad wear wire.
- Mount the wheels.
- Check the brake fluid level and fill if necessary.
 WARNING
Risk of accident!
- With the vehicle stationary, firmly press the brake pedal several times so that the brake pads in the operating condition properly sit in their respective position.
- Make sure the brakes are working correctly before driving the vehicle for the first time.

Brake Pads, Removing and Installing, Steel Brakes, 1LU
Special tools and workshop equipment required
- Torque Wrench 1332 40-200Nm -VAG1332-
- Piston Resetting Tool -T10145-
- Lithium grease. Refer to the Parts Catalog.
Removing
- Remove the affected brake caliper. Refer to → Chapter "Brake Caliper, Removing and Installing, Steel Brakes, 1LU".
- Remove the brake pad wear sensor. Refer to → Chapter "Brake Pad Wear Indicator Wire, Removing and Installing, Steel Brakes, 1LU".
 Note
Note
Label the brake pads when removing if they are going to be used again. Install in the same position, otherwise the braking effect will be uneven.
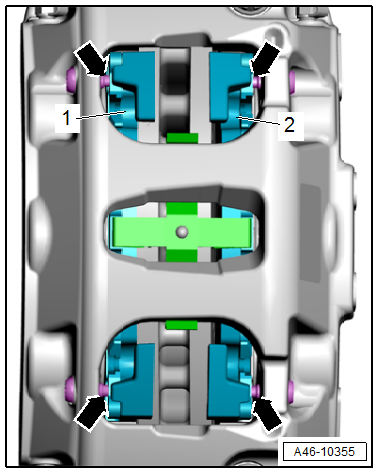
- Remove the brake pads -1 and 2- in succession from the guide pins -arrows-.
 Caution
Do not remove the guide pin -arrows-.
 Note
Note
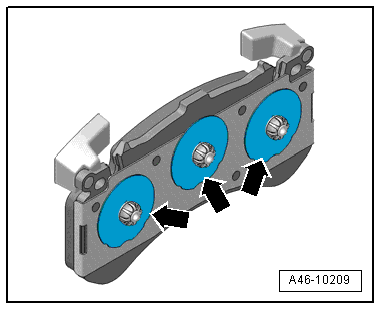
- When reusing the brake pads, the shims -arrows- on the back side of the brake pads must not be damaged.
- No shim may be loosened from the back side of the brake pad.
- If a shim is damaged or has become loose, all three shims per brake pad must be replaced.
 Note
Note
- Use new shims when installing new brake pads. Insert the shims into the brake pistons before inserting the brake pads.
- If the old brake pads are reinstalled, insert the brake pads with the shims attached into the brake caliper.
- If the brakes pads are replaced, then the brake pad spring must also be replaced. To do this, pry the brake pad spring -1- out of the brake caliper with a screwdriver -arrow-.
Installing
Install in reverse order of removal and note the following:
- When the brake pads are replaced, check the brake rotors for wear and damage:
- Brake rotor wear limit. Refer to → Chapter "Technical Data, Brakes".
 Note
Note
- Always replace brake pads on both sides of the axle.
- Use the complete repair kit when installing new brake pads.
- Use new shims.
 WARNING
Health Risk.
Do not blow out brake system with compressed air.
 Note
Note
- Use only mineral spirits to clean the brake caliper.
- Check the brake caliper piston protective caps for damage and install the complete repair kit, if necessary. Refer to → Chapter "Brake Caliper Piston, Removing and Installing, 1LU/1LM/1LX/1LN/1LW".
 Caution
There is a risk of contamination and paint damage from escaping brake fluid.
- If the brake pads are worn out and brake fluid is filled unnecessary, the brake fluid may overflow, causing the pistons in the brake cylinders to be pressed back.
- Check the brake fluid level before pressing back the pistons. If there is brake fluid up to the "MAX" mark, some brake fluid will need to be extracted.
- Use the Brake Charger/Bleeder Unit -VAS5234- to extract brake fluid from the brake fluid reservoir.
- Use the Piston Resetting Tool -T10145- to press the brake caliper piston completely back into the brake caliper.
- Clean the brake caliper.
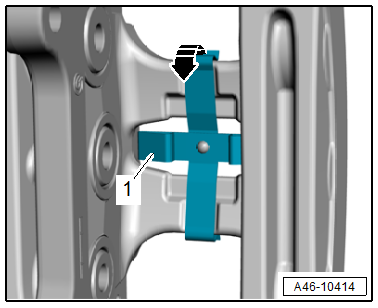
- Clean the brake caliper on the contact surfaces -1 and 2- to the brake pads and the guide pins -arrows- and thinly coat them with Lithium grease.
 Caution
Do not remove the guide pin -arrows-.
- Clip the brake pad spring into the brake caliper.
- The brake pad spring must be completely locked into the brake caliper.
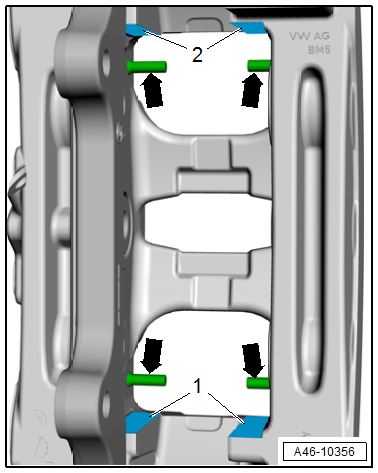
- If the brake pads are being replaced, insert the shims -arrows- into the brake caliper pistons before installing the brake pads.
 Note
Note
- Use new shims -arrows- when installing new brake pads. Insert the shims into the brake pistons before inserting the brake pads.
- If the old brake pads are reinstalled, insert the brake pads with the shims attached into the brake caliper.
- Remove the foil from the new shims.

- If reusing, install the marked brake pads in the same location.
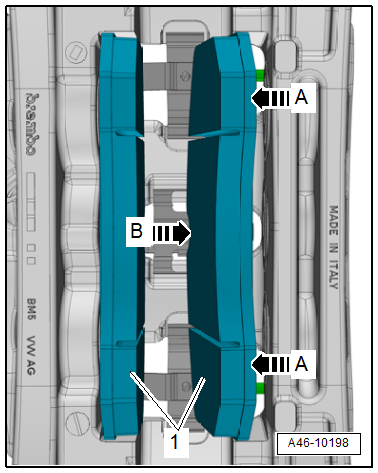
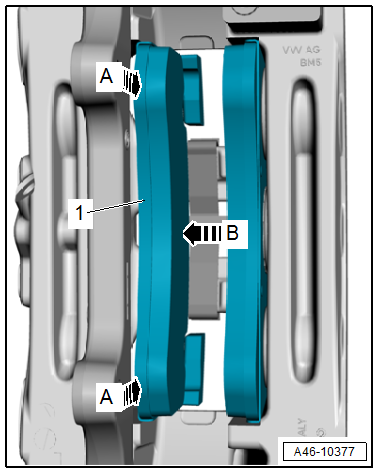
- Insert the brake pads -1- in succession into the brake caliper by pressing each brake pad against the brake pad spring -arrows A- and pushing them all the way onto the guide pins -arrow B-.
- Install the brake caliper. Refer to → Chapter "Brake Caliper, Removing and Installing, Steel Brakes, 1LU".
- Install the brake pad wear sensor. Refer to → Chapter "Brake Pad Wear Indicator Wire, Removing and Installing, Steel Brakes, 1LU".
- Install the front wheel. Refer to → Suspension, Wheels, Steering; Rep. Gr.44; Wheels, Tires.
 WARNING
Risk of accident!
- With the vehicle stationary, firmly press the brake pedal several times so that the brake pads in the operating condition properly sit in their respective position.
- Make sure the brakes are working correctly before driving the vehicle for the first time.
- Check brake fluid level, and fill if necessary.
Brake Pads, Removing and Installing, Steel Brakes, 1LM/1LX
Special tools and workshop equipment required
- Torque Wrench 1331 5-50Nm -VAG1331-
- Piston Resetting Tool -T10145-
- Commercial type punch pin
- Lithium grease. Refer to the Parts Catalog.
Removing
 Note
Note
Label the brake pads when removing if they are going to be used again. Install in the same position, otherwise the braking effect will be uneven.
- Remove the affected front wheel. Refer to → Suspension, Wheels, Steering; Rep. Gr.44; Wheels, Tires.
- Disconnect the brake pad wear sensor connector -2-.
- Release the connector -1- to the brake pad wear sensor from the bracket -arrow A- and turn it 90º at the same time -arrow B-.
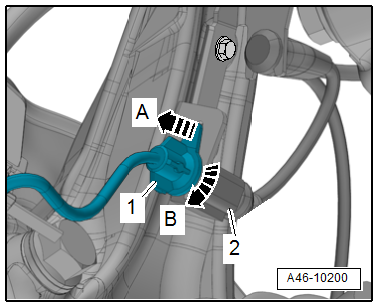
- Free up the brake pad wear sensor electrical wire -3- by opening the dust cap -2- and unclip it from the brake caliper -arrow-.
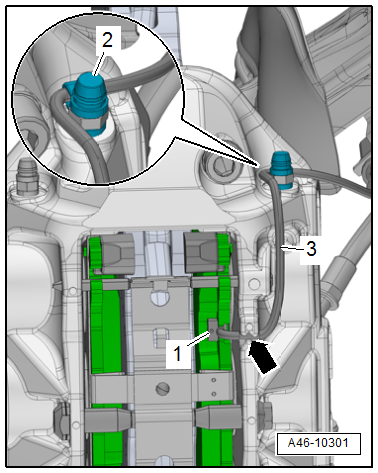
 Note
Note
Ignore -item 1-.
 Note
Note
When removing the brake pad pin, make sure that the brake caliper coating is not damaged.
 Note
Note
Pushing back on the brake pads lightly with pliers -1- makes it easier to remove the brake pads -3- from the brake caliper. To prevent damage to the paint coat on the brake caliper, place a piece of rubber -2- between the pliers and brake caliper.
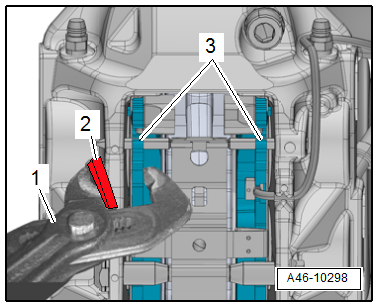
 WARNING
Risk of injury!
The brake pad spring -5- is tensioned. Press down with hand on the brake pad spring while removing the brake pad pin.
- Drive the lower brake pad pin -1- from the outside toward the inside out of the brake caliper.
- Drive the upper brake pad pin -3- from the outside toward the inside out of the brake caliper and remove the brake pad spring -5-.
- Remove the bolt -4-.
- Remove the tension strut -2- from the brake caliper.
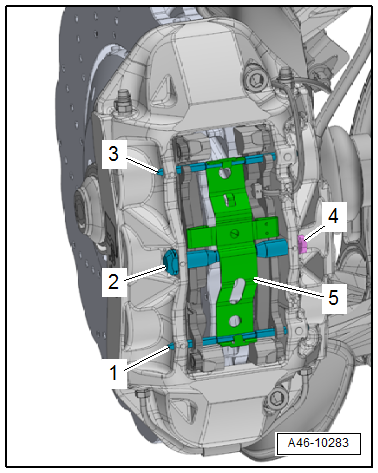
- Remove the brake pads -1 and 3- from the brake caliper.
 Note
Note
Ignore -item 2-.
 Caution
There is a risk of damaging the brake caliper piston.
Do not press the brake pedal when the brake caliper is removed.
Installing
Install in reverse order of removal and note the following:
- When the brake pads are replaced, check the brake rotors for wear and damage:
- Brake rotor wear limit. Refer to → Chapter "Technical Data, Brakes".
 Note
Note
- Always replace brake pads on both sides of the axle.
- Use the complete repair kit when installing new brake pads.
 WARNING
Health Risk.
Do not blow out brake system with compressed air.
 Note
Note
- Use only mineral spirits to clean the brake caliper.
- Check the brake caliper piston protective caps for damage and install the complete repair kit, if necessary. Refer to → Chapter "Brake Caliper Piston, Removing and Installing, 1LF/1LL".
 Caution
There is a risk of contamination and paint damage from escaping brake fluid.
- If the brake pads are worn out and brake fluid is filled unnecessary, the brake fluid may overflow, causing the pistons in the brake cylinders to be pressed back.
- Check the brake fluid level before pressing back the pistons. If there is brake fluid up to the "MAX" mark, some brake fluid will need to be extracted.
- Use the Brake Charger/Bleeder Unit -VAS5234- to extract brake fluid from the brake fluid reservoir.
- Use the Piston Resetting Tool -T10145- to press the brake caliper piston completely back into the brake caliper.
- Clean the brake caliper.
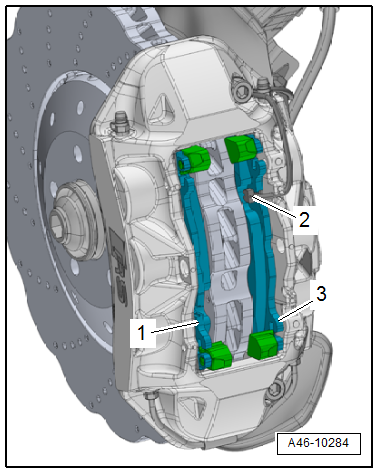
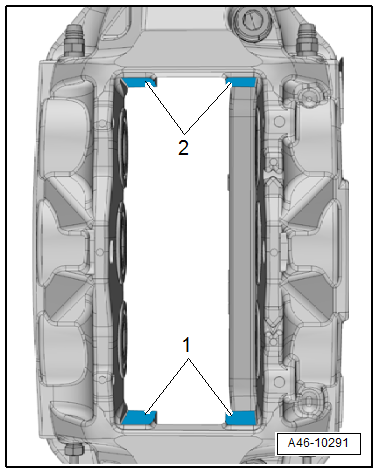
- Clean the brake caliper on the brake pad contact surfaces -1 and 2- and thinly coat them with Lithium grease.
- Install the brake pad wear sensor -2-.
- Check the brake pad wear sensor for correct seating and damage if installing used brake pads.
 Note
Note
Replace the damaged brake pad wear sensor.
- If reusing, install the marked brake pads in the same location.
- Insert brake pads -1 and 3- into the brake caliper.
- The brake pad with the brake pad wear sensor mount faces toward the inside of the vehicle.

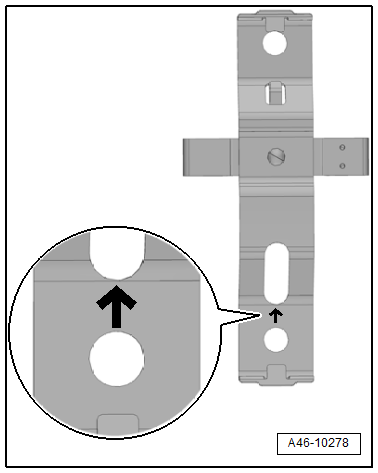
- Note the installation position of the brake pad spring:
- The "arrow" points in the direction of forward wheel rotation.
- Insert the tension strut -2- and tighten with a new bolt -4-.
- Insert the upper brake pad pin -3- with the brake pad spring -5- into the brake caliper.
- Drive the brake pad pin into the brake caliper until it stops.
- Press the bottom of the brake pad spring down and drive the lower brake pad pin -1- into the brake caliper until it stops.

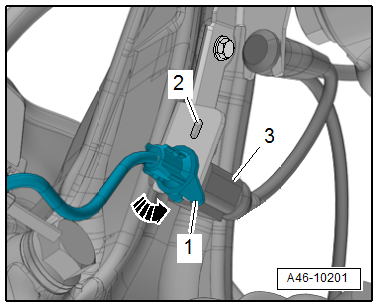
- Secure the brake pad wear sensor electrical wire -3- by guiding it on the brake caliper -arrow- and securing it with the dust cap -2- as illustrated.
 Note
Note
Ignore -item 1-.

- Bring the connector into its installed position and turn in the direction of the -arrow- until the tab -1- engages in the hole -2- on the bracket.
- Connect the connector -3-.
- Install the front wheel. Refer to → Suspension, Wheels, Steering; Rep. Gr.44; Wheels, Tires.
 WARNING
Risk of accident!
- With the vehicle stationary, firmly press the brake pedal several times so that the brake pads in the operating condition properly sit in their respective position.
- Make sure the brakes are working correctly before driving the vehicle for the first time.
- Check brake fluid level, and fill if necessary.
Brake Pads, Removing and Installing, Ceramic Brakes, 1LN/1LW
Special tools and workshop equipment required
- Torque Wrench 1332 40-200Nm -VAG1332-
- Piston Resetting Tool -T10145-
- Lithium grease. Refer to the Parts Catalog.
- When the brake pads are replaced, check the brake rotors for wear and damage:
- Cracks in connection area. Refer to → Chapter "Cracks in Ceramic Brake Rotor Connection Area".
- Chamfer. Refer to → Chapter "Chamfer".
- Nicks. Refer to → Chapter "Nicks on Ceramic Brake Rotor".
- Crack in cooling channel. Refer to → Chapter "Crack in Cooling Channel".
- Brake Rotor Thickness. Refer to → Chapter "Ceramic Brake Rotor, Determining Wear".
 Note
Note
- Always replace brake pads on both sides of the axle.
- Use the complete repair kit when installing new brake pads.
Removing
- Remove the affected brake caliper. Refer to → Chapter "Brake Caliper, Removing and Installing, Ceramic Brakes, 1LN/1LW".
- Remove the brake pad wear sensor. Refer to → Chapter "Brake Pad Wear Indicator Wire, Removing and Installing, Ceramic Brakes, 1LN/1LW".
 Note
Note
Label the brake pads when removing if they are going to be used again. Install in the same position, otherwise the braking effect will be uneven.
- Remove the brake pads -1 and 2- in succession from the guide pins -arrows-.
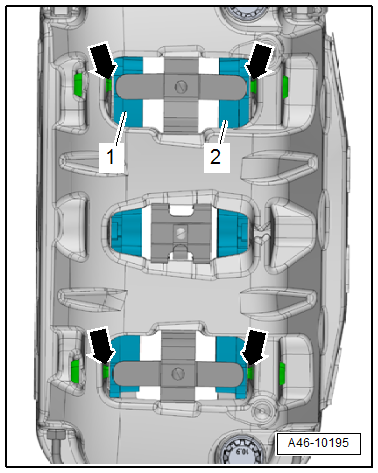
- If the brakes pads are replaced, then the brake pad springs and guide pins must also be replaced. Pry the brake pad springs -1 and 2- out of the brake caliper with a screwdriver -arrows-.
- Remove the guide pins for the brake pads.
Installing
Install in reverse order of removal and note the following:
Use a new repair kit. Refer to the Parts Catalog.
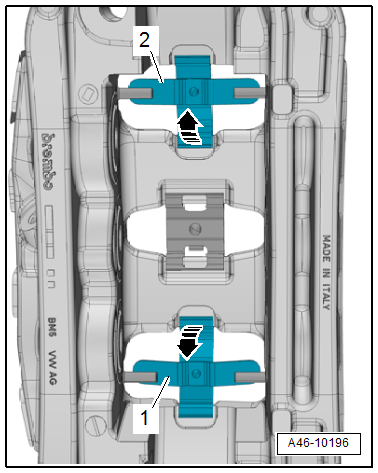
- Use new brake pad springs -1 and 2-.

Use new guide pins -arrows- for the brake pads and tighten them to 24 Nm.
 WARNING
Health Risk.
Do not blow out brake system with compressed air.
 Note
Note
- Use only mineral spirits to clean the brake caliper.
- Do not clean ceramic brake rotors with fluids.
- Check the brake caliper piston protective caps for damage and install the complete repair kit, if necessary. Refer to → Chapter "Brake Caliper Piston, Removing and Installing, 1LU/1LM/1LX/1LN/1LW".
 Caution
There is a risk of contamination and paint damage from escaping brake fluid.
- If the brake pads are worn out and brake fluid is filled unnecessary, the brake fluid may overflow, causing the pistons in the brake cylinders to be pressed back.
- Check the brake fluid level before pressing back the pistons. If there is brake fluid up to the "MAX" mark, some brake fluid will need to be extracted.
- Use the Brake Charger/Bleeder Unit -VAS5234- to extract brake fluid from the brake fluid reservoir.
- Use the Piston Resetting Tool -T10145- to press the brake caliper piston completely back into the brake caliper.
- Clean the brake caliper.

Install new guide pins -arrows- for the brake pads and tighten them to 24 Nm.
- Clip the new brake pad springs into the brake caliper.
- The brake pad springs must be completely locked into the brake caliper.

- Clean the brake caliper on the brake pad contact surfaces -1 and 2- and thinly coat them with Lithium grease.
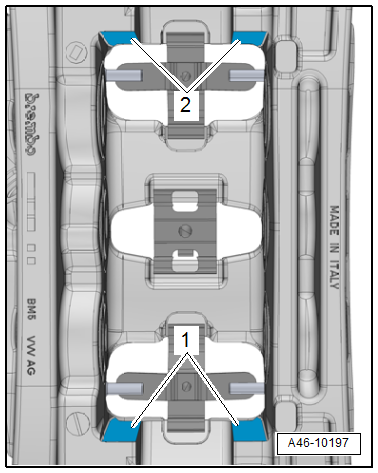
- Insert the brake pads -1- in succession into the brake caliper by pressing each brake pad against the brake pad springs -arrows A- and pushing them all the way onto the guide pins -arrow B-.
- Install the brake caliper. Refer to → Chapter "Brake Caliper, Removing and Installing, Ceramic Brakes, 1LN/1LW".
- Install the brake pad wear sensor. Refer to → Chapter "Brake Pad Wear Indicator Wire, Removing and Installing, Ceramic Brakes, 1LN/1LW".
 WARNING
Risk of accident!
- With the vehicle stationary, firmly press the brake pedal several times so that the brake pads in the operating condition properly sit in their respective position.
- Make sure the brakes are working correctly before driving the vehicle for the first time.
- Check brake fluid level, and fill if necessary.
