Audi A6 Typ 4G: Front Seat Belt Guide, Removing and Installing
Front Seat Belt Guide, Removing and Installing
Removing
- Remove the upper B-pillar trim panel. Refer to → Chapter "Upper B-Pillar Trim, Removing and Installing".
- Set aside the upper B-pillar trim with the seat belt still threaded through it.
- Remove the lower B-pillar trim panel. Refer to → Chapter "Lower B-Pillar Trim Panel, Removing and Installing".
- Remove the B-pillar air guide. Refer to → Heating, Ventilation and Air Conditioning; Rep. Gr.87; Air Guide; Air Distribution Channels, Removing and Installing.
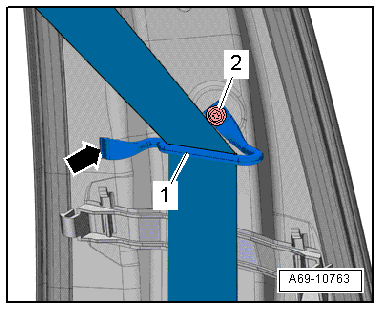
- Remove the bolt -2-.
- Disengage the front seat belt guide -1- on the B-pillar -arrow- and remove it.
Installing
Install in reverse order of removal. Note the following:
- Make sure the belt does get pinches and is not damaged.
- Place the belt into the depression in the front belt guide -1-.
- Attach the front seat belt guide to the B-pillar -arrow- and tighten the bolt -2-.
Installation notes, for example tightening specifications, replacing components. Refer to → Chapter "Overview - Front Three-Point Seat Belt".
Front Seat Belt Guide, Removing and Installing, Multi-contour Seat
Removing
- Remove the trim on the sill side. Refer to → Chapter "Seat Side Trim on Sill Panel Side/Front Seat Trim, Removing and Installing, Multi-contour Seat".
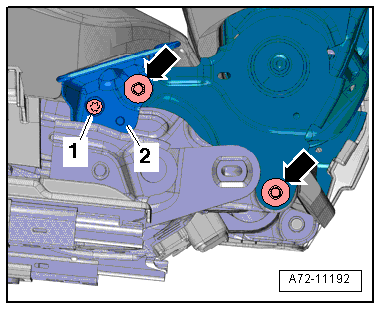
- Remove backrest hinge bolt -up arrow-.
- Remove bolt -1- and belt guide -2-.
Installing
Install in reverse order of removal. Note the following:
Installation notes, for example tightening specifications, replacing components. Refer to → Chapter "Overview - Front Backrest, Multi-contour Seat".
Front Belt End Fitting, Removing and Installing
Removing
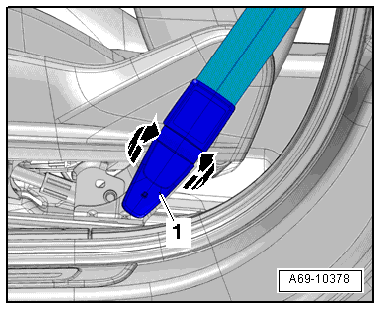
- Move the front seat all the way forward/up.
Standard Seat/Sport Seat/Super Sport Seat
- Unclip the cover -1- on the belt relay -arrows- and fold it up.
 Caution
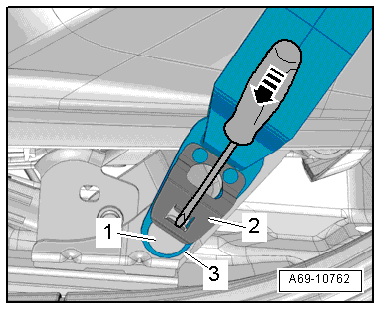
- The spring -2- will get bent if it is removed incorrectly. Replace the three-point seat belt if the spring gets bent.
- Move the spring -2- just far enough until it is possible to unlock the tab on the spring.
- Release the spring catches -2- by inserting a small screwdriver in the opening in the spring -arrow-.
- Slide the belt end fitting -3- downward and disengage at the pin -1-.
Multi-Contour Seat
Caution
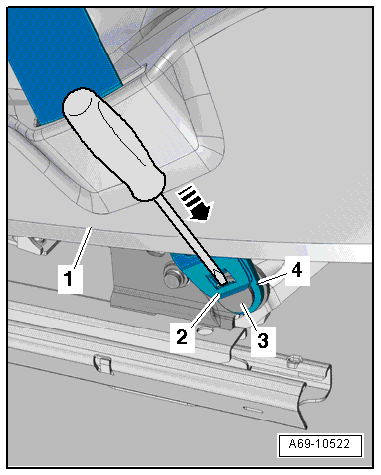
- The spring -2- will get bent if it is removed incorrectly. Replace the three-point seat belt if the spring gets bent.
- Move the spring -2- just far enough until it is possible to unlock the tab on the spring.
- Release the spring catches -2- by inserting a small screwdriver in the opening in the spring -arrow-.
- Move the belt anchor -4- down and detach at the pin -3-.
- Feed the belt anchor out up through the trim on the sill side -1-.
Installing
Install in reverse order of removal. Note the following:
Caution
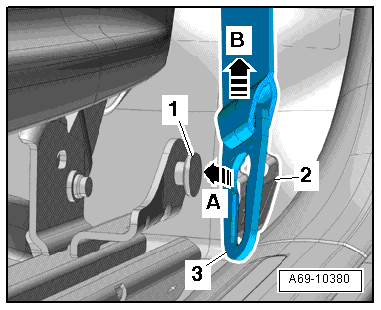
- The spring -2- will get bent if it is removed incorrectly. Replace the three-point seat belt if the spring gets bent.
- Move the spring -2- just far enough until it is possible to unlock the tab on the spring.
- Connect the belt anchor -3- to the bolt -1--arrow A- and pull it up -arrow B-, until the spring catches -2- audibly lock on the bolt heat.
Installation notes, for example tightening specifications, replacing components. Refer to → Chapter "Overview - Front Three-Point Seat Belt".
Rear Outer Belt End Fitting, Removing and Installing
Removing
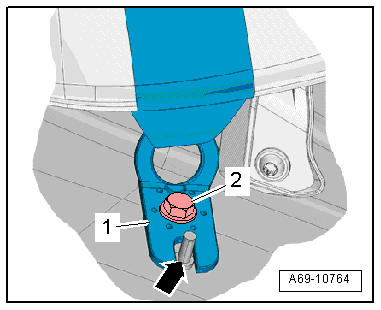
- Remove the rear bench seat. Refer to → Chapter "Seat Bench/Single Seat, Removing and Installing".
- Remove the bolt -2- from the belt end fitting -1-.
Installing
Install in reverse order of removal. Note the following:
- The threaded pin -arrow- on the floor panel must be positioned in the cut-out of the belt anchor.
Installation notes, for example tightening specifications, replacing components. Refer to → Chapter "Overview - Rear Outer Three-Point Seat Belt".