Audi A6 Typ 4G: Rear Seat Belt Guide, Removing and Installing
Rear Seat Belt Guide, Removing and Installing, Sedan
Removing
- Remove the side cushion. Refer to → Chapter "Side Cushion, Removing and Installing".
- For vehicles with a fixed rear seat backrest: remove the rear seat backrest. Refer to → Chapter "Rear Seat Backrest, Removing and Installing".
- For vehicles with a Multi-contour seat: remove the Multi-contour seat. Refer to → Chapter "Rear Seat Backrest, Removing and Installing, Multi-contour Seat".
- Remove the luggage compartment side trim panel.
- For all except for A6 hybrid. Refer to → Chapter "Luggage Compartment Side Trim Panel, Removing and Installing".
- For the A6 hybrid. Refer to → Chapter " Luggage Compartment Side Trim Panel, Removing and Installing, A6 Hybrid".
- Remove the D-pillar trim panel. Refer to → Chapter "D-Pillar Trim, Removing and Installing, Sedan".
- Remove the rear shelf. Refer to → Chapter "Rear Shelf, Removing and Installing".
 Caution
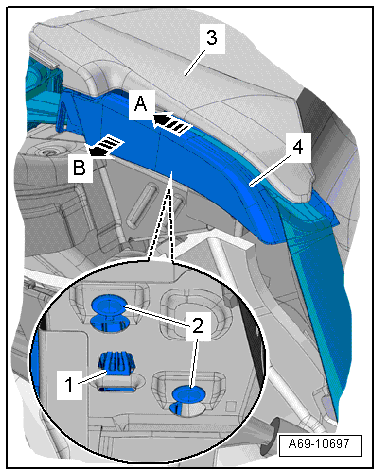
- Do not rotate bolts -2- under any circumstances when removing and installing the seat belt guide -4-. They are set by the manufacturer.
- Replace the entire belt guide if damaged.
- Push the belt guide retaining hook -1- upward and hold it there.
- Lift the C-pillar trim -3- slightly and push the seat belt guide toward the rear -arrow A- until the bolt heads -2- can be disengaged from the bracket on the body.
- Remove the seat belt guide -4- toward the inside of the vehicle -arrow B-.
- Rear outer right seat belt guide: Disconnect the connector from the Rear Parking Aid Warning Buzzer -H15-.
- Thread out the belt and remove the belt guide.
Installing
Install in reverse order of removal. Note the following:
- Insert the belt into the depression in the belt guide -4- and then place the belt guide on onto the bracket.
- Insert the belt guide with the bolt heads -2- in the guides on the console.
- Press the belt guide down while pulling it forward. This engages the bolt heads in the guides.
- Pull the belt webbing forward until the retaining hooks engage audibly.
Installation notes, for example tightening specifications, replacing components. Refer to → Chapter "Overview - Rear Outer Three-Point Seat Belt".
Rear Seat Belt Guide, Removing and Installing, Avant
Removing
- Remove the luggage compartment side trim. Refer to → Chapter "Luggage Compartment Side Trim Panel, Removing and Installing, Avant".
- Remove the foam piece from the opening under the belt guide.
Caution
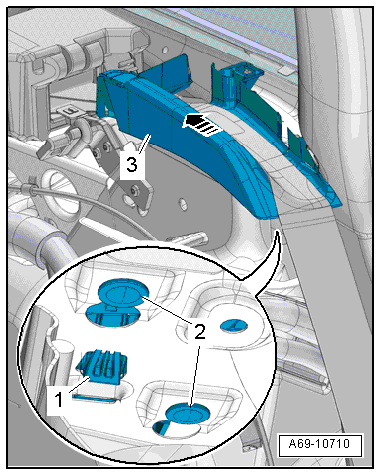
- Do not rotate bolts -2- under any circumstances when removing and installing belt guide -3-. They are set by the manufacturer.
- Replace the entire belt guide if damaged.
- Press the seat belt guide hooks -1- upward with a screwdriver and keep them pressed.
- Slide the belt guide -arrow- back until the bolt heads -2- can be disengaged from the console on the body.
- Remove the seat belt guide sideways from the vehicle interior.
- Rear outer right seat belt guide: Disconnect the connector from the Rear Parking Aid Warning Buzzer -H15-.
- Thread out the belt and remove the belt guide.
Installing
Install in reverse order of removal. Note the following:
- Insert the belt into the depression in the belt guide -3- and then place the belt guide on onto the bracket.
- Insert the belt guide with the bolt heads -2- in the guides on the console.
- Press the belt guide down while pulling it forward. This engages the bolt heads in the guides.
- Pull the belt webbing forward until the retaining hooks engage audibly.
Installation notes, for example tightening specifications, replacing components. Refer to → Chapter "Overview - Rear Outer Three-Point Seat Belt".
Rear Seat Belt Guide in Rear Shelf, Removing and Installing
Special tools and workshop equipment required
- Trim Removal Wedge -3409-
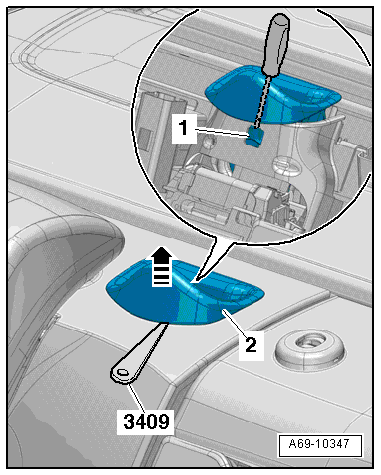
Removing
- Unclip the seat belt guide -1- using the Trim Removal Wedge -3409- in direction of -left arrow-.
- Unclip the belt guide on the opposite side -right arrow- using the Trim Removal Wedge -3409- and pull it out upward from the rear shelf.
- Open the belt guide at the separating point and thread out the belt.

Installing
Install in reverse order of removal. Note the following:
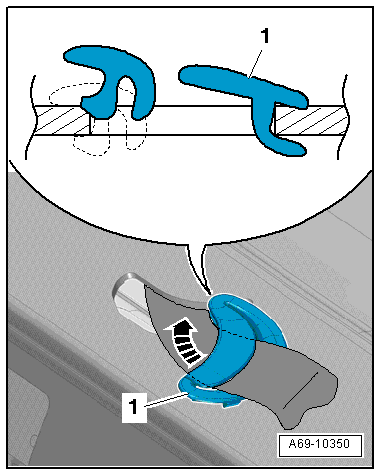
- Install the belt guide -1- with the edge turned approximately 90º over the cut-out in the parcel shelf as illustrated.
- Insert the belt guide into the corner of the cut-out while turning it at the same time -arrow-.
- Push the belt guide downward until the tabs engage in the parcel shelf.
Installation notes, for example tightening specifications, replacing components. Refer to → Chapter "Overview - Rear Center Three-Point Seat Belt".
Rear Seat Belt Guide in Rear Seat Backrest, Removing and Installing
Special tools and workshop equipment required
- Trim Removal Wedge -3409-
Removing
- Remove the center rear belt end fitting. Refer to → Chapter "Rear Seat Belt Latch, Removing and Installing".
- Release the catches -1- by inserting a screwdriver from above through the hole in the belt guide.
- At the same time, unclip the seat belt guide -2- using the Trim Removal Wedge -3409--arrow-.
- Thread out the belt and remove the belt guide.
Installing
Install in reverse order of removal.
Installation notes, for example tightening specifications, replacing components. Refer to → Chapter "Overview - Rear Center Three-Point Seat Belt".