Audi A6 Typ 4G: Headlamp Washer System
Overview - Headlamp Washer System
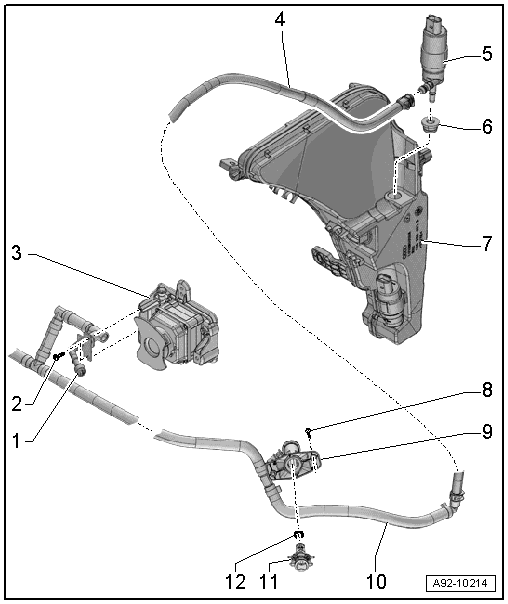
1 - Spray Nozzle for Night Vision System Camera -R212-
- Removing and installing. Refer to → Chapter "Night Vision System Camera -R212- Spray Nozzle, Removing and Installing".
2 - Screw
- 2.5 Nm
- Quantity: 2
3 - Mount
- For Night Vision System Camera -R212-
4 - Washer Fluid Hose
- To the spray nozzles
5 - Headlamp Washer Pump -V11-
- Removing and installing. Refer to → Chapter "Headlamp Washer Pump -V11-, Removing and Installing".
6 - Grommet
- For Headlamp Washer Pump -V11-
7 - Windshield Washer Fluid Reservoir
8 - Screw
- 2.5 Nm
- Quantity: 2
9 - Mount
- For nozzle
- Removing and installing. Refer to → Chapter "Headlamp Washer System Spray Nozzle Mount, Removing and installing".
10 - Washer Fluid Hose
- For the spray nozzle and infrared camera
11 - Spray Nozzle
- Removing and installing. Refer to → Chapter "Headlamp Washer System Spray Nozzle, Removing and Installing".
12 - O-Ring
- Replacing
Windshield Washer Fluid Reservoir, Removing and Installing
 Note
Note
The shared windshield and headlamp washer system washer fluid reservoir is located in the left front wheel housing.
- Washer fluid reservoir, removing and installing. Refer to → Chapter "Windshield Washer Fluid Reservoir, Removing and Installing".
Headlamp Washer Pump -V11-, Removing and Installing
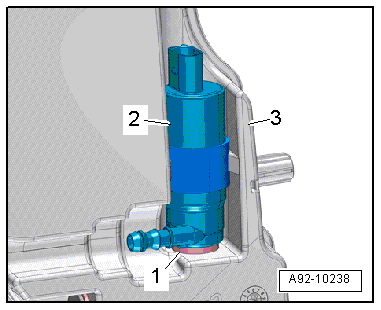
Removing
- Remove the washer fluid reservoir. Refer to → Chapter "Windshield Washer Fluid Reservoir, Removing and Installing".
- Remove the Headlamp Washer Pump -V11--item 2- upward out of the washer fluid reservoir -3-.
Installing
Install in reverse order of removal. Note the following:
- Check the sealing grommet -1- for damage.
Spray Nozzles, Removing and Installing
Headlamp Washer System Spray Nozzle, Removing and Installing
Removing
- Pull the spray nozzle telescope -2- all the way out of the bumper cover.
- Hold the telescope in the pulled-out position.
- Open the side retainers in direction of -arrows- and remove the spray nozzle -1- from the telescope.
- Let the telescope go back into the mount slowly.
- Remove the cover if the spray nozzle is being replaced. Refer to → Body Exterior; Rep. Gr.63; Front Bumper; Attachments, Removing and Installing.
Installing
Install in reverse order of removal. Note the following:
- Replace the O-ring -3- if the same spray nozzle is being installed again.

Headlamp Washer System Spray Nozzle Mount, Removing and installing
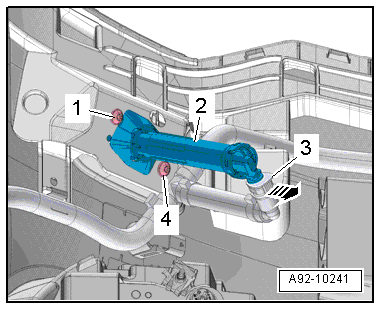
Removing
- Remove the headlamp washer system spray nozzle. Refer to → Chapter "Headlamp Washer System Spray Nozzle, Removing and Installing".
- Remove the front bumper cover. Refer to → Body Exterior; Rep. Gr.63; Front Bumper; Bumper Cover, Removing and Installing.
- Open the clip in direction of -arrow- and remove the windshield washer fluid hose -3- from the mount.
Note
Depending on the version, release buttons might be installed on the washer fluid hose connecting piece.
- Remove the screws -1 and 4- and the mount -2-.
Installing
Install in reverse order of removal.
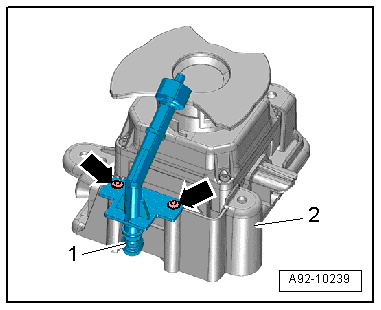
Night Vision System Camera -R212- Spray Nozzle, Removing and Installing
Removing
- Remove the Night Vision System Camera -R212- mount. Refer to → Body Exterior; Rep. Gr.63; Front Bumper; Attachments, Removing and Installing.
- Remove the bolts -arrows-.
- Remove the spray nozzle -1- from the mount -2-.
Installing
Install in reverse order of removal. Note the following:
- If the mount is removed, the Night Vision System Camera -R212- must be recalibrated. Refer to → Suspension, Wheels, Steering; Rep. Gr.44; Infrared System; Infrared System, Calibrating.
Spray Nozzles, Adjusting
Note
The nozzles are already adjusted by the manufacturer and must not be adjusted after installation.
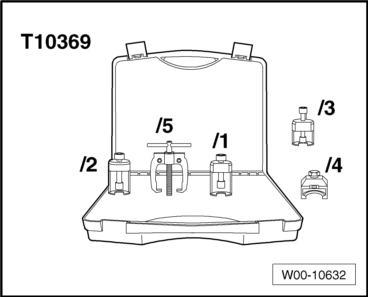
Special Tools
Special tools and workshop equipment required
- Puller - Wiper Arm Kit -T10369-