Audi A6 Typ 4G: Headlamp, Removing and Installing
Headlamp Housing, Removing and Installing, Halogen Headlamp
Removing
- Turn the light switch to position "0".
- Remove the front bumper cover. Refer to → Body Exterior; Rep. Gr.63; Front Bumper; Bumper Cover, Removing and Installing.
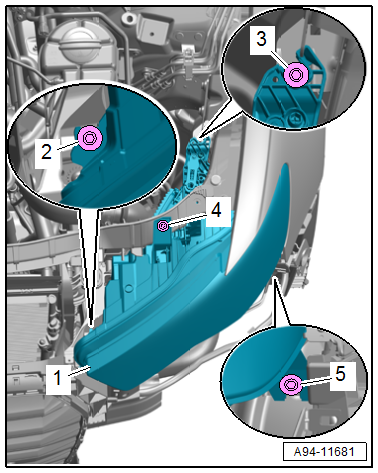
- Remove the bolts -1 and 4-.
- Loosen the bolts -3- four turns.
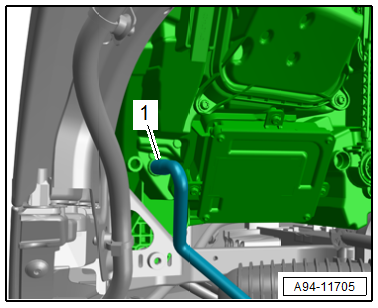
- Remove the headlamp housing -2- forward. Make sure the ventilation hose -5- does not get stuck.
- Disconnect the connector and remove the headlamp housing.
Installing
Install in reverse order of removal. Note the following:
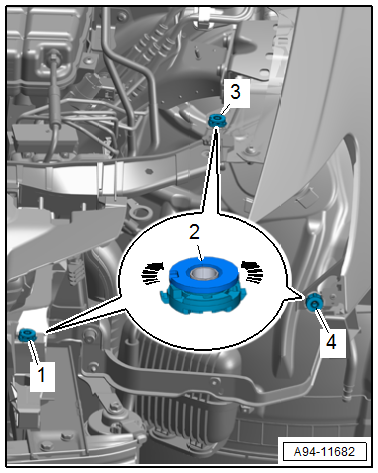
- Make sure the adjusting nut -2- on the adjusting mechanisms -1, 3 and 4- move easily -arrows-.
- Turn the adjusting nut all the way down, but do not tighten it.
- Insert the headlamp housing -2-. The ventilation hose -5- must hang loosely inside the wheel housing.
- Align the headlamp housing with the edge of the fender and tighten the bolt -3-.
- The headlamp housing must be flush with the fender.
- Tighten the bolts -1 and 4-.
 Note
Note
Tightening the bolts automatically turns the adjusting nut on the adjuster towards headlamp housing mounting point and secures the housing.
- Adjust the headlamp. Refer to → Chapter "Headlamp, Adjusting".
Headlamp Housing, Removing and Installing, HID Headlamp and LED Headlamp through MY 2014
 WARNING
Danger to life due to high voltage.
- For work on the yellow high voltage symbol marked areas HID headlamp must be de-energized.
- Turn off the ignition and all electrical consumers and remove the ignition key.
- Do not press the flasher.
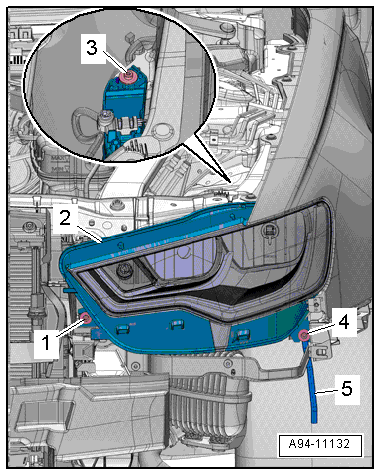
Removing
- Turn the light switch to position "0".
- Turn off the ignition and all electrical consumers and remove the ignition key.
- Do not press the flasher.
- Remove the front bumper cover. Refer to → Body Exterior; Rep. Gr.63; Front Bumper; Bumper Cover, Removing and Installing.
- Remove the bolts -1, 3 and 5-.
- Loosen the screws -4- four turns.
- Remove the headlamp housing -2- forward. Make sure the ventilation hose -6- does not get stuck.
- Disconnect the connector and remove the headlamp housing.
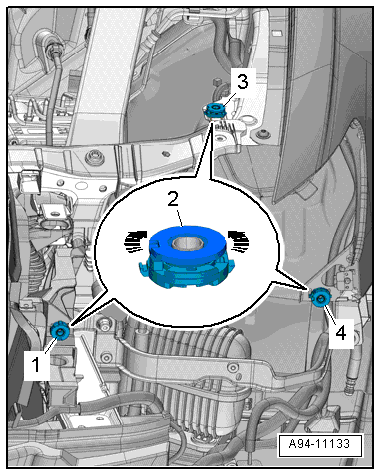
Installing
Install in reverse order of removal. Note the following:
- Make sure the adjusting nut -2- on the adjusting mechanisms -1, 3 and 4- move easily -arrows-.
- Turn the adjusting nut all the way down, but do not tighten it.
- Insert the headlamp housing -2-. The ventilation hose -6- must hang loosely inside the wheel housing.
- Align the headlamp housing with the edge of the fender and tighten the bolt -3-.
- The headlamp housing must be flush with the fender.
- Tighten the bolts -1, 4 and 5-.
Note
Tightening the bolts automatically turns the adjusting nut on the adjuster towards headlamp housing mounting point and secures the housing.
- Adjust the headlamp. Refer to → Chapter "Headlamp, Adjusting".
Headlamp Housing, Removing and Installing, HID Headlamp and LED Headlamp from MY 2015
WARNING
Danger to life due to high voltage.
- For work on the yellow high voltage symbol marked areas HID headlamp must be de-energized.
- Turn off the ignition and all electrical consumers and remove the ignition key.
- Do not press the flasher.
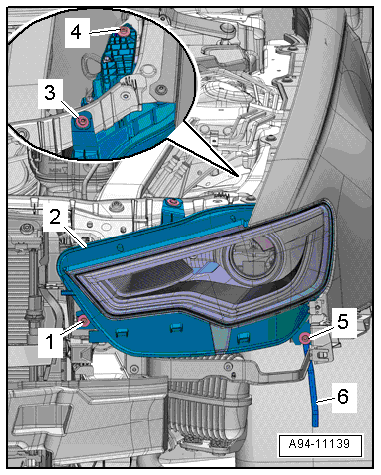
Removing
- Turn the light switch to position "0".
- Switch off ignition and all electrical equipment. Set the ignition key outside of the vehicle.
- Do not press the flasher.
- Remove the front bumper cover. Refer to → Body Exterior; Rep. Gr.63; Front Bumper; Bumper Cover, Removing and Installing.
- Remove the ventilation hose -1-.
- Remove the bolts -4 and 5-.
- Loosen the bolts -2 and 3- four turns.
- Left: Free up the wiring harness on the headlamp housing.
- Remove the headlamp housing -1- toward the front, and disconnect the connector.
- Remove the headlamp housing.
Installing
Install in reverse order of removal. Note the following:
- Make sure the adjusting nut -2- on the adjusting mechanisms -1, 3 and 4- move easily in direction of -arrows-.
- Turn the adjusting nut all the way down, but do not tighten it.
- Insert the headlamp housing -1- and slide the ventilation hose on the connection.
- Align the headlamp housing with the edge of the fender and tighten the bolt -5-.
- The headlamp housing must be flush with the fender.
- Tighten the screws -2, 3 and 6-.
Note
Tightening the bolts automatically turns the adjusting nut on the adjuster towards headlamp housing mounting point and secures the housing.
- Left: Tighten the wiring harness -4-.
- Adjust the headlamp. Refer to → Chapter "Headlamp, Adjusting".
Filter Membrane, Removing and Installing, Halogen Headlamp and HID Headlamp through MY 2014
Removing
- Remove the lock carrier cover. Refer to → Body Exterior; Rep. Gr.63; Front Bumper; Attachments, Removing and Installing.
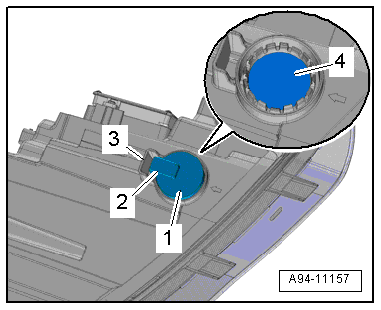
- Remove the vent -4- on the headlamp housing.
- Remove the filter membrane -1-.
Installing
Install in reverse order of removal. Note the following:
- Push the vent all the way onto the headlamp housing. Make sure the "arrow"-3- is opposite the marking -2-.

Filter Membrane, Removing and Installing, LED Headlamp through MY 2014
Removing
- Remove the headlamp housing. Refer to → Chapter "Headlamp Housing, Removing and Installing, HID Headlamp and LED Headlamp through MY 2014".
- Remove the vent -1- on the headlamp housing.
- Remove the filter membrane -4-.
Installing
Install in reverse order of removal. Note the following:
- The ventilation opening -2- must face the tab -3-.
- Install the vent all the way onto the headlamp housing.
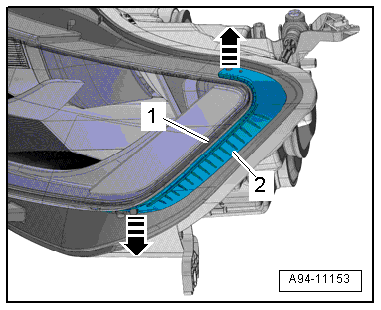
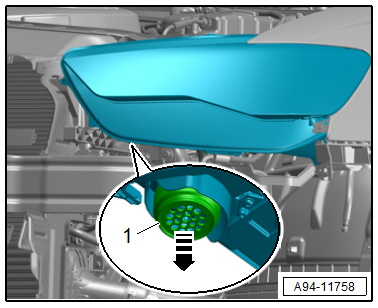
Filter Membrane, Removing and Installing, HID Headlamp and LED Headlamp from MY 2015
Removing
- Remove the front bumper cover. Refer to → Body Exterior; Rep. Gr.63; Front Bumper; Bumper Cover, Removing and Installing.
- Lift the filter membrane -1- in direction of -arrow- and remove it.
Installing
Install in reverse order of removal.
Sealing Frame, Removing and Installing
Removing
- Remove the headlamp housing. Refer to → Chapter "Headlamp, Removing and Installing".
- Detach the frame -2- from the top and bottom of the headlamp housing -1--arrows- and remove it.
Installing
Install in reverse order of removal.