Audi A6 Typ 4G: Hinges, Removing and Installing
Hinges, Removing and Installing, Sedan
 Note
Note
- Remove and install the left and right hinges one after the other when replacing the hinges on both sides.
- Mark the position of the hinges on the rear lid before removing them.
- Use the markings on the rear lid hinge when adjusting the hinge lengthwise.
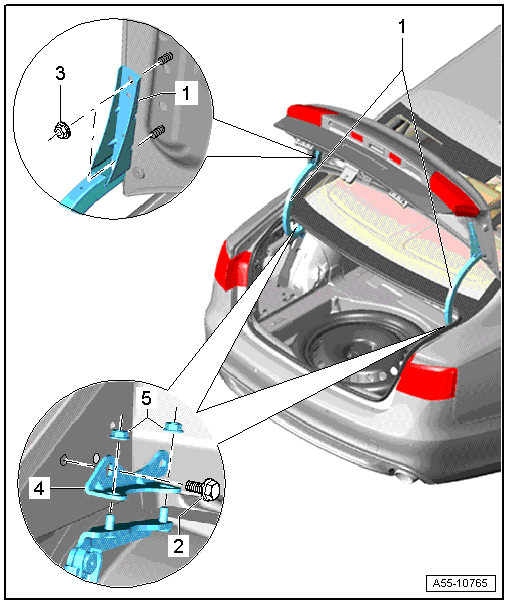
1 - Lid Hinge
Note
Have a second technician hold the rear lid so that it cannot fall down.
- The luggage compartment side trim panel is removed. Refer to → Body Interior; Rep. Gr.70; Luggage Compartment Trim Panels; Luggage Compartment Side Trim Panel, Removing and Installing.
- Remove the rear lid lower trim panel. Refer to → Body Interior; Rep. Gr.70; Luggage Compartment Trim Panels; Lower Rear Lid Trim Panel, Removing and Installing.
- Remove the nuts -3- from the rear lid first.
- Remove the bolts -2- from the side panel and remove the hinge.
- Align the with the markings when installing and then tighten the bolts and nuts to the tightening specification.
- Check the gap dimensions.
2 - Bolt
- 21 Nm
3 - Nut
- 21 Nm
4 - Bracket
Hinges, Removing and Installing, Avant
Note
- The rear lid drive units must be removed first on vehicles equipped with power lid actuation. Refer to → Chapter "Rear Lid Motor 1 and 2 -V444-/-V445-, Removing and Installing, Avant".
- When installing, pay close attention to the tightening sequence for the bolts.
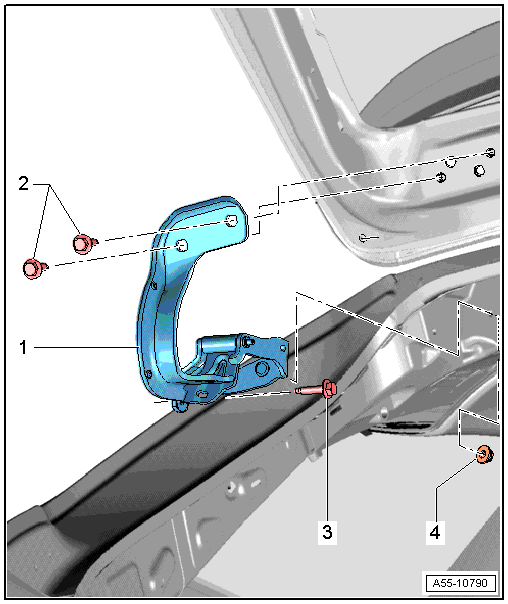
1 - Lid Hinge
- Removing:
- Lower the headliner. Refer to → Body Interior; Rep. Gr.70; Roof Trim Panels; Headliner, Removing and Installing.
- Remove the rear lid hinge cover → Fig.
Note
Support the rear lid to keep it from falling down and too prevent damage the rear lid or the vehicle body.
- Remove the bolts -3- from the lid.
- Remove the bolt -1- and hex nut -4- and then remove the hinge.
- Installing:
- Place the hinge onto the body and gently tighten the nut -4- on the roof frame.
- Then lightly attach the hinge on the side with the bolt -3-.
- Tighten the bolts -2- on the hinge.
- Align the lid to the body on the left and right side and tighten the bolts -2- to the tightening specification.
- Adjust the height of the lid to the roof and then tighten the bolt -3- and nut -4- to the tightening specification.
- Press on hinge cover.
2 - Bolt
- 30 Nm
3 - Bolt
- 21 Nm
4 - Hex Nut
- 21 Nm
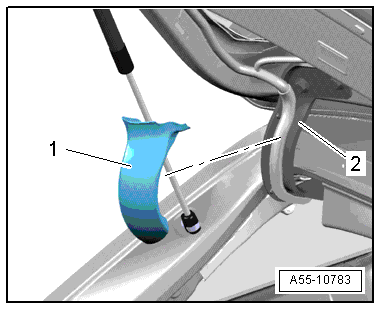
Rear Lid Hinge Cover, Removing and Installing
Removing
- Cover is placed on rear lid hinge.
- Loosen side locking tabs on cover -1- and remove from hinge -2-.
Installing
Install in reverse order of removal. Note the following:
- To install, position retainer tabs in catches on hinge arm and press opposite side of cover down completely.
- The cover must audibly engage.